
You are using an out of date browser. It may not display this or other websites correctly.
You should upgrade or use an alternative browser.
You should upgrade or use an alternative browser.
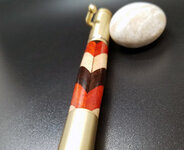
First segmented pen - Halloween / Fall Hunting Theme with Wenge, Padauk and Maple
- Thread starter pnemox
- Start date
-
- Tags
- bolt action fall halloween hunting
Signed-In Members Don't See This Ad


Signed-In Members Don't See This Ad
johncrane
Member
Very nice work Wes! neat color contrast
Alan Morrison
Member
Very good, and excellent as it's your first
Alan
Alan
Lucky2
Member
Very nice pen Wes, I like the design and colors you chose.
Len
Len
kruzzer
Member
Real nice with great colors
mark james
IAP Collection, Curator
Great job for your first Wes. I like both the choice of timbers and the pattern, but as I suspect you are now aware of - they are very unforgiving for minor issues. The alignment of the points if even a slight bit off can become very noticeable, and the distinctive line between the Maple sections also is apparent. For your first segmenting, these are less a criticism but more of an acknowledgement that you are now getting into more detailed challenges - welcome, its a fun ride. ")
So, I'll offer some thoughts for you to consider and if these are well known to you just ignore. Insure that all segments are equal in dimensions where they are glued together, and that they match for whatever pattern. To minimize any glue-line, I'll suggest a veneer between the segments. A veneer separator will also assist in any slight misalignment in your glue-up; it won't fix a large mis-alignment, but for a minor one it will break the visual match just enough to help. This gives an intended line, rather than an unintended one, or one that is only visible in some sections but not others. Prior to any turning and drilling the ends are accurately marked/centered in the middle of the pattern. Insure that the tube hole was drilled in the center. There are different techniques for each of these concerns and all are manageable after you have paid your dues with a bucket of "oops." (I have 2 such buckets).
Using sanding sealer after final turning and prior to any sanding will also help with any cross contamination of wood dust. Others will also recommend mastering a skew to the point that little/no sanding is needed - that skill still eludes me.
Finally, the best recommendation I can give is - do 10 more!
I wish my first segmentation looked as good.
MRDucks2
Member
Thanks guys, I appreciate the encouragement. Mark, I think you are spot on with your feedback. I did notice that the two pieces were not 100% flat but it was the best I could do the the belt sander at hand. I'm thinking a disc sander is essential to get the best flat surfaces. I'll take a look at the veneer separators and sanding sealer. I've noticed several times shaping knife handles that the dust from sanding will stain lighter colors. The only partial solution I knew was to stick with harder woods that were less porous and then use tape afterwards to try to remove some of the dust.
What is the best way to sand down a piece of thin wood to a precise thickness around 1/8 or 1/16? I think a planer would rip it apart but I'm not sure. Would a drum sander work?
For issues with blanks splitting apart and dust cross contamination, has anyone tried stabilizing the assembled blank with cactus juice or is it just not worth the extra time?
My personal take-aways from this first attempt are as follows:
1. Sharper angled matching segments are harder to match up precisely. This one was around 65 degrees. Might try again at 45.
2. Precision (and symmetry) mean everything
3. Use thinner pieces of wood. For some reason, the visible section of the final turned pen is much smaller than I had imagined while assembling the wood blank. I thought more layers would be visible.
4. I have a new addiction