Triple Crown
Member
Now that I have written this, it appears to be a little long. Sorry! This is my experience doing my first home made casting.
-----------
Well I finally received my pressure pot on February 13. Not much time to make a Valentine's Day pen for my wife, but at least I got something started for her. I don't think she was really thrilled getting two white tubes with heart stickers on them and me saying "I think that you're going to like it when it's done." (She's heard stuff like this before.) We did go out to dinner! ♥ Anyway, here is my experience casting my first blanks.
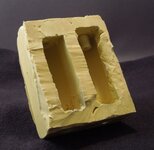
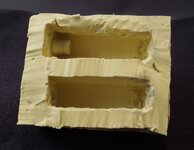
My eventual goal is to do some snake skin and postage stamp pens, so I made a crude mold to cast tube-in blanks. I went a different route in making my mold than I have seen so far. I made it using the Alumilite Amazing Putty. The goal was to make one like some of the others I've seen on this site for doing tube-on casting - with built-in nubs to go right into the tubes. Of course the first time doing anything you learn a lot for the next round. The putty started hardening faster than I expected. I should have used longer-than-final-length blanks or made some shims so that there is some material to mill off and square the blanks to the tubes. I ended up losing three of my four nubs and drilled holes through the mold for some plugs to go through. (The fourth nub held strong so I kept it.) One of the reasons it looks so beat up is because I used a pretty dull exacto knife to cut more out and get some added length for the blanks. Here are some pictures of my ugly beat up looking mold.


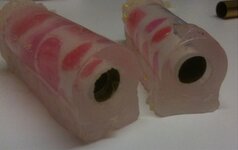
On Monday, my son and I put my new tools together – a little 3 gallon pancake air compressor and the 2.5 gallon pressure pot. Tested it out: turned it on and it took its time and made a lot of noise (it's just loud) but it did pressurize the pot. Had to keep adding pressure though. Then mixed up the Alumilite Clear according to the directions and poured it over the heart tubes in the mold. Put it in the pressure pot and kept it pressurized at 50 psi. (How much should I use for Alumilite?) It was late for a weeknight/schoolnight so went to bed. Took it out the next morning. Removed the blanks from the mold, and they looked like this. I was surprised that they did not look clear. I did note though that when I chipped a little piece off, it appeared to be clear material underneath the frosted looking resin.

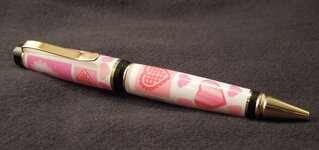
Got to play again last night and turned the blanks. I was amazed at the long ribbons coming off the tool. Long and strong ribbons. I've turned quite a few store bought acrylic pen blanks and have done some circuit board pens. When those ribbons wrap themselves around the mandrel, I just brush them away. These almost seemed to tie themselves in knots! I had to turn the lathe off quite a few times and work at tearing off the wrapped shavings. No complaints though! Just thought that it was interesting at how strong the stuff is. The clarity did improve right away when I turned the blanks down. Micromeshed through 12000 and assembled the pen. Came upstairs and gave my Valentine her gift. And she does love it! Here are some pictures of my very simple beginning to tube-on casting (stickers).


Another learning point is that I need to make sure that the stickers are completely adhered to the tubes. I did a little saying (not clearly shown in the pictures) on a clear Avery label. You can see air bubbles under it. I'm guessing that if I had looked more carefully before I cast it, I would have noticed them and addressed it then. I'll need to really inspect these in the future.
Any comments and suggestions are very welcome! Thanks for looking! Greg
Greg
-----------
Well I finally received my pressure pot on February 13. Not much time to make a Valentine's Day pen for my wife, but at least I got something started for her. I don't think she was really thrilled getting two white tubes with heart stickers on them and me saying "I think that you're going to like it when it's done." (She's heard stuff like this before.) We did go out to dinner! ♥ Anyway, here is my experience casting my first blanks.
My eventual goal is to do some snake skin and postage stamp pens, so I made a crude mold to cast tube-in blanks. I went a different route in making my mold than I have seen so far. I made it using the Alumilite Amazing Putty. The goal was to make one like some of the others I've seen on this site for doing tube-on casting - with built-in nubs to go right into the tubes. Of course the first time doing anything you learn a lot for the next round. The putty started hardening faster than I expected. I should have used longer-than-final-length blanks or made some shims so that there is some material to mill off and square the blanks to the tubes. I ended up losing three of my four nubs and drilled holes through the mold for some plugs to go through. (The fourth nub held strong so I kept it.) One of the reasons it looks so beat up is because I used a pretty dull exacto knife to cut more out and get some added length for the blanks. Here are some pictures of my ugly beat up looking mold.


On Monday, my son and I put my new tools together – a little 3 gallon pancake air compressor and the 2.5 gallon pressure pot. Tested it out: turned it on and it took its time and made a lot of noise (it's just loud) but it did pressurize the pot. Had to keep adding pressure though. Then mixed up the Alumilite Clear according to the directions and poured it over the heart tubes in the mold. Put it in the pressure pot and kept it pressurized at 50 psi. (How much should I use for Alumilite?) It was late for a weeknight/schoolnight so went to bed. Took it out the next morning. Removed the blanks from the mold, and they looked like this. I was surprised that they did not look clear. I did note though that when I chipped a little piece off, it appeared to be clear material underneath the frosted looking resin.

Got to play again last night and turned the blanks. I was amazed at the long ribbons coming off the tool. Long and strong ribbons. I've turned quite a few store bought acrylic pen blanks and have done some circuit board pens. When those ribbons wrap themselves around the mandrel, I just brush them away. These almost seemed to tie themselves in knots! I had to turn the lathe off quite a few times and work at tearing off the wrapped shavings. No complaints though! Just thought that it was interesting at how strong the stuff is. The clarity did improve right away when I turned the blanks down. Micromeshed through 12000 and assembled the pen. Came upstairs and gave my Valentine her gift. And she does love it! Here are some pictures of my very simple beginning to tube-on casting (stickers).


Another learning point is that I need to make sure that the stickers are completely adhered to the tubes. I did a little saying (not clearly shown in the pictures) on a clear Avery label. You can see air bubbles under it. I'm guessing that if I had looked more carefully before I cast it, I would have noticed them and addressed it then. I'll need to really inspect these in the future.
Any comments and suggestions are very welcome! Thanks for looking!
