Wmcullen
Member
I'm not sure if this process is right or wrong; unique or common. But it works for me and I want to share in case it's interesting. |
11:Eccentric Revolution
last post: 10: On Center Drilling

There are lots of ways to put an off-axis ring of dots in a pen. This is my method.
last post: 10: On Center Drilling
There are lots of ways to put an off-axis ring of dots in a pen. This is my method.
Problem
Trying to drill holes in this pattern by hand was too difficult and yielded bad results.
Solution
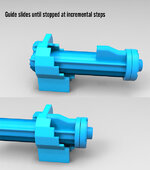
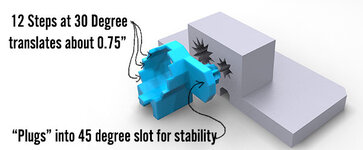
I needed "jig" help and came up with a couple of new parts (in blue) to fit into the 3d printed jig system I've written about previously.
It includes a Step Guide and an elongated 30 Degree Plug.
The jig helps a blank revolve over 12 steps (30 degree increments) while moving in and out to finish where it started.
I'd like to pretend it didn't take very long to work out, but...
Here's what it looks like in action.
The base is clamped to my drill press. The Eccentric Guide is held in place by a rubber band.
Working carefully, the holes come out nicely.
I have a little hint for gluing closely spaced dowels.
Hint: It's better to glue every other dowel and work your way around twice when holes are close together.
Here's why I think this:
A. Cutting thin dowels with sharp scissors is a fast way to work. But the scissors require a little clearance. If the dowels are too close together each one might need a little more clearance than the last and you'll eventually have unnecessarily tall dowels sticking out of the blank. It's a little wasteful but more importantly, creates a situation that might need to be cleaned up before you put it on the lathe or risk tear out.
B. Working on every other dowel lets you keep the trimmed ends close to the center. The second time around is only a little taller.
Summary
Projects like this put new capabilities in my toolbox; provide a bit of confidence when I find solutions that work, and deliver pen designs I might have had difficulty producing other ways.
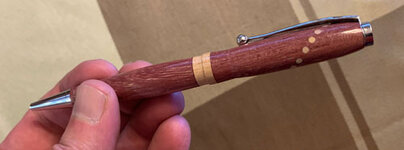
Here's my favorite execution so far. All holes were drilled at 30 degree increments, either straight around the circumference or at an angle.
*Post Script
In the comments section of my last post, Ken asked a fantastic question:
I was working on this post at the time and thought... "Ha ha! Cullen's ahead of the curve!"Here's one for you to ponder. Can you figure out a jig to place dots that run on an angle completely around a pen?
But no.
") In so many ways... no.
In so many ways... no.Ken has a great example of a specific pen where the dots stay in the middle of a stripe.
This jig does not address that challenge.
But I think I've figured out a solution and will post again soon with the results.
Spoiler: it's another jig... or two.
Notes on the Jig attachment:
If you have access to a 3d printer, I'm happy to share the files for the jig and this new attachment.
The pictured pieces on the right indicate how they print out.
I've designed each piece with a flat bottom, so parts A&C will need to be glued together, as will parts B&D.
In the end it should look like the parts on the left.
(Red coloring just for clarity.)
Geometry files (*.objs) in the attached file named "jig.zip."