Drilling Segmented Blanks with Metal Layers

Signed-In Members Don't See This Ad
Joined
Nov 1, 2020
Messages
37
Location
Spooner, WI
I've been looking around on the forums for how to do this, but I haven't found a definitive answer. When you make a segmented blank with a metal band in it, do you glue the segments together and then drill, or do you drill the segments separately and then glue them together? Also, what kind of drill bit do you use for thin metal stock (brass or aluminum), and will a brad point work? Finally, if the metal strip is at an angle, how do you drill it?
 
Signed-In Members Don't See This Ad

Joebobber

Member
Joined
Sep 24, 2018
Messages
1,172
Location
Erie, North Dakota
I found that its best to glue then drill, otherwise getting it lined up is almost impossible. Also using a brad point doesn't seem to work that good. At least for me.
 

jttheclockman

Member
Joined
Feb 22, 2005
Messages
19,148
Location
NJ, USA.
Hello Carleton. This subject just came up a few days ago. I will look for that thread for you. But here is another that may interest you.

https://www.penturners.org/threads/drilling-segmented-blanks.167327/

https://www.penturners.org/threads/have-you-ever-made-a-blank-you’re-scared-to-turn.164807/page-2

To quickly answer your questions. No on the brad point bits. Machine bits are best. It is always easier to drill components seperate and then build the blank on the tube. May need to get creative when holding thin metals such as brass and aluminum. Could sandwich between a couple piece of scraps. When drill blanks on an angle it is necessary to drill slow and clean swarf out every so often and most accurate way is to drill on the lathe. Drilling in the center of your design is also an important step. Good luck. Others will chime in too.
 

Ray-CA

Member
Joined
Nov 14, 2020
Messages
290
Location
San Diego CA, USA (SAN)
I've been drilling with the Brad point bit until I hit the metal. Switch to a metal bit and drill through the metal in two stages then go back to the brad point. Keep switching as needed.
 

TDahl

Member
Joined
Dec 11, 2019
Messages
1,894
Location
Brentwood
I drill all the parts first and then glue everything up. I have used both types of bits. I made a jig to hold the metal segments in place while drilling. I will take some photos and add to this post.
 

studioseven

Member
Joined
May 6, 2014
Messages
794
Location
Wisconsin
Just a tip I learned. I drill a lot on my lathe. I was having trouble with my segmented blanks coming apart at the glue sections. Didn't matter if I used epoxy or CA. And the blanks were allowed to dry for 24-48 hours. I believe the culprit was my drill bit was getting too hot. The heat was softening the glue allowing it to come apart. I now drill slower and lubricate my bit frequently. I haven't had a blank come apart since.

Seven
 

leehljp

Member Liaison
Joined
Feb 6, 2005
Messages
9,329
Location
Tunica, Mississippi,
JohnT has links with photos of drilling BEFORE and assembling. The tube aligns them perfectly. The issue is how to drill thin metal without deforming it. I place a .5mm or 1/32" sheet metal plate, say 6 inches by 12 inches between two layers of plywood that are at least 8' x 14 inches and screw the plywood together all the way around. I mark out the general area of the metal plate and in approximate 1 inch squares. I drill the center of each. Next is to take the screws out of the plywood and use sheet metal snips or metal shears to cut the 1" squares with the hole in the middle.Then I cut the squares into octagonal shape. It will distort the squares for sure, but I have an anvil and flat head hammer to flatten. My press does not get it as flat as I would like, but a flat head hammer does.

I bought a metal punch set about a year ago from Grizzly but have not yet set it up to use it to punch up to 1mm thick washers with various inside and outside diameters.


A tip on this type of layout is to use at least 15 minute epoxy, or longer. I usually use 30 minute to 1 hour and clamp from the ends. I also make the end pieces about 1/16" longer than needed and sand down to the tube after it cures. For me, I make dry runs on the alignment/placing on the tube before gluing. That is very helpful in that problems, if there are some can be spotted before gluing.
 
Last edited:

jttheclockman

Member
Joined
Feb 22, 2005
Messages
19,148
Location
NJ, USA.
I too have bought one of those punch sets some time ago but never got around to using it. Was going to use for watch part pens. It is somewhere in the shop but who knows. Just another way I cut and drill small thin metals is to use doublesided tape and tape them to a flat board. Works well too. Yes you need to flatten the burrs after drilling but that is easy. Sometimes I just take a rats tail file and remove burrs. Many ways to get the job done.
 

TDahl

Member
Joined
Dec 11, 2019
Messages
1,894
Location
Brentwood
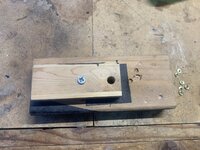
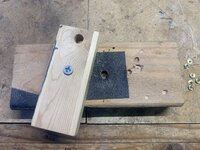
Here is the jig I mentioned earlier in this post. I have experienced all of the difficulties everyone else mentioned when drilling metal segments. This jig solved all of my problems. The sand paper is 400 grit and holds the metal segments in place. The tension created by tightening the screw holds the metal pieces tight and helps maintain the flat form. I have been able to knock out half a dozen metal segments in minutes.
 

Attachments

  • IMG_4818.jpg
    IMG_4818.jpg
    370.4 KB · Views: 93
  • IMG_4819.jpg
    IMG_4819.jpg
    410.4 KB · Views: 88
Top Bottom