Drilling Issue

Signed-In Members Don't See This Ad

JCochrun

Member
Joined
Sep 13, 2010
Messages
230
Location
Penn Valley, CA
The past few blanks that I have drilled had some problems. The entry hole is fine but the exit hole is slightly bigger than the tube. The drill bit seems to be fine but there must be something wrong. Drilling has never been a problem before. Any ideas? I'm using a Skill drill press. Been thinking about getting a new one.

Jim
 
Signed-In Members Don't See This Ad
Is it chipping out at the end?

Try leaving the blank long, drilling the correct length, then cutting the blank off, revealing the hole.
 
It isn't chipping. I glued up some tubes and noticed that the hole was bigger than tube. I'll post a pic in a minute.

Jim
 
Here is a pic of the blank. It is an acrylic. Not sure what is causing it.

Jim
 

Attachments

  • photo(4).jpg
    photo(4).jpg
    50 KB · Views: 306
Try drilling something else with the same drill bit to see if it does it again. If it does, try a different bit the same size and see if you still have a problem. It may be the bit is out of round.
 
hmmmm

I sometimes have a similar problem but it is at the entry end. Mostly with larger diameter bits. I cut the blank a tad long then recut it to size after drilling.
 
This happens quite a bit on me if I get rushed when doing plastic blanks. The waste material melts, and forms one long "sting" of plastic, that moves up one side of the drill, this causes the drill to be heavier on one side of the drill, which causes it to wobble. This produces the larger hole in the exit side of the blank, as in the entrance hole.

Solution is to clear the bit more often, and prevent heat build up. Go slower.
 
An guy in our local wood shop that sales our pen supplies told me to watch squeezing the blank to tight in the vise because some material will compress and once drilled expend to make a larger hole. Don't know if it is true but makes some since.
 
An guy in our local wood shop that sales our pen supplies told me to watch squeezing the blank to tight in the vise because some material will compress and once drilled expend to make a larger hole. Don't know if it is true but makes some since.

I had this issue some time back... but their was a combination of things that were going wrong to create the perfect storm. I had my drill speed too fast, not clearing waste, and too much of a squeeze on it.

And here's why it was the perfect storm... going too high of RPM and not clearing the bit generated heat, heat made the acrylic more pliable, more pliable made for a larger oblong hole around halfway through the blank to the bottom of the hole.

I have solved this issue by using just enough squeeze to hold the blank, slowing down the drill and "dynamically" clearing the bit...I have an air nozzle directed down the drill bit while I am drilling. It keeps it clear and cool and is just one smooth motion.... oh ya, keep your bits sharp, wear safety glasses and be prepared for the mess!!
 
Im not familiar with that drill press but could it be the bearings at top of press getting hot and causing a wobble? I had about the same problem and talked to a local woodworker and he was telling me about some drill presses doing that.
I have a belt driven press and even with pen vise can never get a real good straight hole but with my setup I have to stop and move the blank up in the vise to finish the hole and thats with the blanks cut down for slimlines and all.
Just another opinion.
 
An guy in our local wood shop that sales our pen supplies told me to watch squeezing the blank to tight in the vise because some material will compress and once drilled expend to make a larger hole. Don't know if it is true but makes some since.

I had this issue some time back... but their was a combination of things that were going wrong to create the perfect storm. I had my drill speed too fast, not clearing waste, and too much of a squeeze on it.

And here's why it was the perfect storm... going too high of RPM and not clearing the bit generated heat, heat made the acrylic more pliable, more pliable made for a larger oblong hole around halfway through the blank to the bottom of the hole.

I have solved this issue by using just enough squeeze to hold the blank, slowing down the drill and "dynamically" clearing the bit...I have an air nozzle directed down the drill bit while I am drilling. It keeps it clear and cool and is just one smooth motion.... oh ya, keep your bits sharp, wear safety glasses and be prepared for the mess!!

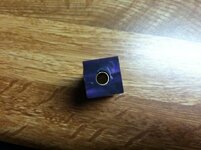
Thanks for all of the advice.

I slowed the speed of the drill down. I also cleared the bit a whole lot more often. That must have been the problem. It worked like a charm.

I did run into another issue. I was turning a blank between centers. When I finished it looked great. I took the bushing out and the tube came with one of the bushings. Was a little bummed but I glued it back. It should be fine. I sand all my tubes before gluing them in. Any idea what would cause the tube to come out like that?


Jim
 
Jim, Just read this in a newsletter I get from Wood N Whimsies

TECH TALK
When I drill a hole in my pen blank, the hole is larger than the

This hole above was drilled with a 27/64" drill on the lathe without pre-drilling a smaller hole. As you can see, the result is less than desirable
tube on one end and the tube does not fit snugly all the way through. Is my drill bit defective? What's going on!!! I'm pretty sure my drill bit must be bent. No, your drill bit is not defective or bent, the problem is the procedure you are using to drill the hole. I have watched many YouTube Pen Making videos and each and every time I see the host of the video break out just the right size drill bit and load it into the chuck. They take careful aim to make sure that they are drilling as close to center as they can and then with a steady hand, a whisp of dusty wood chips, and a few squeeks and squeels a hole is drilled through the blank.
The idea is to have a blank that has a hole which will accommodate the tube and not have the tube bouncing around inside the blank on one end. In order to get the perfect size hole you cannot use the exact size drill you need from the get go. When a professional machinist drills a hole in a piece of metal on a lathe or milling machine he follows a procedure which will result in the perfect hole for the application he needs. To

This hole was drilled with the exact same drill bit but by following the described Tech Talk procedure, What a difference!
do this he drills a centering hole with what is commonly called a center drill, not very deep but deep enough so that the next drill bit will not walk around on the metal surface and start out crooked from the start. Next they will use a drill bit which is a few thousandths of an inch smaller than the final hole size they need and drill through or as deep as desired. They then follow this with what is called a reamer which will produce the perfect hole diameter. After this he may take a countersink bit and clean the burs off of the hole opening. Presto, everything fits snugly.
When drilling a hole in wood we do not have to be quite as precise but accuracy is good though. The larger the hole you are trying to drill the more the wallowing will effect your final result. Try this next time; drill your first hole with a bit just slightly smaller than the hole you desire. Say you want a 27/64" hole. Use a 10mm drill bit to make the first cut and then retool the drill chuck with the 27/64" drill bit and follow through center of the initial hole. Be careful not to move the workpiece between bit changes, a firmly mounted centering vise will suit your needs in this application. It is also a good idea to not use a brad point bit for the final cut. Instead us a jobber bit for far better accuracy, a brad point will not follow the hole since the drill point is not a fully tapered angle.
Now remove your blank from the vise and test fit your tube. I guarantee you will get a much better result and there will be no sloppy gap between your brass tube and the inside wall of your blank. A very small gap is preferred since you do need room for the glue. Too tight and all the glue gets pushed out and the tube will later spin in the blank when you are squaring the ends.
If you drill your blanks on the lathe you can still follow the same procedure and the results will amaze you. I use a center drill to make my first initial cut. I had gotten away from doing this until Tracey had a problem with the acrylic blanks used on her Military Yellow Ribbon Blanks. The blank was wallowed on one end. I went back to to following basic machine shop rules and that problem was solved just like that.
 
Back
Top Bottom