Double Flames - Olivewood & Wenge

Signed-In Members Don't See This Ad
See more from lane223

lane223

Member
Joined
Sep 14, 2007
Messages
113
Location
Alcala de Henares, Madrid, Spain.
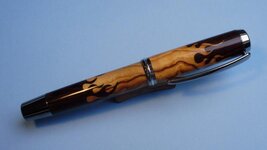
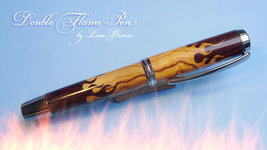
A few weeks ago I posted my first (single) flame pen. Here is the first of the double flame pens. We are thinking about offering these as kits but there is still some details to work out. For example the smaller flames on the bottom barrel break off if you look at them funny. Need to remove the smaller flame "licks" and make the design simpler. Used a dark brown dye with epoxy to put it together. If you know what you are looking for you can barely see the seams in the wenge. Probably will use very dark brown/black dye next time to hide them even more.
 

Attachments

  • edited double flame 17 09 09.jpg
    edited double flame 17 09 09.jpg
    23.9 KB · Views: 664
Signed-In Members Don't See This Ad
Bob, I have someone cut the pattern with a laser. Can't even think of how to begin using a scroll saw for cutting something tubular and have matching patterns. Lots of work yes, but Cincelaser deserves a lot of credit. I made the cutting mandrills, with his input, he did the design, with my inputs. I turned the tubes, he cut the flames, and then I put it together. Truly a work of collaboration. Hopefully with more to come.
 
Slick! Hot! Cool! Sick! and many other adjectives I could list...:cool: Having a bit of a passion for Hot Rods, of which flames are always welcome, this pen is outstanding!
 
Wow -- fabulous! BUT -- I think you ought to send a couple of those babies to me for further product testing! I'll see if I can't swear those little licks into place (it works for other things around the house!).
Doug
 
It certainly is fantastic work and I think it is great. However, to me there is something wrong. The cap has the lighter material giving off the flames, which looks correct, but the lower part has the darker material doing the flames. I think it would look better perhaps if both sets of flames came from the lighter ( wood ):confused: But that's just me.
I still think it's very cool ( or hot?:biggrin:) though.
 
The workmanship is fantastic. Send me one and I promise not to look at the small flames funny!:tongue:
 
It certainly is fantastic work and I think it is great. However, to me there is something wrong. The cap has the lighter material giving off the flames, which looks correct, but the lower part has the darker material doing the flames. I think it would look better perhaps if both sets of flames came from the lighter ( wood ):confused: But that's just me.
I still think it's very cool ( or hot?:biggrin:) though.


You got it!
icon10.gif

I think the same but this one is a survivor beta version pen for me. I made a little improvements in the kit and the next one will be more easy to mount.

Also, I think that making the flames a bit longer is best to improve the design. They are occupying 1/3 lenght of the barrel (from low to top flame points) but I want to made a try with 2/3 lenght. What you think?
 
Last edited:
It certainly is fantastic work and I think it is great. However, to me there is something wrong. The cap has the lighter material giving off the flames, which looks correct, but the lower part has the darker material doing the flames. I think it would look better perhaps if both sets of flames came from the lighter ( wood ):confused: But that's just me.
I still think it's very cool ( or hot?:biggrin:) though.

That was an option, but I wanted to keep the olive wood grain in line and together. In fact, the first example picture Alberto gave me was exactly what you described, but I didn't think the flames going in two directions look right. Another option is (starting from the bottom) olive wood flames, wenge, olive wood flames, wenge. OR have the olive wood flames start at the bottom and in a continous pattern go all the way to the top, with wenge fill ins. Imagine keeping that all aligned!
 
It certainly is fantastic work and I think it is great. However, to me there is something wrong. The cap has the lighter material giving off the flames, which looks correct, but the lower part has the darker material doing the flames. I think it would look better perhaps if both sets of flames came from the lighter ( wood ):confused: But that's just me.
I still think it's very cool ( or hot?:biggrin:) though.

The pen is stunning. Great choice of woods. I do agree with Steven though.
 
I am new at this laser cutting stuff, and was wondering what sizes you turn the mandrels and tubes to. I know the pen kits/sizes will determin that. Is the inside of the tube sized for the brass tube before lasering.??? TKU

Lin.
 
I am new at this laser cutting stuff, and was wondering what sizes you turn the mandrels and tubes to. I know the pen kits/sizes will determin that. Is the inside of the tube sized for the brass tube before lasering.??? TKU

Lin.

What works for me perhaps doesn't for you. I know how it can be done (still improving) with the rotary attachment for the Epilog's systems. Other manufacturers has different rotary attachments and I can't figure how work with them. As I see, the solution isn't easy as with the Epilog rotary attachment. Also no all machines cuts in the same way. (The new Epilog's ones seems to do it best than other systems, I made a comparison with more than 4 systems in a show before buying the second one I have, 4 years ago).


Please PM and tell me about your machine and rotary attachment. Best with photos. Take in mind that English isn't my first languague. I can understand it so well but I can't express myself as I want.
 
Also, I think that making the flames a bit longer is best to improve the design. They are occupying 1/3 lenght of the barrel (from low to top flame points) but I want to made a try with 2/3 lenght. What you think?

I dunno, I think that it is beautifully balanced as it is. I'd think that making the flames longer ( assuming thinner too? ) would perhaps make it even more delicate and difficult to assemble. :confused:

I think to solve the problem, you guys need to send some to me so I can compare them to Jeff's cool scrolled ones:biggrin: I have several of them and love them all:biggrin:
 
Skiprat, compare the lenght of the flames, see the first one (my birthday gift from Lane
icon7.gif
):
http://www.penturners.org/forum/showthread.php?t=50503&highlight=flame+pen

It's well balanced too, because the wenge/olivewood area is the same!

No details decided yet, but I think that Lane is thinking in the way of that all the "overseas Smeagols" can get his precious treasure kit!
icon12.gif
 

Attachments

  • smeagol.jpg
    smeagol.jpg
    32 KB · Views: 117
Last edited:
I dunno, I think that it is beautifully balanced as it is. I'd think that making the flames longer ( assuming thinner too? ) would perhaps make it even more delicate and difficult to assemble. :confused:

I think to solve the problem, you guys need to send some to me so I can compare them to Jeff's cool scrolled ones:biggrin: I have several of them and love them all:biggrin:

How in the world would one do that with a scroll saw?
 
Well mister skiprat, you were one of the two people I was thinking of to send "prototype testing apparatus design version 0.87 to. Ok and who is this Jeff character (and where can I see his work) Any ideas and suggestion from the forum are always welcome and usually incorporated. Sometimes.... on a good day....


I dunno, I think that it is beautifully balanced as it is. I'd think that making the flames longer ( assuming thinner too? ) would perhaps make it even more delicate and difficult to assemble. :confused:

I think to solve the problem, you guys need to send some to me so I can compare them to Jeff's cool scrolled ones:biggrin: I have several of them and love them all:biggrin:
 
Lin,

I made the mandrels (the part that the rotary attachment turns) the same size as the outside diameter of a finished pen. Each pen, two sizes, one for the upper, the other for the lower end. Yes the Wood is drilled just the same size for the brass tube. And it is a problem. Some wood, and just so happens olive wood and wenge fall into this catagory, the drilled size will change over time. So, sometime it takes a bit of inside sanding to get the laser cut tube to fit on the brass tube.


I am new at this laser cutting stuff, and was wondering what sizes you turn the mandrels and tubes to. I know the pen kits/sizes will determin that. Is the inside of the tube sized for the brass tube before lasering.??? TKU

Lin.
 
Thanks Lane. I think its all starting to make sense now. I am going to see the guy with the lazer next week, he is about 75 mi from where I live, to see what he will need to start cutting these. Not even sure if he needs a mandrel, but I am sure he will.
Lin.
 
I find it to be un-balanced. I love the original one with the flames on the cap only, but this one is just too busy. could be because of the dark to light to dark, don't know for sure. It's certainly not what I was expecting. I was thinking when you said double flames that you where going to make flames inside of flames , like you have a flame and then another flame 1/8" higher above the first flame, something to that effect. Great laser work though and the fit and finish are spot on!

Oh, I missed that last question. I am Jeff. I do flames in 2 different techniques depending on what the end result may be. I cut them with my scrollsaw and they are all one single solid piece that requires no assembly...the blank that is, you still have to drill it and assemble the pen kit.
 
Last edited:
Back
Top Bottom