Double ended fountain pen

Signed-In Members Don't See This Ad
See more from Carl Fisher

Carl Fisher

Member
Joined
Jun 7, 2011
Messages
2,775
Location
Cape Coral, FL
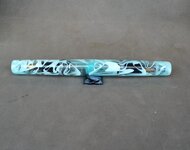
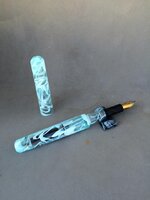
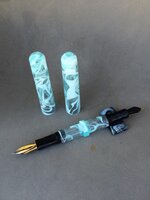
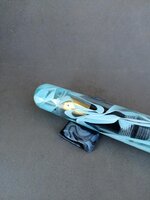
Something a little special for a customer. We worked out a design together and I just finished it up today.
 

Attachments

  • 12021834_10206801619179583_1987142559_n.jpg
    12021834_10206801619179583_1987142559_n.jpg
    48.8 KB · Views: 362
  • 11217829_1237446956281480_561265366643587247_n.jpg
    11217829_1237446956281480_561265366643587247_n.jpg
    49 KB · Views: 304
  • 12039305_1237446646281511_8383332897531123809_n.jpg
    12039305_1237446646281511_8383332897531123809_n.jpg
    55.4 KB · Views: 565
  • 12006297_1237446676281508_4639935980185925401_n.jpg
    12006297_1237446676281508_4639935980185925401_n.jpg
    59.2 KB · Views: 291
Signed-In Members Don't See This Ad
As for why? Because the customer asked for it :biggrin:

One side will have an XF, the other side will have a Broad. I'm waiting on the permanent nibs now and they will both be polished silver, not two tone like shown. Each side should hold just over 1ml each. His target was 1ml and I think I managed a bit more once completely filled. Eyedropper fill.

This was a very specific design. He came to me with a sketch and we had to refine it quite a bit to get all of the internals and clearances correct and still meet all of his must haves. It's a tight fit to get everything in there, but I managed!

If he would have allowed some concessions, I could have made it a bit more compact but it had to have a #6 nib on each side, 1ml of ink capacity, tapered caps, mint water acrylic, black/blue ebonite sections. I'm happy I pushed through it though as the end result turned out nice.
 
Last edited:
That is a really admirable accomplishment, Carl !! . Congratulations !!

I think that polishing the interior surfaces must have been a real challenge.

It looks like the caps are friction fit on the body ... getting that just right would also be a challenge.
 
Last edited:
The caps are threaded. The thread is about half way up inside the cap and have matching threads on the grip section. These were just cell phone pics after I finished it up yesterday.

Jonathon helped me work through the steps to get the inside all polished up. It's not perfect, but each successive one should be better now that I know some of the steps to tweak.
 
I know the duck call guys use a small torch wand to do the insides of theirs, but I can't see any way of making that work in such close confines as the internals of a pen. I'd love to be able to flame polish it and call it a day, but as it is I have to go through the same sanding process as everything else.
 
I know the duck call guys use a small torch wand to do the insides of theirs, but I can't see any way of making that work in such close confines as the internals of a pen. I'd love to be able to flame polish it and call it a day, but as it is I have to go through the same sanding process as everything else.

Yes I see your point, could be quite a squeeze. perhaps we need to machine our own wand suitable for pen turning
 
Excellent pen Carl.

I thought I saw a video, or at least a link to one, here in the forum. It was a demonstration of flame polishing the inside of a pen. I'll have to take a look around to see if I find it.
 
I know the duck call guys use a small torch wand to do the insides of theirs, but I can't see any way of making that work in such close confines as the internals of a pen. I'd love to be able to flame polish it and call it a day, but as it is I have to go through the same sanding process as everything else.

Yes I see your point, could be quite a squeeze. perhaps we need to machine our own wand suitable for pen turning

Well here's the scary thing. I had a small left over piece in the shop and decided to play with the small butane torch I have for other jobs. The acrylic caught fire. Not sure if it's the ribbons or something in the acrylic itself, but instead of leaving behind a nice polish like you get when you flame polish plexi, this stuff actually lit on fire and burned.
 
I can't see that being that hard to polish the inside. Have to come up with some sanding things to adapt to a drill or dremel.
 
Very interesting and creative and beautifully done. The only thing I think the customer will wish he/she had requested was some sort of an indicator as to which end was which (i.e. a thin band of black acrylic on the end with the broad point). I think they'll find it frustrating when they open the pen intending to write with the fine end and they have a 50-50 chance of getting it right. Just a thought...
 
Very interesting and creative and beautifully done. The only thing I think the customer will wish he/she had requested was some sort of an indicator as to which end was which (i.e. a thin band of black acrylic on the end with the broad point). I think they'll find it frustrating when they open the pen intending to write with the fine end and they have a 50-50 chance of getting it right. Just a thought...

I've actually been giving that thought but haven't come up with a solution yet. Unless he plans to ink both sides with a different color in which case it'll be pretty easy to identify.

I really wish I had a laser engraver in the shop. In retrospect it would have been more beneficial than the CNC I built instead.
 
Sappherios, Thank you for your kind words. Nothing to be in awe over however as once you learn some basic techniques, it's just a matter of finding new ways to apply them.

Looking forward to see what you come up with as you progress.
 
Back
Top Bottom