robutacion
Member
Hi peoples,
Here is another project that come to my head last night 1/1/14, when sorting some stuff...!
Continued...! in the work-shop, when I run into the box where I had some the Mediterranean Cypress cones I used to make some blanks with and one of them was used on my Christmas Gift game #2 here and I had a though, make a small bowl out of them and some resin...!
So, I looked into the dozens of rough turned blanks I'm always making and I have a bunch made out of Stone Pine, some cracked up so I got the biggest one that would fit in the pressure post and small one that would fill the centre to avoid too much resin wastage.
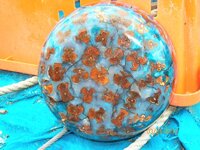
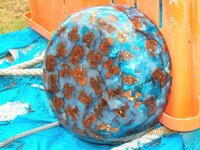
Both rough bowl had cracks so I didn't bother is try re-use them, I started gluing cone by cone into the inner part of the largest bowl using thick CA and accelerator. When I had the inside covered with the cones the smaller bowl fitted nicely so, I strapped both bowls together to avoid the small bowl to float but also to use the straps as a handle to allow me to insert the whole thing in the pressure pot after the resin was poured.
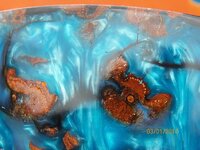
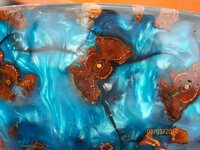
I didn't have any pre plans for colours or anything, I though that I would try to make it a little translucent to enhance the cones but after I made the first one litre of mix using the Interference Green from Pearlex, I was very short on the resin and I didn't like much of how it looked with the cones so, I made another 3/4 of a litre mix but this time I used something that I know, it always work and looks pretty good and that is the Sky-Blue, also from Pearlex.
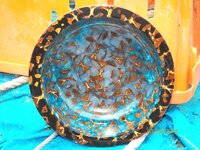
What I haven't said yet is that, I know that large pour tend to crack pretty bad due to the heat produced and while in most other casting, the cracks would spoil the blank, I decided that, I had a strong/solid base mold and the top wasn't going anywhere to I deliberately used a little extra hardener to make sure it would crack.
The idea was that, even filling the mold to capacity, as soon as I would put it in the pressure pot, the pressure would push the resin deed down and the resin level would go down, a fair bit so, I would re-pour some carbon black I had into the mold after the cast was in the pressure pot long enough to set the resin firm/crack but still with a soft to layer so that I wouldn't have a straight line from the last pour.
It took about 1 hour in the pressure pot, in the mean time I had the carbon colour mixed with some resin leaving the hardener for when I got the mold out of the pressure pot.
The idea was to make sure the main pour will crack and then use the black resin to create a rim at the bowl top and have the black resin to be forced under pressure (100 PSI) into all the cracks, hopping that I would have the web type effect, that off-course would depend upon the ways the cracks would form and the available gaps for filling with the black.
In the morning, I got the mould out of the pot and the black was still soft but not runny so, I had set myself to get it done today, the weather was cool, raining, lots of moisture so, I wasn't going to wait, I put the whole thing in the over @60°Celsius for 90 minutes and walked away.


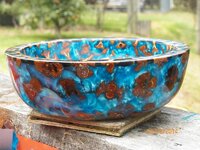
Comeback just a few minutes before the timer would go off, got it out of the oven, mount it in the lathe and took it for a spin. I was easy to mount this thing as I was using the 2" recess I had made on the largest bowl so, I started buy cutting the inner pine bowl, until I exposed the resin, cleaned it all up inside and coated it with super thin CA, 2 coats...!
Then I got started on the outside,
 and finish the hole thing, coating the outside the same way I did the inside, this coating will work as the sanding sealer as I want to do the final coating with my Floorseal.
I got it up-side-down in the mail shed with a varnish coat on the outside, before I go to bed I will turn it over and varnish the inside, let it dry overnight and ready to be handled in the morning...!
I didn't say anything to the wife but, when she went down to the work-shop to call me for dinner, she saw it almost done and said " I din't know that you had a cast piece commissioned...!" I said " I don't...!" she lost no time in saying "OK so, that piece is mine...!" :wink::biggrin:
I don't know where she is going to put it, the house is full of this stuff but, she always finds room for one more piece, time and time again, makes he happy so, makes me happy...!:wink:
I love these non-planned and out of the blue urges to make stuff/ something/anything, the problem is that I have no patience to wait, I like to start and finish in one go, in this case, I made the resin a little more brittle by putting it in the oven, I don't suggest others to do it but I was never any good in follow my own advice so, nothing different there...!
You are now thinking, where are the pics of the finished bowl, huh...???:biggrin:
Well folks, that has to wait until tomorrow, I didn't take any pics when I got it off the lathe so, you are going to get a couple of pics of the finished piece, I hope that the varnish doesn't let me down and that no dam bug spoils the coating inside, will see...!
I reckon is will look pretty porch...!:wink::biggrin:
Cheers
George
Here is another project that come to my head last night 1/1/14, when sorting some stuff...!
Continued...! in the work-shop, when I run into the box where I had some the Mediterranean Cypress cones I used to make some blanks with and one of them was used on my Christmas Gift game #2 here and I had a though, make a small bowl out of them and some resin...!
So, I looked into the dozens of rough turned blanks I'm always making and I have a bunch made out of Stone Pine, some cracked up so I got the biggest one that would fit in the pressure post and small one that would fill the centre to avoid too much resin wastage.
Both rough bowl had cracks so I didn't bother is try re-use them, I started gluing cone by cone into the inner part of the largest bowl using thick CA and accelerator. When I had the inside covered with the cones the smaller bowl fitted nicely so, I strapped both bowls together to avoid the small bowl to float but also to use the straps as a handle to allow me to insert the whole thing in the pressure pot after the resin was poured.
I didn't have any pre plans for colours or anything, I though that I would try to make it a little translucent to enhance the cones but after I made the first one litre of mix using the Interference Green from Pearlex, I was very short on the resin and I didn't like much of how it looked with the cones so, I made another 3/4 of a litre mix but this time I used something that I know, it always work and looks pretty good and that is the Sky-Blue, also from Pearlex.
What I haven't said yet is that, I know that large pour tend to crack pretty bad due to the heat produced and while in most other casting, the cracks would spoil the blank, I decided that, I had a strong/solid base mold and the top wasn't going anywhere to I deliberately used a little extra hardener to make sure it would crack.
The idea was that, even filling the mold to capacity, as soon as I would put it in the pressure pot, the pressure would push the resin deed down and the resin level would go down, a fair bit so, I would re-pour some carbon black I had into the mold after the cast was in the pressure pot long enough to set the resin firm/crack but still with a soft to layer so that I wouldn't have a straight line from the last pour.
It took about 1 hour in the pressure pot, in the mean time I had the carbon colour mixed with some resin leaving the hardener for when I got the mold out of the pressure pot.
The idea was to make sure the main pour will crack and then use the black resin to create a rim at the bowl top and have the black resin to be forced under pressure (100 PSI) into all the cracks, hopping that I would have the web type effect, that off-course would depend upon the ways the cracks would form and the available gaps for filling with the black.
In the morning, I got the mould out of the pot and the black was still soft but not runny so, I had set myself to get it done today, the weather was cool, raining, lots of moisture so, I wasn't going to wait, I put the whole thing in the over @60°Celsius for 90 minutes and walked away.
Comeback just a few minutes before the timer would go off, got it out of the oven, mount it in the lathe and took it for a spin. I was easy to mount this thing as I was using the 2" recess I had made on the largest bowl so, I started buy cutting the inner pine bowl, until I exposed the resin, cleaned it all up inside and coated it with super thin CA, 2 coats...!
Then I got started on the outside,
and finish the hole thing, coating the outside the same way I did the inside, this coating will work as the sanding sealer as I want to do the final coating with my Floorseal.I got it up-side-down in the mail shed with a varnish coat on the outside, before I go to bed I will turn it over and varnish the inside, let it dry overnight and ready to be handled in the morning...!
I didn't say anything to the wife but, when she went down to the work-shop to call me for dinner, she saw it almost done and said " I din't know that you had a cast piece commissioned...!" I said " I don't...!" she lost no time in saying "OK so, that piece is mine...!"
:wink::biggrin:I don't know where she is going to put it, the house is full of this stuff but, she always finds room for one more piece, time and time again, makes he happy so, makes me happy...!:wink:
I love these non-planned and out of the blue urges to make stuff/ something/anything, the problem is that I have no patience to wait, I like to start and finish in one go, in this case, I made the resin a little more brittle by putting it in the oven, I don't suggest others to do it but I was never any good in follow my own advice so, nothing different there...!
You are now thinking, where are the pics of the finished bowl, huh...???:biggrin:
Well folks, that has to wait until tomorrow, I didn't take any pics when I got it off the lathe so, you are going to get a couple of pics of the finished piece, I hope that the varnish doesn't let me down and that no dam bug spoils the coating inside, will see...!
I reckon is will look pretty porch...!:wink::biggrin:
Cheers
George
Last edited: