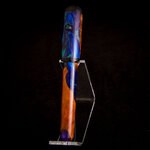
It's one piece - same material as the other black resin pieces. It's a mix of Siraya Tenacious and Elegoo Black. It just appears a different color because I didn't finish it and probably also because it's a little thinner on that back end, so is slightly translucent.
I think it'll wear fine, but we'll see. I've played with it a lot already and I don't notice any change. It's got a different feel to it than traditional threads, which I'm ok with, as I was going for the look and aggressive travel rather than the feel. The thread is a triple start 2 TPI, so it typically takes a portion of a revolution to close it. The threads are round - neither imperial or ACME
")