Emaxx3
Member
I figured I would "borrow" this format as it seems easy to follow.
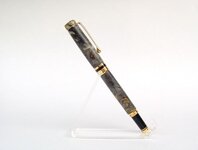
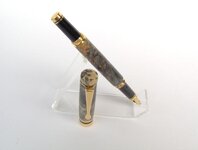
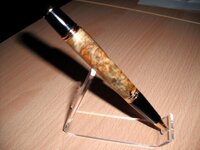
Constant sent me a couple blanks to test: Stabilized Buckeye Burl - Natural & Red
For the record, I am a novice turner. Only been turning for a little while and have done some PR blanks (from Exotic), Woodcraft's acrylic blanks, and a lot of different exotic woods. This is my first experience with stabilized wood.
Out of the package: very nice, very square.
Cutting the blank: I use a bandsaw to cut the blanks and didn't feel much difference between these blanks and acrylic and wood blanks. For the record, I prepped some acrylic blanks from Woodcraft, some purple heart and the test blanks from Constant.
Drilling: easier than the acrylic, the waste was almost powdery (like saw dust). Since I have never turned a stabilized wood before, my expectations were that the blank would be more acrylic like than wood - not the case here. Minor pitting and voids in the drilled holes. Filled with CA and re-drilled later. I used 5 min epoxy to glue the tubes.
Trimming: used a barrel trimmer in a jacobs chuck on the lathe. This is my new favorite way of trimming blanks. The blanks trimmed up nicely... more acrylic like than the PH. I noticed some small voids in the wood and a large crack on the red one. I filled them with CA and allowed them to set.
Turning: I started with a natural colored blanks and started with the roughing gouge. (I turned an acrylic and PH blank first to sense the difference). First few passes to knock off the edges and away I went. Turned like wood... very fast. I was able to get it to shape and final size quickly... didn't even need to use the skew. I used my normal wood finish (CA and BLO).
Remember above I mentioned a crack I saw when trimming the red one? Well... my CA repair must not have penetrated all the way. Sure enough, the bank exploded. After seeing how good the natural one looked, I was excited to check out the red one. I still have the other half... Sierra. I did not prep that half, will now though.
Color: Red color penetrated all the way... a couple of the "eyes" showed as natural color when I got turning (before destruction).
Finishing: CA + BLO... I am getting it down real good now. Looks like plastic. Love it.
Summary: I like the product... wish the red one didn't blow up on me. Going to do the other half and see how it looks. The natural color is awesome. Even my mother in law loved it (and she only like the acrylics I have done). Oh, and the smell is not like anything I have turned before... really weird. Probably should have used a mask.
Thanks you Constant! Please let me know if you have any questions.
Sorry about the quality of the photos... I will take better ones when I get the photo tent set back up. These photos really stink... but it shows that I did turn the blank.")
Thanks!
Jon
Constant sent me a couple blanks to test: Stabilized Buckeye Burl - Natural & Red
For the record, I am a novice turner. Only been turning for a little while and have done some PR blanks (from Exotic), Woodcraft's acrylic blanks, and a lot of different exotic woods. This is my first experience with stabilized wood.
Out of the package: very nice, very square.
Cutting the blank: I use a bandsaw to cut the blanks and didn't feel much difference between these blanks and acrylic and wood blanks. For the record, I prepped some acrylic blanks from Woodcraft, some purple heart and the test blanks from Constant.
Drilling: easier than the acrylic, the waste was almost powdery (like saw dust). Since I have never turned a stabilized wood before, my expectations were that the blank would be more acrylic like than wood - not the case here. Minor pitting and voids in the drilled holes. Filled with CA and re-drilled later. I used 5 min epoxy to glue the tubes.
Trimming: used a barrel trimmer in a jacobs chuck on the lathe. This is my new favorite way of trimming blanks. The blanks trimmed up nicely... more acrylic like than the PH. I noticed some small voids in the wood and a large crack on the red one. I filled them with CA and allowed them to set.
Turning: I started with a natural colored blanks and started with the roughing gouge. (I turned an acrylic and PH blank first to sense the difference). First few passes to knock off the edges and away I went. Turned like wood... very fast. I was able to get it to shape and final size quickly... didn't even need to use the skew. I used my normal wood finish (CA and BLO).
Remember above I mentioned a crack I saw when trimming the red one? Well... my CA repair must not have penetrated all the way. Sure enough, the bank exploded. After seeing how good the natural one looked, I was excited to check out the red one. I still have the other half... Sierra. I did not prep that half, will now though.
Color: Red color penetrated all the way... a couple of the "eyes" showed as natural color when I got turning (before destruction).
Finishing: CA + BLO... I am getting it down real good now. Looks like plastic. Love it.
Summary: I like the product... wish the red one didn't blow up on me. Going to do the other half and see how it looks. The natural color is awesome. Even my mother in law loved it (and she only like the acrylics I have done). Oh, and the smell is not like anything I have turned before... really weird. Probably should have used a mask.
Thanks you Constant! Please let me know if you have any questions.
Sorry about the quality of the photos... I will take better ones when I get the photo tent set back up. These photos really stink... but it shows that I did turn the blank.
Thanks!
Jon
Attachments

Last edited: