Closed-end fountain pen

Signed-In Members Don't See This Ad
See more from fotographik

fotographik

Member
Joined
Mar 25, 2010
Messages
39
Location
Gatineau, QC
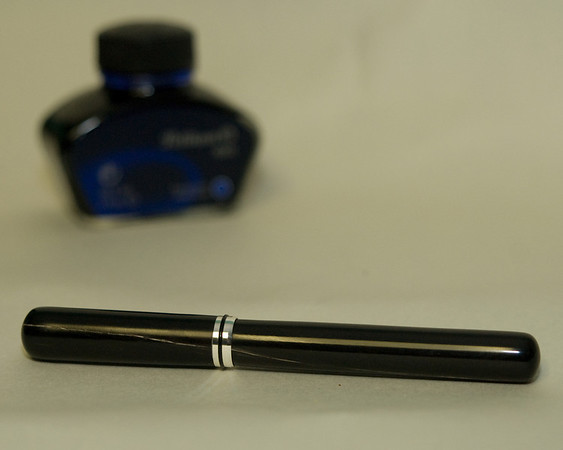
Decided to make closed end fountain pen for personnal use.
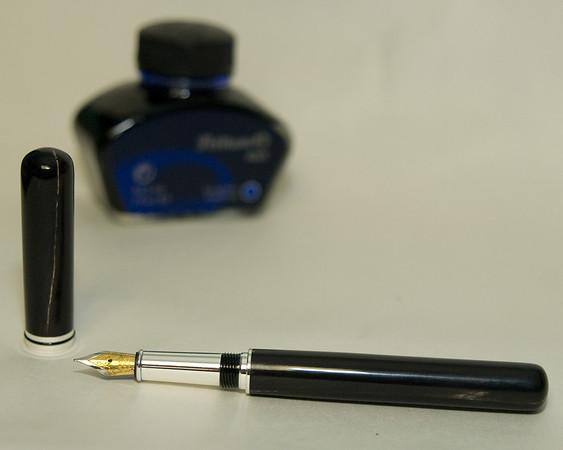
The parts are from a Sterling Silver Baron kit while the blank is Water Buffalo horn.
C&C appreciated.
1114166103_Cp9Yv-M.jpg


1114166617_QZcWn-M.jpg
 
Signed-In Members Don't See This Ad
As usual, I can't find anything to criticize here. That's really nice. Pretty slick combo. Looks quite high dollar. I would NOT be ahsmed of showing that off at all.
 
I mean every word. Even the misspelled one. I hope my Dad walks me through making stuff like that sometime soon. I'm still working on basics on a small mountain of slimlines and enjoying the bejeezuz out of it.
 
I mean every word. Even the misspelled one. I hope my Dad walks me through making stuff like that sometime soon. I'm still working on basics on a small mountain of slimlines and enjoying the bejeezuz out of it.

I'm sure he will...it's nice that you and your dad can enjoy this pastime together. Keep on turning!
 
You ain't whistling Dixie. Dad got me into it, then donated his old equipment when he upgraded almost all of his shop. And then got me a lathe and a bunch of Slims. You can't ask for a better situation.
 
That understatement of excellence is outstanding. That is standing proof that less is more. Congratulations on a beautiful pen.
Charles
 
Looks great!....now the wait to see if it splits or not. Enjoy it's beauty..(while it lasts:wink:..:biggrin:)

Funny you should mention this....I was wondering the same thing when I saw that white "streak" going down the center. So far it's holding up (I even dropped it once already:mad:) but then again, it's only a few days old! Time will tell.
 
Every single horn pen I've made has slowly come apart. The customers who bought them were warned of it but seem to like the fact the horn is pulling apart. Proof of authenticity kind of thing. I asked them to keep me up to date on their pens state of disintegration..:biggrin:
 
That's Fantastic work!! Love the idea and execution. Did you put a ca finish over the horn, or is it just polished?

That's about the most difficult to repair design out of perhaps the most frequently repaired materials I can think of. I'm not sure how you plan to go about fixing the cracks when they do show up. All the cape buffalo horn and gemsbok horn pens I've had to fix cracks in have been standard kit designs so I could disassemble them and put them back on the lathe to sand the CA smooth after the repair. A hint for you. If you put a drop of blank ink from a sharpie in the crack it will mask the brass tube but not interfere with the med ca filling and sealing the crack. After the CA sets and you sand the ridge back down smooth, it's almost impossible to see the repair.

Keep us posted on how it holds up, I'd really like to see how it looks after 6 months and/or a year of use.
 
Every single horn pen I've made has slowly come apart. The customers who bought them were warned of it but seem to like the fact the horn is pulling apart. Proof of authenticity kind of thing. I asked them to keep me up to date on their pens state of disintegration..:biggrin:

You've made me paranoid now....I keep looking my pen over to see if I can find a crack!!!:frown: So far...so good....we'll see how long that lasts!:confused:
 
That's Fantastic work!! Love the idea and execution. Did you put a ca finish over the horn, or is it just polished?

That's about the most difficult to repair design out of perhaps the most frequently repaired materials I can think of. I'm not sure how you plan to go about fixing the cracks when they do show up. All the cape buffalo horn and gemsbok horn pens I've had to fix cracks in have been standard kit designs so I could disassemble them and put them back on the lathe to sand the CA smooth after the repair. A hint for you. If you put a drop of blank ink from a sharpie in the crack it will mask the brass tube but not interfere with the med ca filling and sealing the crack. After the CA sets and you sand the ridge back down smooth, it's almost impossible to see the repair.

Keep us posted on how it holds up, I'd really like to see how it looks after 6 months and/or a year of use.

Thanks! As for the finish: Micro Mesh to 12000, polished with plastic polish and, since it was my first time turning horn, I went with the suppliers recommendations and simply put some Shellawax on it even though I never use the stuff on my pens normally.

If cracks do appear, I'll try do disassemble (haven't thought of how yet:confused:) and re-chuck to repair. If that fails....I'll just tear it appart and turn a different blank for it...I hope it does not get to that as I really like the feel of this pen.

Thanks for the sharpie ink tip...it may come in handy.

I'll keep you posted as to the durability of this pen. I'm using it every day so it'll be a good "acid" test for it.
 
If cracks do appear, I'll try do disassemble (haven't thought of how yet:confused:) and re-chuck to repair. If that fails....I'll just tear it appart and turn a different blank for it...I hope it does not get to that as I really like the feel of this pen.

Thanks for the sharpie ink tip...it may come in handy.

Skippy posted a "closed end disassembly tool" a while back, IIRC

Basic concept is to split the head and first couple of inches of a long (like 8 or 9 inch) bolt then turn the head to fit through the threads WHEN COMPRESSED. Once past the threads, release the halves so they catch the ends of the coupler, wedge slightly just below the coupler to hold, then slide on a weight, thread a nut on the far end. hold pen, push weight up to the cap, then slide down hitting the nut. Repeat till pen is disassembled or something breaks. YMMV
 
Back
Top Bottom