
robutacion
Member
Hi peoples,
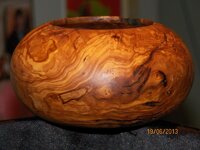
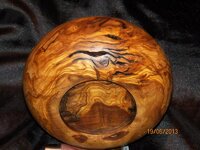
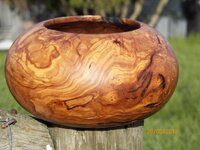
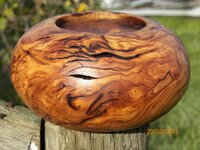
You may remember those large Olive roots that I started processing last year, some pen blanks have already pen put to use on my recently ended "question game/challenge" and other larger pieces are starting to make me itchy to turn and or do something with...!
I had a fairly sized block that I cut square and that I didn't touch with any sealer's, wax or anything, put it in such place that I kept staring at it all the time, well sort of...!
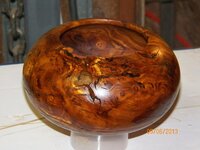
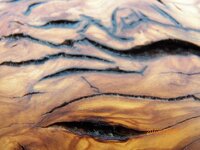
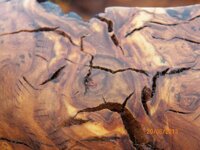
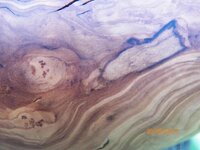
Last Summer was very hot so, my woods got a got drying period with some showing signs of almost ready or ready, in fact. In one of my turning mood days, I grabbed that blank and got turning, I already had a shape and use in mind and that had all to do with the way the wood looked when I cut it from one of the root slabs and how is behaved as it dried, something that was not only expected and wanted and that is, all those natural aged cracks (those with the black edge) and the new stress drying cracks, typical of certain parts of the Olive root when it gets "disturbed"/ chopped into pieces...!
I did not wanted to put anything artificial on this piece, such as resins or fillings of any nature, this is how high figured Olive root should look, I was disappointed that the large openings/cracks shown on the blank before I started working on it, were cut away and the ones inside where not as large as one of my intentions was to put some light inside it so that it would reflect through all those crevasses.
That didn't work as well as I wanted so, I was happy to have still plenty of the grain, burl eyes, colours and all its natural characteristics, by the time I had it turned/shaped as I wanted. I don't call these "bowls" I call them "vessels":wink:
The wood was @ 19%MC when worked on, that for this type of wood is quite good and normal, natural oils will not allow the MC% to get too low, ever so, I will expect some movement for the next few years but nothing too serious or damaging.
To assist the wood to stabilise and to minimise any further stress cracking after the piece was turned, I soaked it twice a day with Fungishield (wood preservative) for a whole 7 days, so much so that the outer surface was starting showing some shine from the saturation of the wood with the dry Fungishield, a quick rub with steel wood, resolved that issue, to which I followed with several coats of natural timber oils called Arganoil (nice smelly stuff)
Natural timber oils, is a much more suitable finish than any hard coats such as varnishes and the like so, ,the wood can move, without showing any cracks on the finish...!
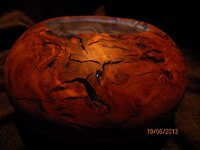
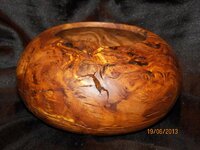
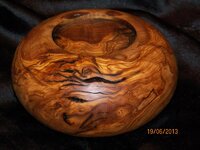
Another disappointment was that, I had specific ideas of how I wanted the pics to look but, for some reason, none of the times/days I tried, gave me even close to what I visualised. I trued during the day in the shade, the very same location where I take most of my pen blanks samples, I tried at night with accessory light and without, I tried during a sunny day with direct sun exposure and in the shade but nothing turned out the way I wanted.
I just could not find a way to get an accurate colour in any of the pics, some aren't too bad but, this piece gave me the $#!ts , after so many pics taken, in a period of a few days so, I cut my losses and stop wasting more time.
This piece will be a gift to the person that allowed me to have the roots so, I hope he likes it...!:wink::biggrin:
Which pics you like the most...???
Cheers
George
You may remember those large Olive roots that I started processing last year, some pen blanks have already pen put to use on my recently ended "question game/challenge" and other larger pieces are starting to make me itchy to turn and or do something with...!
I had a fairly sized block that I cut square and that I didn't touch with any sealer's, wax or anything, put it in such place that I kept staring at it all the time, well sort of...!
Last Summer was very hot so, my woods got a got drying period with some showing signs of almost ready or ready, in fact. In one of my turning mood days, I grabbed that blank and got turning, I already had a shape and use in mind and that had all to do with the way the wood looked when I cut it from one of the root slabs and how is behaved as it dried, something that was not only expected and wanted and that is, all those natural aged cracks (those with the black edge) and the new stress drying cracks, typical of certain parts of the Olive root when it gets "disturbed"/ chopped into pieces...!
I did not wanted to put anything artificial on this piece, such as resins or fillings of any nature, this is how high figured Olive root should look, I was disappointed that the large openings/cracks shown on the blank before I started working on it, were cut away and the ones inside where not as large as one of my intentions was to put some light inside it so that it would reflect through all those crevasses.
That didn't work as well as I wanted so, I was happy to have still plenty of the grain, burl eyes, colours and all its natural characteristics, by the time I had it turned/shaped as I wanted. I don't call these "bowls" I call them "vessels":wink:
The wood was @ 19%MC when worked on, that for this type of wood is quite good and normal, natural oils will not allow the MC% to get too low, ever so, I will expect some movement for the next few years but nothing too serious or damaging.
To assist the wood to stabilise and to minimise any further stress cracking after the piece was turned, I soaked it twice a day with Fungishield (wood preservative) for a whole 7 days, so much so that the outer surface was starting showing some shine from the saturation of the wood with the dry Fungishield, a quick rub with steel wood, resolved that issue, to which I followed with several coats of natural timber oils called Arganoil (nice smelly stuff)
Natural timber oils, is a much more suitable finish than any hard coats such as varnishes and the like so, ,the wood can move, without showing any cracks on the finish...!
Another disappointment was that, I had specific ideas of how I wanted the pics to look but, for some reason, none of the times/days I tried, gave me even close to what I visualised. I trued during the day in the shade, the very same location where I take most of my pen blanks samples, I tried at night with accessory light and without, I tried during a sunny day with direct sun exposure and in the shade but nothing turned out the way I wanted.
I just could not find a way to get an accurate colour in any of the pics, some aren't too bad but, this piece gave me the $#!ts , after so many pics taken, in a period of a few days so, I cut my losses and stop wasting more time.
This piece will be a gift to the person that allowed me to have the roots so, I hope he likes it...!:wink::biggrin:
Which pics you like the most...???
Cheers
George
Attachments
-
 015.JPG63.4 KB · Views: 277
 -
 005.JPG48.9 KB · Views: 202
 -
 008.JPG79.1 KB · Views: 231
 -
 018.JPG67.5 KB · Views: 219
 -
 019.JPG67.3 KB · Views: 227
 -
 021.JPG85 KB · Views: 237
 -
 027.JPG73.4 KB · Views: 229
 -
 028.JPG83.8 KB · Views: 246
 -
 029.JPG65.9 KB · Views: 192
 -
 030.JPG71.8 KB · Views: 270
 -
 031.JPG67.5 KB · Views: 224

 character