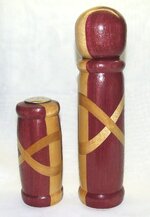
the real problems im having is the knots do not connect or they connect too close and do not show the holes in the knot. I built a jig to make the same cuts but I think my cuts are wrong.
Start with a square blank. Having a square blank helps make sure that the knot is axially centered on the turning.
Number the faces of the blank sequentially - 1, 2, 4, and 4.
Set your miter gage for whatever angle you want to make the cut. The traditional angle is 45deg - but using larger or smaller angles will either expand or compress the knot. Install an auxiliary fence on the miter gage that reaches almost to the saw blade. Then, place the blank against the fence, and using a small clamp, attach a stop block to the auxiliary fence that allows you to return the blank to exactly the same position against the fence for each cut. After setting the angle and installing the stop block, don't make any more changes to the miter gage until after you have completed all four cuts for each of the blanks you are making. The objective is to be absolutely consistent in making those four cuts.
Also, you must make sure that the width of the saw kerf is exactly the same as the thickness of the inlay material.
Start with face 1 of the blank. Mark the end of the blank goes against the stop block. Set the face of the blank against the fence and stop block, and make the first cut. It's easier to do the glue up if you make the depth of the cut about 1/16" shorter than the thickness of the blank (so that the two pieces of the blank remain attached after the cut). Put glue on both sides of the inlay, and using a card, smear glue on both sides of the saw kerf, and then press the inlay into place. Allow the glue to cure. I prefer ordinary yellow glue (Titebond) for this.
Repeat the cut and glue-up with face 3 against the fence and with the marked end against the stop block. After it cures, face 2, and finally face 4. Note that rather than working around the blank, you are working across the blank, and also that you are alwaysYou may need to carefully trim any excess inlay material that protrudes out of the cut - don't do that on the saw. Instead, use a knife or sharp bench chisel to carefully trim away the excess without cutting into the blank. You want to leave the face of the blank fairly smooth so that it will sit squarely on the saw table and against the miter gage fence for subsequent cuts.
After gluing in all four pieces of inlay, you need to drill the hole for the tube. Make sure that you identify the center of the blank, and drill as squarely as you can.