Best Pen Photography Setups

Signed-In Members Don't See This Ad

jrista

Member
Joined
Aug 12, 2021
Messages
2,241
Location
Colorado
I'm relatively new to pen making. I started last year, but only did a little bit before health and lathe problems put me out of commission until about May this year. I'm going to try to start selling the pens I make, and am looking to produce very professional quality pens and pen photos.

I've been doing photography for years, and have a new Canon EOS R5 that I picked up for bird, wildlife, macro and landscape photography. So I know photography in general very well. I've never really done much indoors photography, though, and have never really worked with artificial lighting or flash much or any of that.

I'm curious what people have found as the best setups. I don't necessarily just want a pen on a clear stand...I think some of the best photos I see, at least the ones I like, seem to have nice background and base materials. They also seem to have really great lighting, with soft shading, but still enough specular highlights to show of the pen's shine.

I'm curious what base/background materials people have found work best for their scenes. Also curious how people set up their lighting to get the best shots, at low ISOs and high frame rates, but without blowing out the highlights too much.
 
Signed-In Members Don't See This Ad

sorcerertd

Member
Joined
Sep 30, 2019
Messages
2,701
Location
North Carolina, USA
Well, for what it's worth, here is my simple solution photo "booth". The backdrop consists of foam craft board, black on one side and white on the other, though I usually have a cloth draped over it anyway. I use pieces of cardboard with aluminum foil on them for reflectors. The bubble wrap goes right under the cloth to help keep pens from rolling when I put the clips facing up or to help the tips stay put when leaned against something. It can easily be folded up and put away, too. I'd love to do something better eventually, but since this is effective, moving up is not a top priority. A camera is more of a priority for me than a booth. I am just using my phone and have problems are with depth of field and white balancing that you won't run into with your camera. Funny how I was able to take a lot better pictures with my Samsung Galaxy Note 9 than I do with the Note 20. The bottom pic is from that setup using my old phone. I do use some props, too, but don't want to distract from the object of the picture. It does at least give you an idea of how well the lighting and backdrop work, though.

Don't mind the mess. This is a craft/utility/whatever room that makes it look like hoarders live here.

photobooth.jpg

20210301_115643.jpg

jr.mal.ant.br.jpg
 

jrista

Member
Joined
Aug 12, 2021
Messages
2,241
Location
Colorado
Well, for what it's worth, here is my simple solution photo "booth". The backdrop consists of foam craft board, black on one side and white on the other, though I usually have a cloth draped over it anyway. I use pieces of cardboard with aluminum foil on them for reflectors. The bubble wrap goes right under the cloth to help keep pens from rolling when I put the clips facing up or to help the tips stay put when leaned against something. It can easily be folded up and put away, too. I'd love to do something better eventually, but since this is effective, moving up is not a top priority. A camera is more of a priority for me than a booth. I am just using my phone and have problems are with depth of field and white balancing that you won't run into with your camera. Funny how I was able to take a lot better pictures with my Samsung Galaxy Note 9 than I do with the Note 20. The bottom pic is from that setup using my old phone. I do use some props, too, but don't want to distract from the object of the picture. It does at least give you an idea of how well the lighting and backdrop work, though.

Don't mind the mess. This is a craft/utility/whatever room that makes it look like hoarders live here.

Thanks for the info, Todd! The bubble wrap is a great idea...I was having problems keeping my pens still earlier when trying to figure out a setup.

I am curious, what is that light you have there? The one with the mount dog cover? Is that really just it, a bulb with a mount dog cover? Or is there also something diffusing the light?

What a beautiful pen!! Mind if I ask, if that uses a kit, what kit was it? Also, what blank was that...the upper part, with those contrasting curves, is just wonderful!!!
 

sorcerertd

Member
Joined
Sep 30, 2019
Messages
2,701
Location
North Carolina, USA
I am curious, what is that light you have there?
That's a softbox. This one to be exact. There are quite a few of different (and strange) names that are all about the same thing.

I am considering buying one with a boom so I don't have the tripod/stand in the way. Just mentioning it as something to think about if you decide to get something like that. People in reviews complain about the plastic parts breaking on those, but I am pretty sure they just don't understand that it doesn't have to be super tight, just properly balanced with the right amount of ballast.

What a beautiful pen!! Mind if I ask, if that uses a kit, what kit was it? Also, what blank was that...the upper part, with those contrasting curves, is just wonderful!!!
Thank you. The wood is Brown Mallee burl on a Jr. George kit.

By the way, I use bubble wrap by my assembly station, too. I really hate it when the parts roll away. They always go under the workbench, just far enough back to be a pain to reach. I usually have a foam tray (from meat packaging) handy, too.
 

jrista

Member
Joined
Aug 12, 2021
Messages
2,241
Location
Colorado
That's a softbox. This one to be exact. There are quite a few of different (and strange) names that are all about the same thing.

I am considering buying one with a boom so I don't have the tripod/stand in the way. Just mentioning it as something to think about if you decide to get something like that. People in reviews complain about the plastic parts breaking on those, but I am pretty sure they just don't understand that it doesn't have to be super tight, just properly balanced with the right amount of ballast.


Thank you. The wood is Brown Mallee burl on a Jr. George kit.

By the way, I use bubble wrap by my assembly station, too. I really hate it when the parts roll away. They always go under the workbench, just far enough back to be a pain to reach. I usually have a foam tray (from meat packaging) handy, too.

Thanks for the link on the softbox.

Really like that kit. I may have to get some of those.

I hear ya about things rolling just too far away! Every time, it seems! :p I tend to have a microfiber cloth at my assembly station, where I've rolled it up a couple layers at the edge so nothing can roll off the table. Even so, there is always that one thing that will just bounce its way off the table regardless... LOL
 

leehljp

Member Liaison
Joined
Feb 6, 2005
Messages
9,329
Location
Tunica, Mississippi,
I would use 5000K LED lights. 4000K can work but the colors jump out at 5000K. It is like outside in daylight. This also will bring out flaws better that you can only see outside in daylight. Very helpful.

With 4000K and less, tints, hues etc are not as noticeable. I love working with bloodwood and holly. Some oils will make holly look like ivory and it is not as noticeable in 4000K and less, but it is noticeable outside in daylight and under 5000K LED. For bloodwood, it is a beautiful maroon-ish red outdoors and under strong 5000K lighting. But finish them off with an oil or wax finish and the bloodwood will look good in lesser lights but once outside in daylight or under 5000K, a hint of orange-ish tint will be visible.

This is not to overpower and wash out the photo but to bring out the true colors.
 

jrista

Member
Joined
Aug 12, 2021
Messages
2,241
Location
Colorado
I would use 5000K LED lights. 4000K can work but the colors jump out at 5000K. It is like outside in daylight. This also will bring out flaws better that you can only see outside in daylight. Very helpful.

With 4000K and less, tints, hues etc are not as noticeable. I love working with bloodwood and holly. Some oils will make holly look like ivory and it is not as noticeable in 4000K and less, but it is noticeable outside in daylight and under 5000K LED. For bloodwood, it is a beautiful maroon-ish red outdoors and under strong 5000K lighting. But finish them off with an oil or wax finish and the bloodwood will look good in lesser lights but once outside in daylight or under 5000K, a hint of orange-ish tint will be visible.

This is not to overpower and wash out the photo but to bring out the true colors.

Yeah, I would agree here... I would actually say around 5600K would be more optimally direct-sunlight balanced (neutral white to maybe slightly warm-white). For daylight balanced (i.e. accounting for the blue sky as well as direct sunlight, so a cooler white) I think you would want 6500K?

I'm curious, though, about LED lights...they are usually made either with a yellow phosphor and a blue filter, so they usually have very poor spectrum coverage (and a strong bluer emission). And RGB LEDs emit in bands of blue, green and red, so while they can often give better "white" light, they still don't usually have optimal spectrum coverage. But this is my knowledge about photography lighting from some years ago...

Are there LEDs these days that have better coverage across the full visible spectrum? I remember...oh, 8 years ago or so, you could get these High CRI bulbs (which were usually CFL IIRC) that would emit light broadly across the full visible spectrum, and their spectral power distributions were more consistent and higher across the spectrum, like sunlight/daylight.
 

leehljp

Member Liaison
Joined
Feb 6, 2005
Messages
9,329
Location
Tunica, Mississippi,
Yeah, I would agree here... I would actually say around 5600K would be more optimally direct-sunlight balanced (neutral white to maybe slightly warm-white). For daylight balanced (i.e. accounting for the blue sky as well as direct sunlight, so a cooler white) I think you would want 6500K?

I'm curious, though, about LED lights...they are usually made either with a yellow phosphor and a blue filter, so they usually have very poor spectrum coverage (and a strong bluer emission). And RGB LEDs emit in bands of blue, green and red, so while they can often give better "white" light, they still don't usually have optimal spectrum coverage. But this is my knowledge about photography lighting from some years ago...

Are there LEDs these days that have better coverage across the full visible spectrum? I remember...oh, 8 years ago or so, you could get these High CRI bulbs (which were usually CFL IIRC) that would emit light broadly across the full visible spectrum, and their spectral power distributions were more consistent and higher across the spectrum, like sunlight/daylight.
You are bringing up something that I have long suspected but do not have the means to verify. I lived in Japan from '86 to 2011. IN the last 5 years in Japan, I started using LED lights all around (house and shop) and the ones I had there were similar to ones that I bought when I returned home, but I noticed a shift in both color and numerical number from what I used in Japan and what I started using initially when I returned to the USA. Back then 5000K was like 6000K+ with a blue purple tint or hue or what ever., but in the last 8 or 9 years, 5000K became more white and lost the bluish purple tint. It wasn't just me, but my wife also complained of the 5000K back 10 years ago for the color, but now 5000K is fine to us.

I don't have the technical knowledge nor have I been educated in that aspect of lighting for great photos, but I do know from a layman's experience what makes for overall good lighting for picts. My early photos for this forum looked yellowish of off and then I learned what the best visual color of light made for the best overall picts - after I took a few pictures of pens outside. Then I started experimenting with sun, shade and overcast photos and in white photo tents outside.
 

foursquare

Member
Joined
Oct 12, 2019
Messages
10
Location
Ontario Canada
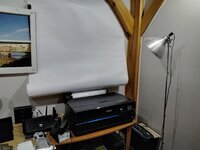
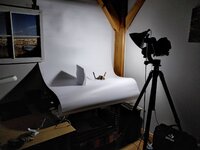
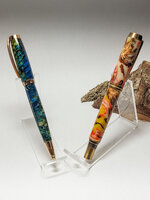
Here is my setup. I wanted something I could use to photograph all my turnings including bowls, hollow forms, boxes, and pens. I bought a large white background that I leave hanging and roll the bottom out of the way when not in use. In use, I roll it out on top of my printer, and I am good to go. I prefer to shoot in the late evening so I can control the light. I use a 5000K led flood lamp and add white paper or card stock as needed to reflect the light. I also shoot with a Canon R5, and post process with Lightroom. I usually add a graduated filter in post to yield a dark background at the top of the photo that fades to white at the bottom. I've attached an example.

IMG_20210816_203312.jpgIMG_20210816_203043.jpg20210810_111807.jpg
 

jrista

Member
Joined
Aug 12, 2021
Messages
2,241
Location
Colorado
You are bringing up something that I have long suspected but do not have the means to verify. I lived in Japan from '86 to 2011. IN the last 5 years in Japan, I started using LED lights all around (house and shop) and the ones I had there were similar to ones that I bought when I returned home, but I noticed a shift in both color and numerical number from what I used in Japan and what I started using initially when I returned to the USA. Back then 5000K was like 6000K+ with a blue purple tint or hue or what ever., but in the last 8 or 9 years, 5000K became more white and lost the bluish purple tint. It wasn't just me, but my wife also complained of the 5000K back 10 years ago for the color, but now 5000K is fine to us.

I don't have the technical knowledge nor have I been educated in that aspect of lighting for great photos, but I do know from a layman's experience what makes for overall good lighting for picts. My early photos for this forum looked yellowish of off and then I learned what the best visual color of light made for the best overall picts - after I took a few pictures of pens outside. Then I started experimenting with sun, shade and overcast photos and in white photo tents outside.

Thanks for the insights, Hank. Sounds like LED lights have improved over time. I'll have to look into it more. Looking around for high CRI bulbs, the only real options seem to be LEDs now. I've even seen some 95 CRI ones...I'm honestly skeptical, given the way LED bulbs are designed, that they could reach that high of a CRI. A 95 basically means the bulbs are covering 95% of the spectrum of light the sun emits. Problem is, there is spectral distribution, and spectral power, and while the distribution may be sufficient, if the power in some parts of the spectrum is low, then you would still have color shift....

I need to learn more about modern LED lighting.
 

jrista

Member
Joined
Aug 12, 2021
Messages
2,241
Location
Colorado
Here is my setup. I wanted something I could use to photograph all my turnings including bowls, hollow forms, boxes, and pens. I bought a large white background that I leave hanging and roll the bottom out of the way when not in use. In use, I roll it out on top of my printer, and I am good to go. I prefer to shoot in the late evening so I can control the light. I use a 5000K led flood lamp and add white paper or card stock as needed to reflect the light. I also shoot with a Canon R5, and post process with Lightroom. I usually add a graduated filter in post to yield a dark background at the top of the photo that fades to white at the bottom. I've attached an example.

View attachment 314949View attachment 314950View attachment 314951

Very nice. I like the little makeshift fill light reflector. ;)

I'm curious, what is your rollout backdrop made of? Is it just a roll of paper?
 

foursquare

Member
Joined
Oct 12, 2019
Messages
10
Location
Ontario Canada
Very nice. I like the little makeshift fill light reflector. ;)

I'm curious, what is your rollout backdrop made of? Is it just a roll of paper?
It is made of pvc plastic. Shiney on one side and matte on the other. It is quite large I would guess 3 ft x 5 ft. Here is the one I bought https://www.amazon.ca/gp/product/B01EUSKEQ2/ref=ppx_yo_dt_b_asin_title_o00_s01?ie=UTF8&psc=1

Another trick I use is to take multiple shots with the focus on different parts of the object, then use focus stacking in Photoshop. This yields a picture that is fully in focus front to back. I don't often need it with pens, but bowls almost always benefit from this.
 

jttheclockman

Member
Joined
Feb 22, 2005
Messages
19,145
Location
NJ, USA.
There is no such thing as BEST but there are many ways to get the job done and each of us have ours. I know I have changed mine many times over the years and now I just set up a sheet and shine a bunch of lights on the pens. You can check my photo album out here and see some of my pens.

If i may though direct you to the library here and you can check out a few good articles written about this over the years that may interest you. Here are 2 of them

https://www.penturners.org/resources/pen-photography.260/

https://www.penturners.org/resources/pen-photography-concept-and-practice.261/
 

jrista

Member
Joined
Aug 12, 2021
Messages
2,241
Location
Colorado
There is no such thing as BEST but there are many ways to get the job done and each of us have ours. I know I have changed mine many times over the years and now I just set up a sheet and shine a bunch of lights on the pens. You can check my photo album out here and see some of my pens.

If i may though direct you to the library here and you can check out a few good articles written about this over the years that may interest you. Here are 2 of them

https://www.penturners.org/resources/pen-photography.260/

https://www.penturners.org/resources/pen-photography-concept-and-practice.261/

Thank you for the links. You just helped me discover the resources section of this site...WOW. So much content here! Love it!

There are some truly talented pen makers here. Really love it. Its clear that pen photography skill is a key part of making professional quality pens. There are some excellent pen photographers here, too!
 

Sylvanite

Member
Joined
Jul 18, 2006
Messages
3,113
Location
Hillsborough, North Carolina, USA.
My early photos for this forum looked yellowish of off and then I learned what the best visual color of light made for the best overall picts - after I took a few pictures of pens outside. Then I started experimenting with sun, shade and overcast photos and in white photo tents outside.
This yellow tint is one of the most common technical problems with pen photos I see posted on the IAP. The cause is photographing under incandescent or "warm" tinted fluorescent or LED bulbs when the camera thinks you are photographing in daylight. One fix (as Hank notes) is to move out into sunlight. Another is to tell the camera that you are using a light source with a different tint. This is known as setting the "white balance". Most digital cameras have a white balance setting. Select the matching light source (or take a custom reading) and the colors should come out right. See Photography Basics - White Balance for more information.

Before you go out and buy new 5000K or 5500K light bulbs, try setting the white balance on your camera. You'll most likely find that you can fix the problem without spending any money.

Just one thing... Whatever lights you use, make sure they are all the same tone (i.e. color temperature). If you have different color lights, you're never going to get an even color rendition.

I hope that helps,
Eric
 

Sylvanite

Member
Joined
Jul 18, 2006
Messages
3,113
Location
Hillsborough, North Carolina, USA.
There is no such thing as BEST but there are many ways to get the job done and each of us have ours.
John is absolutely correct here. There is no single "best" setup.

The major challenge in pen photography is that pens typically have reflective metallic components that are either cylindrical (centerbands) or conical (nosecones) in shape. Getting those parts evenly lit is an issue not faced in most photography situations and takes some thought. See https://www.penturners.org/threads/photography-basics-why-use-a-light-tent.121808/ for some illustrative photos.

The key to solving this problem is for light to strike the pen from a wide range of angles, so that these surfaces are fully lit. In photography terms, this is known as a "large light". There are many solutions, including:
  1. Photograph outdoors on an overcast day. The entire sky becomes the light source.
  2. Photograph indoors in a room with white ceiling and walls. Point your lights at the walls and let them illuminate the subject. Some professional photographers paint their studio walls white for this reason.
  3. Strategically drape some white sheets around the pen and point your lights at them (basically a smaller version of the above).
  4. Use a softbox and reflectors, as shown at https://www.penturners.org/threads/polarization-and-glare.133334/page-2#post-1798673 (and by others in this thread).
  5. Use a light tent, as shown in https://www.penturners.org/threads/polarization-and-glare.133334/page-2#post-1801843. Light tents are simple and effective. They are also relatively inexpensive -- you can even construct one for yourself. I do NOT recommend a light tent with opaque walls and internal LED lights (which is all the rage right now). In my opinion, the internal lights defeat the purpose of the light tent. Stick to one with translucent white walls that you illuminate from the outside.
  6. Build a custom enclosure with diffusers and reflectors, such as the one shown in https://www.penturners.org/threads/using-a-black-background.130593/. This is the most complicated solution of the bunch, but also the most versatile one.
In short, a pen photography setup can be as simple or complex (and as cheap or expensive) as you like. Most of my pen photos were taken with a light tent and two inexpensive CFL lights. You can see an example at https://www.penturners.org/threads/pen-photography-putting-concept-into-practice.128555/.

Once you have the lighting worked out, you can move on to composition.

I hope that helps,
Eric
 

leehljp

Member Liaison
Joined
Feb 6, 2005
Messages
9,329
Location
Tunica, Mississippi,
John is absolutely correct here. There is no single "best" setup.

The major challenge in pen photography is that pens typically have reflective metallic components that are either cylindrical (centerbands) or conical (nosecones) in shape. Getting those parts evenly lit is an issue not faced in most photography situations and takes some thought. See https://www.penturners.org/threads/photography-basics-why-use-a-light-tent.121808/ for some illustrative photos.

Eric

Eric, I have always appreciated your input. You have a knack for bringing the technical to the vernacular and still be accurate or correct! Now, the reason I quoted you was to get your reply on another subject - background color!

I know that a black background accentuates many photos well. Black is good, IF done right. But I rarely see a black background of pen photos that doesn't suck all of the light out of the photo and makes the edges of an otherwise beautiful pen hard to see because of its own shadows.

So, my question is how to have a black background and still accentuate the whole pen? Is it possible? (BTW, this does fit into the OP's first question in the last paragraph.)
 

jrista

Member
Joined
Aug 12, 2021
Messages
2,241
Location
Colorado
This yellow tint is one of the most common technical problems with pen photos I see posted on the IAP. The cause is photographing under incandescent or "warm" tinted fluorescent or LED bulbs when the camera thinks you are photographing in daylight. One fix (as Hank notes) is to move out into sunlight. Another is to tell the camera that you are using a light source with a different tint. This is known as setting the "white balance". Most digital cameras have a white balance setting. Select the matching light source (or take a custom reading) and the colors should come out right. See Photography Basics - White Balance for more information.

Before you go out and buy new 5000K or 5500K light bulbs, try setting the white balance on your camera. You'll most likely find that you can fix the problem without spending any money.

Just one thing... Whatever lights you use, make sure they are all the same tone (i.e. color temperature). If you have different color lights, you're never going to get an even color rendition.

I hope that helps,
Eric

Thanks for the tips, Eric. Adjustable white balance is great, and it can indeed help correct color casts. The ability to adjust white balance after the fact is one of the great benefits of digital photography and RAW. I'm always fiddling with the white balance setting to try and match it to the environment.

That said, I wouldn't consider white balance to be a complete replacement for good lighting. The kind of light you use affects what is reflected from your objects. A very warm light with low blue emissions, for example, may not bring out the most out of bluer objects, as those objects may simply not be receiving enough or the right wavelengths of photons to fully express those details. White balance adjustment can only work with what was captured, and what you capture is dependent on how the scene is illuminated.
 

jrista

Member
Joined
Aug 12, 2021
Messages
2,241
Location
Colorado
John is absolutely correct here. There is no single "best" setup.

The major challenge in pen photography is that pens typically have reflective metallic components that are either cylindrical (centerbands) or conical (nosecones) in shape. Getting those parts evenly lit is an issue not faced in most photography situations and takes some thought. See https://www.penturners.org/threads/photography-basics-why-use-a-light-tent.121808/ for some illustrative photos.

The key to solving this problem is for light to strike the pen from a wide range of angles, so that these surfaces are fully lit. In photography terms, this is known as a "large light". There are many solutions, including:
  1. Photograph outdoors on an overcast day. The entire sky becomes the light source.
  2. Photograph indoors in a room with white ceiling and walls. Point your lights at the walls and let them illuminate the subject. Some professional photographers paint their studio walls white for this reason.
  3. Strategically drape some white sheets around the pen and point your lights at them (basically a smaller version of the above).
  4. Use a softbox and reflectors, as shown at https://www.penturners.org/threads/polarization-and-glare.133334/page-2#post-1798673 (and by others in this thread).
  5. Use a light tent, as shown in https://www.penturners.org/threads/polarization-and-glare.133334/page-2#post-1801843. Light tents are simple and effective. They are also relatively inexpensive -- you can even construct one for yourself. I do NOT recommend a light tent with opaque walls and internal LED lights (which is all the rage right now). In my opinion, the internal lights defeat the purpose of the light tent. Stick to one with translucent white walls that you illuminate from the outside.
  6. Build a custom enclosure with diffusers and reflectors, such as the one shown in https://www.penturners.org/threads/using-a-black-background.130593/. This is the most complicated solution of the bunch, but also the most versatile one.
In short, a pen photography setup can be as simple or complex (and as cheap or expensive) as you like. Most of my pen photos were taken with a light tent and two inexpensive CFL lights. You can see an example at https://www.penturners.org/threads/pen-photography-putting-concept-into-practice.128555/.

Once you have the lighting worked out, you can move on to composition.

I hope that helps,
Eric

Thanks for the details and links.

I can tell in your photos how the softer light does soften the highlights on the pens. Your highlights tend to be broader and fainter than what I usually get (which are thin, bright, blown out lines of white). I think I agree with you that a translucent light tent would be better...it would help diffuse and soften the light.
 

Sylvanite

Member
Joined
Jul 18, 2006
Messages
3,113
Location
Hillsborough, North Carolina, USA.
So, my question is how to have a black background and still accentuate the whole pen? Is it possible?
Hank,

A common issue with pens photographed against a dark (especially black) background is that the areas of the metal components that reflect the background also turn out dark (or black) - becoming nearly invisible. In other words, the pen loses edge definition. What you need to do to fix this problem is put light (or white) reflectors just out of frame where they can illuminate the edges of the pen. This takes attention to detail and careful placement - which isn't always easy.

You can see an example at https://www.penturners.org/threads/using-a-black-background.130593/.
 

leehljp

Member Liaison
Joined
Feb 6, 2005
Messages
9,329
Location
Tunica, Mississippi,
Hank,

A common issue with pens photographed against a dark (especially black) background is that the areas of the metal components that reflect the background also turn out dark (or black) - becoming nearly invisible. In other words, the pen loses edge definition. What you need to do to fix this problem is put light (or white) reflectors just out of frame where they can illuminate the edges of the pen. This takes attention to detail and careful placement - which isn't always easy.

You can see an example at https://www.penturners.org/threads/using-a-black-background.130593/.
Thanks! That was what I was looking for. Perfect! I appreciate this explanation and the example from back in 2015 that I missed!
 

Sylvanite

Member
Joined
Jul 18, 2006
Messages
3,113
Location
Hillsborough, North Carolina, USA.
The kind of light you use affects what is reflected from your objects. A very warm light with low blue emissions, for example, may not bring out the most out of bluer objects, as those objects may simply not be receiving enough or the right wavelengths of photons to fully express those details.
Well, yes and no.

It is true that if you shine a blue light on a red object, it will not shine red (it won't shine at all). You DO need more than one wavelength of light to express all the visible colors.

You DO NOT, however, need ALL the wavelengths of the visible light spectrum to produce all the visible colors. You only need three: Red, Green, and Blue. Think about it -- your computer monitor (or whatever device you are using to view this post) only emits three colors yet (by mixing them) it produces a broad color gamut. That wouldn't be possible if the full spectrum was required. Although equal amounts of red, green, and blue in your white light is optimal, it is not really necessary. Modern digital cameras capture way more shades of each than can be represented in a JPG file. Any light source from 2500K to 7500K (quite yellow to quite blue) should be correctable back to neutral.

Color grading en toto is a very complex and complicated subject that is well beyond the scope of this forum, but for the purpose of posting photos in the SOYP forum, it doesn't need to be. Whatever the color temperature of your studio lighting, if the pen colors look ok in person, then (with proper white balance) they should look the same in your photograph. If not, the problem is with the photograph, not the light.

Regards,
Eric
 

jrista

Member
Joined
Aug 12, 2021
Messages
2,241
Location
Colorado
Well, yes and no.

It is true that if you shine a blue light on a red object, it will not shine red (it won't shine at all). You DO need more than one wavelength of light to express all the visible colors.

You DO NOT, however, need ALL the wavelengths of the visible light spectrum to produce all the visible colors. You only need three: Red, Green, and Blue. Think about it -- your computer monitor (or whatever device you are using to view this post) only emits three colors yet (by mixing them) it produces a broad color gamut. That wouldn't be possible if the full spectrum was required. Although equal amounts of red, green, and blue in your white light is optimal, it is not really necessary. Modern digital cameras capture way more shades of each than can be represented in a JPG file. Any light source from 2500K to 7500K (quite yellow to quite blue) should be correctable back to neutral.

Color grading en toto is a very complex and complicated subject that is well beyond the scope of this forum, but for the purpose of posting photos in the SOYP forum, it doesn't need to be. Whatever the color temperature of your studio lighting, if the pen colors look ok in person, then (with proper white balance) they should look the same in your photograph. If not, the problem is with the photograph, not the light.

Regards,
Eric
I understand the additive color blending model with RGB. I was thinking more about having enough wavelengths at high enough power in the light source to make sure that the objects reflect all the wavelengths possible. RGB works great on a computer screen, for example, as its not reflecting anything...its simply emitting.

If you have narrow band blue, red and green emissions, you may not be emitting all the light an object can reflect. Now, it was years ago that I was last into lighting, and LED is pretty endemic now. So It may be that things have changed, and that LED lights emit across a broader spectrum, etc. If they are emitting enough signal across the visible spectrum, then you may be right, it may not matter if we are talking about 2500k or 7500k. It used to be that you had some fairly narrow ranges of wavelength where the power was strong, and everywhere else it was very low.
 

Sylvanite

Member
Joined
Jul 18, 2006
Messages
3,113
Location
Hillsborough, North Carolina, USA.
I was thinking more about having enough wavelengths at high enough power in the light source to make sure that the objects reflect all the wavelengths possible... If you have narrow band blue, red and green emissions, you may not be emitting all the light an object can reflect... It used to be that you had some fairly narrow ranges of wavelength where the power was strong, and everywhere else it was very low.
This discussion has been popping up for decades now (e.g. https://www.penturners.org/threads/how-do-you-take-a-good-pic-of-a-purple-pen.76428/) and I admit that 20 years ago, I was making the same argument. I've taken a lot of pen photos under many different lights since then, however, and I've found that I can get good color rendition regardless of the light source - provided I do my part. I still use CFL light bulbs that I bought 25 years ago (probably some of the oldest bulbs in my house) that supposedly have the worst spectral coverage around. They work just fine. I've also photographed under strobe, tungsten, quartz-halogen, and LED lights ranging from 2500K to 5500K - all without color issues. I've come to the conclusion that (at least for the purpose of taking photos to post on the internet) spectral coverage and color rendition index (CRI) claims are mostly marketing hype.

I'll say this again. Look at your pen under whatever lights you currently have. If the colors appear good in person, then there's sufficient spectral coverage for the colors to match in a photograph (using the appropriate white balance). There's no need to go out and buy high CRI light bulbs (nor whatever other specialized lighting systems people say they use). If you can't see your pen's colors under your existing lights - well, you probably want to replace them anyway.

I hope that helps,
Eric
 

sorcerertd

Member
Joined
Sep 30, 2019
Messages
2,701
Location
North Carolina, USA
I don't know how much this adds now that the pros have weighed in here, but since I was editing some pictures and thought of this thread, I figured I'd throw in a pic of the home made reflectors I have been using. There's another one above this to reflect light on the opposite side of the pen from the softbox light.

20210822_130053.jpg
 

jrista

Member
Joined
Aug 12, 2021
Messages
2,241
Location
Colorado
Todd, thank you so much for all the the insights. I really appreciate them. I have a lot of things to explore and experiment with, thanks to this thread.

I really do like your setups. This one looks excellent. I love how well the pen and that journal go together...so wonderful. The pen itself is beautiful. And I can see that the lighting is really good...soft, leaves a good but not harsh shadow, so you can get that proper sense of depth...

I am curious. Is that linen, or some kind of burlap, that you are using for the base/backdrop of your scene?
 

sorcerertd

Member
Joined
Sep 30, 2019
Messages
2,701
Location
North Carolina, USA
Todd, thank you so much for all the the insights. I really appreciate them. I have a lot of things to explore and experiment with, thanks to this thread.

I really do like your setups. This one looks excellent. I love how well the pen and that journal go together...so wonderful. The pen itself is beautiful. And I can see that the lighting is really good...soft, leaves a good but not harsh shadow, so you can get that proper sense of depth...

I am curious. Is that linen, or some kind of burlap, that you are using for the base/backdrop of your scene?

Thanks. I love those journals, and do take some pictures with them open, too. The pages are recycled cotton paper with deckled edges. They are heavy enough to watercolor on, but the sepia tone doesn't lend itself well to that purpose. I do actually use them for journaling.

That fabric definitely has poly in it, since it doesn't wrinkle as badly as linen, but not sure if it's officially considered linen. Wish I could remember what it is called. I just hit JoAnn with a few pens in hand looking for something in a neutral color that would work for them all. If you are looking for something similar, consider trying raw silk. I'm still searching for the right thing to show off grain on very dark woods (like curly katalox) that photograph so terribly with a light background.

It's funny to come back to this thread just now since I just ordered a new softbox with a boom (seriously , like 5 minutes ago) so I don't have to work around the stand. It has a few crappy reviews about the clamps breaking, but I'm guessing it's people not understanding that you don't need to torque them down if you properly ballast the boom. Suppose I'll find out soon enough.
 

jrista

Member
Joined
Aug 12, 2021
Messages
2,241
Location
Colorado
Thanks. I love those journals, and do take some pictures with them open, too. The pages are recycled cotton paper with deckled edges. They are heavy enough to watercolor on, but the sepia tone doesn't lend itself well to that purpose. I do actually use them for journaling.

That fabric definitely has poly in it, since it doesn't wrinkle as badly as linen, but not sure if it's officially considered linen. Wish I could remember what it is called. I just hit JoAnn with a few pens in hand looking for something in a neutral color that would work for them all. If you are looking for something similar, consider trying raw silk. I'm still searching for the right thing to show off grain on very dark woods (like curly katalox) that photograph so terribly with a light background.

It's funny to come back to this thread just now since I just ordered a new softbox with a boom (seriously , like 5 minutes ago) so I don't have to work around the stand. It has a few crappy reviews about the clamps breaking, but I'm guessing it's people not understanding that you don't need to torque them down if you properly ballast the boom. Suppose I'll find out soon enough.
Do you mind me asking, where do you get the journals?
 

jrista

Member
Joined
Aug 12, 2021
Messages
2,241
Location
Colorado
Finally received a light tent and some lighting. I accidentally ordered a light tent that was too big, so I've ordered a smaller one. Hopefully once I can get the lights closer, I'll get better illumination, but here are some initial photos:

Artisan Fountain Pen - Boisenberry Burgundy Gold-1.jpg


Artisan Fountain Pen - Boisenberry Burgundy Gold-2.jpg


Still needs work. I need to iron the backdrop, and improve my lighting more. But this is better than what I started with!

Todd, thank you for the journal link! Love those! Need to work on positioning and angle of the journal and such, but they are excellent props.
 

farmer

Member
Joined
Jun 16, 2012
Messages
807
Location
NV
At least two different kinds of light reflection.
Angle of reflection and polarized light reflection.


Top Bottom