Bakelite suggestions-please add yours

Signed-In Members Don't See This Ad

ed4copies

Local Chapter Manager
Joined
Mar 25, 2005
Messages
24,529
Location
Racine, WI, USA.
Lately we have been receiving a few requests for further info on turning bakelite.

Here are MY observations:

First, Bakelite is about seventy years old - don't treat it like "turning acrylic" you bought from Taiwan.

To cut in half, I have had NO problems, so any saw should work. Be aware it is round, HOLD both halves firmly, so the blade does not grab and snatch the blank from you.

Drilling: THIS is where I have found some potential problems. I recommend drilling the blank vertically. To me, this means use the drill press. Set the drill, so it will stop short of exiting the blank. I drill about a quarter to a half an inch. Then, put cool water in the hole. Drill another half inch, dump the shavings AND the water and refill with cool water. Continue this strategy until you have reached the depth you set (again, you are not drilling THROUGH the blank)

IF you had enough that you can cut off the end and expose the hole, GREAT. IF not, hold the blank up to a light and mark the center of the hole, from the "plugged" side. Take a small drill bit and drill through the end, exposing your larger hole. Using a round file, make this small hole the same diameter as your "tube hole". The drilling is now complete.

OUNCE OF PREVENTION: Dry the inside of the hole, coat the inside with CA (thickness of your choice). This may help hold the material together, and it MAY require that you redrill or use the round file again.
HEAT IS BAD!!!! Do not do anything that creates a hot blank. IF you have used CA, let it sit a couple days, before moving on.

Glue in brass tubes - I use thick CA and let it sit 24 hours - you can do what you wish.

TURNING: They start out round, use a sharp skew (IMO) Take light cuts, even though there is a lot of material to remove. Did I mention these are SEVENTY YEARS old??? DON'T BEAT them. I believe this is causing much of the fracturing - which I have yet to experience.
HOWEVER, I DO stop from time to time. Patience is not my strong suit. I will usually only turn to about an eighth inch from finished on the first "sitting". Then, I finish the pen the next evening-first thing - while I am rested and sharp (as is my skew, I sharpen two before final turning).

SANDING: Remember the 100 grit gouge can be employed - no one sees what you are doing. HOWEVER, go slow so you don't generate heat.

FINISHING: Plastic polish, MicroMesh, for me-Bealle buffer (careful, this is a bad time to let go of the blank and have the buffer propel it across the room).

COMPONENTS: CLEAN your tubes, use that round file again to make them fit - epoxy the components in, if you must. But DON'T use a ton of pressure, this is SEVENTY YEAR OLD plastic, it WILL CRACK!!!


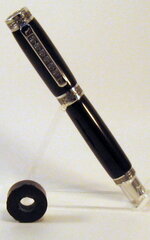
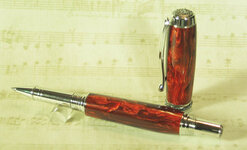
I have made several bakelite pens - almost all full size gents. I broke the first one, since then, they have all been completed. IF you have made pens from Bakelite and have any other "tricks" you would like to add, please do.

DISCLAIMER: Yes, Dawn buys and sells Bakelite. We CANNOT guarantee or warranty that product. It is expensive (relatively speaking). It MAY be fractured in the middle, when we purchase it. We have no way to know that. So, you are purchasing at your own risk.

THANK YOU!!! This thread looks like I am being defensive. This is NOT the case. So far, every communication I have received from unsuccessful attempts has been courteous and has blamed themselves for errors. I HATE SEEING PEOPLE UNSUCCESSFUL!!! This is supposed to be FUN!!!

So, those of you who HAVE made pens of bakelite, did I miss any good tricks???

Thanks for your help.
 
Signed-In Members Don't See This Ad

BRobbins629

Passed Away Dec 28, 2021
In Memoriam
Joined
Mar 8, 2006
Messages
4,037
Location
Richmond, VA, USA.
Bakelite makes great tubeless pens. Especially the translucent ones. I have always drilled mine on the lathe. If you have a metal lathe it reduces the risk of cracking as very light cuts are easy. If you use a kit and tubes, avoid the stress on the blank when pressing in fittings. When fittings are pressed in they actually expand the tube and blank.Take some sandpaper and reduce the diameter of the components to where they slide in with no friction (the opposite is as Ed suggests file out the tube) and glue them in. This works with ivory, ebony and other crack sensitive materials.
 

OKLAHOMAN

Member
Joined
May 17, 2006
Messages
10,228
Location
Costa Rica
Ed, as you know I've bought a number of bakelite blanks from you and Dawn and had 2 crack on me after 3-4 weeks and I know why. Treating it like a 70 year old acrylic, drilling slowly, using SHARP chisles and all of these mean no HEAT. If any of you do outdoor shows in the spring or summer remember please keep them out of the direct sun. Both of mine cracked after or during a show where they were in the sun and to the touch they were HOT very HOT. Most here never had bakelite radios, phones or ever saw insulators made of bakelite but I remember grandma's brown tabletop radio and it had hairline cracks on the top corners and she used to take it outside on her front porch in Tampa to listen to programs. So follow Ed' and Bruces advise but also be carefull at outdoor shows.
 

Dalecamino

Local Chapter Leader
Joined
Jan 2, 2008
Messages
14,572
Location
Indianapolis, In.
Ed , as you know I bought one of the balck bakelite blanks , which was pre-drilled at something like 1/4 " , and loved it . I'm sorry I can't add anymore advise than you have already given . Sharp tool , light cuts and patience are essential , but well worth every minute , IMO . I liked the results , and am anxious to get my next blank .
 

Attachments

  • IMG_0306.JPG
    IMG_0306.JPG
    57.8 KB · Views: 342
  • IMG_0308-1.JPG
    IMG_0308-1.JPG
    62.6 KB · Views: 294

dfurlano

Member
Joined
Oct 8, 2005
Messages
757
Location
Avondale, PA
Using coolant will minimize any breaking. For drills either a low helix or slow spiral drill (like a parabolic) and retracting often to get out the shavings is best. If you can't use coolant a very wet paper towel (not a rag or cloth or anything that will not tear easily) held on the tail stock mounted drill works well. Personally I would not use a tube since you have both an issue with expansion when press fitting and also bakelite moves a lot especially when it gets hot. You would be better off just gluing the parts on to attach them.

Also if you have a wood lathe and a vacuum system a file works wonders. Although a metal lathe is the best way to take off stock. Its hard to get anything to really stick to bakelite and I use a good grade epoxy. You really don't have to do much to finish a part 500-600 grit wet sand paper (don't use dry paper it causes a lot of heat and dust) and then to a buffing wheel.
 

gvpens

Member
Joined
Nov 8, 2007
Messages
50
Location
Walkersville, MD, USA.
I have done a number of Bakelite pens (maybe 15) and, in my case, have had no trouble either drilling or turning them. Bakelite is a thermoset plastic and is relatively heat resistant because of the way it was made. I have not had any issues as far as drilling and heat. Bakelite does not melt, but I understand that the DUST generated by the drilling or turning can be flammable if exposed to a flame. I don't know this from personal experience, but I don't want to find out either.

I NEVER drill completely through the blank. After drilling, I just epoxy the tube in and sand both ends flush with my belt sander. In turning I always use a sharp shew and haven't had problems. A gouge tends to chip the material so I don't use it much. I wet sand to 1000 grit and use micro mesh to 12000 and HUT plastic polish, then RenWax. It finishes to a high gloss.

In my opinion, Bakelite with swirls makes probably the classiest pens ever. The swirls are amazing! You just never know what it will look like until you do the final polishing. Photos just don't do it justice. You have to actually see one in person to really appreciate it's beauty. The fact that it is a vintage material made 60-70 years ago adds to it's desirability and is a great selling point. Vintage Bakelite is expensive but worth every penny in my book.

This is one of my red swirl Bakelite Jr. Statesmen II pens.
 

Attachments

  • Bakelite - red swirl 1.jpg
    Bakelite - red swirl 1.jpg
    54.9 KB · Views: 397

mrburls

Member
Joined
Sep 13, 2008
Messages
1,728
Location
San Antonio Tx.
Okay, I guess I'll put in my two cents on this topic since I've turned a number of bakelite blanks from Ed and Dawn and a few other sources.

To start if the blank is 1 1/4" or larger in diam. I will cut them down on the band saw. Cut about an 1/8" off one side. Then lay that flat side down on table. Cut other two sides and turn over and cut fourth side. Now you are down to about 7/8" to 3/4" square. Next chamfer corners if you have a jig for bandsaw. At this point I will cut blanks to length I want. Now I will put on lathe and turn round to 3/4".

From here I drill on the lathe at about 500 rpm. I use Colt Five Star brad point bits which spits bakelite right out as I am drilling. I also use Pam cooking spray (which someone on this site suggested for making the drilled holes smooth). When bit is full I back out clean off and respray with Pam. It may take 3 or 4 tries till I am through. Yes I said through and have never broke one yet. Blank will get hot but have never cracked one yet. I think that Pan spray really helps. And it will sizzle when you put it on the hot bit. I then soak the blanks in hot Ivory soap for a while and let set to dry to get the pam spray off so epoxy will stick.

At this point you want to paint tubes. Depending on the effect you want will determine the color paint you should use. Another option you have is drilling blanks slightly oversize and refill with alumilite (color of yuor choice again) and redrill blanks for tubes. I find this will avoid any glue lines or bubbles when turning down to final size.

Once tubes in blanks are dry I sand ends to within a 1/16" of tubes (using a belt sander) and then use a sharp pen mill for squaring off blanks.

I turn the blank down to size using a carbide tool. Then dry sand with 150 grit sand paper to final shape. Wet sand the rest of the way with Abralon pads (I love this stuff for all plastics and even stablized woods). Polish and buff.

I have never had a problem with pressing fittings into tubes either. I do file any epoxy out of tubes before turning. So maybe I am slightly removing some of the tube at this point.

Bakelite I think is a beautiful material for turning pens. The color and depths are fantastic. You never know what you will get till turned down thou. What you see on the outside of that 1 1/2" dia. rod may be something totally different when finished. It is probably best used on the larger pens, but with care and planning can be used on Jr. Gent II and Jr. Statesman pens like I like to make with Bakelite.

You asked for it Ed, so there it is. A bit long but that is how I do it :biggrin::biggrin:

Keith "mrburls"
 

ed4copies

Local Chapter Manager
Joined
Mar 25, 2005
Messages
24,529
Location
Racine, WI, USA.
THANKS to everyone!!!

We are all BUYING the Bakelite from the same group of suppliers who are digging it out of their respective attics (so they say).

So I really wanted to expose some of the turners who are having problems to the methods used by those of us who regularly succeed in making these old pieces into pens.

I SINCERELY APPRECIATE your honest answers and your willingness to tell others how it is done.

This is not meant to END this thread. If you have further input, please post.
 

wolftat

Product Reviews Manager
Joined
Aug 19, 2007
Messages
5,377
Location
Fairfield, CT, USA.
After having a few blanks shoot across the shop while buffing, I found an answer for it. I take a transfer punch that is close in size to the tube and put it throught the blank, it now gives me something to hang onto besides just the blank. I haven't had one fly away since.
 

ed4copies

Local Chapter Manager
Joined
Mar 25, 2005
Messages
24,529
Location
Racine, WI, USA.
Neil,

I do a similar thing with wood doweling. Wood won't leave black marks on my buffing wheels.

Of course, if you don't rub your transfer punches on the wheels, YOU won't HAVE that problem ---- but I DID!!!
 
Top Bottom