You are using an out of date browser. It may not display this or other websites correctly.
You should upgrade or use an alternative browser.
You should upgrade or use an alternative browser.
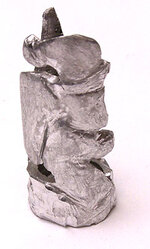
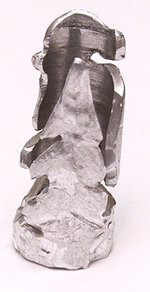
After the overlay thread yesterday...
- Thread starter DurocShark
- Start date
Signed-In Members Don't See This Ad
Signed-In Members Don't See This Ad
btboone
Member
Is that hand ground aluminum you're doing there? Cool stuff.
Interesting use of free style forming, is that electroplate?, melted beer cans? I am envisioning the Piccaso Pen.
hebertjo
Member
Anyone have a link to the other thread for a point of reference?
DurocShark
Member
Anyone have a link to the other thread for a point of reference?
http://www.penturners.org/forum/showthread.php?t=53985
DurocShark
Member
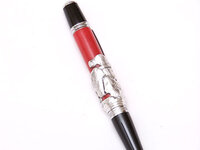
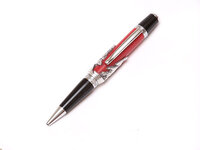
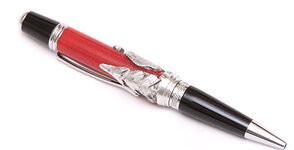
So here it is on the pen.
What I did was take a 5/8" aluminum rod, drill a hole for the sierra tube, then a larger hole for the resin blank. I used my stack of carbide Dremel bits to cut out the design, going for a hammered look.
On the resin blank I cast red sparkle resin in one of those awesome resin saver molds, then turned it B2B. I cut a 1/16" tenon at one end with a skew, tested the overlay fit, then polished.
The overlay is glued on with CA then I used a barrel trimmer to fit the base of the overlay to the tube. Mounted it back up and turned the taper at the bottom.
I'm mostly happy with how it turned out. The weight isn't a problem because it's just above the grip and fits into the pocket made by your hand when writing.
Don't mind the dust in these pics. I was tired last night and completely spaced on cleaning it before taking pics.


gketell
Local Chapter Leader
Very nice!! Thanks for sharing your methodology.
ldb2000
Member
That is just awesome work . Do we have a budding Simpole in our family ?
DurocShark
Member
Simpole?
EDIT: Nevermind. I'm not fully awake yet.
EDIT: Nevermind. I'm not fully awake yet.
Last edited:
NewLondon88
Local Chapter Leader
ok, I'm impressed..
Jgrden
Member
Brilliant.So here it is on the pen.
What I did was take a 5/8" aluminum rod, drill a hole for the sierra tube, then a larger hole for the resin blank. I used my stack of carbide Dremel bits to cut out the design, going for a hammered look.
On the resin blank I cast red sparkle resin in one of those awesome resin saver molds, then turned it B2B. I cut a 1/16" tenon at one end with a skew, tested the overlay fit, then polished.
The overlay is glued on with CA then I used a barrel trimmer to fit the base of the overlay to the tube. Mounted it back up and turned the taper at the bottom.
I'm mostly happy with how it turned out. The weight isn't a problem because it's just above the grip and fits into the pocket made by your hand when writing.
Don't mind the dust in these pics. I was tired last night and completely spaced on cleaning it before taking pics.
View attachment 19851
View attachment 19850
View attachment 19852
Jgrden
Member
Chitman, that is a great idea.
DurocShark
Member
I just discovered that while resin is easier to carve, it looks like crap. It looks cheap. Like the plastic that it is. 
(I was doing a VW Bus pen for a friend. I did the L50 neptune blue resin barrel with white overlay to match his neptune blue and white bus. Looks horrible. Re-doing it in aluminum against the neptune blue.)
(I was doing a VW Bus pen for a friend. I did the L50 neptune blue resin barrel with white overlay to match his neptune blue and white bus. Looks horrible. Re-doing it in aluminum against the neptune blue.)
NewLondon88
Local Chapter Leader
what about aluminum powder in resin?
DurocShark
Member
That would probably work. Don't have any powder. I've made it from copper using a sander, but it's painful (time-wise). I should look to see if I can find any pre-packaged.
NewLondon88
Local Chapter Leader
Alumilite has it on their website.. I might have some left in the shop
NIce work. Try carving in wax and have it cast in silver. Also, if you get one that you really like, then you can make a mold from it (or have it made) and cast multiples.
DurocShark
Member
I plan to do that once I've got the technique down and am doing it for something other than Sierras. 
NewLondon88
Local Chapter Leader
PM me your address and I'll get out some aluminum powder and jeweler's wax
DurocShark
Member
You've already sent me enough. I'll buy some.
Thanks, though. =D
Thanks, though. =D
NewLondon88
Local Chapter Leader
LOL .. ok .. I found a pretty good supplier for stuff like that. I've ordered things
at 4:00 in the afternoon and had them on my doorstep at 11 the next morning!
(helps being only 200 miles, but still..)
http://www.gesswein.com
You might need to make an account to access a lot of it, but there's tons of
toys there. :tongue:
at 4:00 in the afternoon and had them on my doorstep at 11 the next morning!
(helps being only 200 miles, but still..)
http://www.gesswein.com
You might need to make an account to access a lot of it, but there's tons of
toys there. :tongue:
DurocShark
Member
Nice site. Thanks!

