Advice on my jigs...

Signed-In Members Don't See This Ad

Xephius

Member
Joined
Feb 24, 2009
Messages
36
Location
Houston TX, USA
I have several jigs and setups I thought I would run by the community to get advice on. My hope is someone will see a way I can increase my efficiency or make the process easier. I have already learned a great deal about how to better my stabilization process by posting to the lists, I hope to continue that trend. :)

Here is my drilling rig. I ran into several problems in the past. First was using twist bits, they wander off center and made bad cuts in general. I switched to Brad Point for everything I could, and just recently ordered a complete set of metric and standard BP bits. The second problem I had with drilling was the vise. I had tried to use everything from a wood clamp, to a "drill press vise" and always spent a great deal of time adjusting and moving the vise to get it centered. Finally fed up, I went and purchased a 4" cross slide vise from HF. I have been thrilled with the results. I was lucky enough to get a second vise face with the 90 angle holder with the vise. Normally they only come with one, but the sales associate gave me one from the display when I asked about buying a second one.

DrillRig.JPG


Next is my celtic knot jigs. I built them based on some plans given to me by Ed at N. Houston Woodcraft store. I had never done a knot, but he said it was easy, so I gave it a try.

My "slicing" jig. The sliced off bit slides out the back once it is cut. I was worried that it would shoot out like a bullet, but it just slips out and I catch it with a glove.

SlicingJig.JPG


My second slicing jig is setup so I can adjust the with of the laminated layer. I can move the stop with he use of the clamp. You can see a thing slice of wood that has been laminated on both sides with colored wood. It is now the exact thickness of my table saw blade.

SlicingJig2.JPG


Here is the blank cutting jig for knots.

KnotJig.JPG


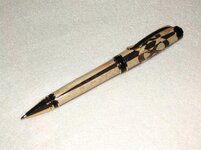
And the results from my first knot...

FirstKnot.JPG

FinishedKnot.JPG


All said, not perfect, but a great learning experience. I have made several others and now have the spacing perfect so everything lines up just right.

Thoughts on improvements?

-X
 
Signed-In Members Don't See This Ad
It looks like you have everything just about set. Unless you have a better looking knot since you said you worked out the spacing thing, I am not too crazy about that knot. It is way to busy in the center. I know what the idea you are after but I think it needs work. Would like to see the others that you said you made. What size blade are you using on your tablesaw??? That looks thinnner than a 3/16"
 
Last edited:
I gotta' say your 'slicing jig' looks like an accident waiting to happen:eek: Check out 'Visexp' website he has a very nice jig that is much safer than what you posted:wink:
 
I gotta' say your 'slicing jig' looks like an accident waiting to happen:eek: Check out 'Visexp' website he has a very nice jig that is much safer than what you posted:wink:

I went to all three of Visexp's websites and did not see any jig information. I have seen his pens before, and they are fantastic. They were my inspiration to get started into lamination. I did intend to rebuild that table saw slicing jig based on another design I found that is much more stable. I will probably build it today.

I would love to learn more about the complicated lamination and the jigs that are required to make them. Any suggestions on where to start?

I will measure my blade thickness today, I don't recall off hand. And yea, that knot is way to "busy". I need to play with the spacing but it was not too bad for my first attempt. I have made up a few blanks for my wife to turn, I will post them up shortly. Still playing with the concept, but I like te way it is going.

-X
 
John

The jig John pointed to on my blog is primarily for cutting thin stripes to width. For ripping thin strips the best jig I have found is the Vacuum Rip Fence made by David Reed Smith. You can see it on his site:

http://www.davidreedsmith.com/Articles/VacuumRipFence/VacuumRipFence.htm

Your jig for the knots looks good, but I would move the clamps. It looks if you moved your sled to far forward you could ruin a blade. You might also want to also look at GaryMcg's tutorial on celtic knots. http://content.penturners.org/articles/2007/celticknot.pdf In it he shows how if you lower your saw blade so that you are not making a through cut it makes alignment of the knot much simpler.

If you are going to continue with segmented pens, and you should as your first knot looks great, then consider drilling on the lathe. You will find it far more accurate. You will need to get a collet chuck, a jacobs chuck and a set of drill centers. Here are some links to what I have. Depending on the size of your lathe spindle you may or may not need an adaptor.

http://www.pennstateind.com/store/LCDOWEL.html
http://www.pennstateind.com/store/TM32.html
http://www.use-enco.com/CGI/INSRIT?PMAKA=369-1810
http://www.amazon.com/PSI-Woodworki...ref=sr_1_1?ie=UTF8&s=hi&qid=1240188513&sr=8-1

Give this celtic knot a try. You will need to build two blanks, mirror image of each other. Each blank consist of 9 pieces 1/4" x 1/4". One blank will be cut up for the knots, the other will be the body of your pen. It's a fun project :smile:
 

Attachments

  • DSCN1911.jpg
    DSCN1911.jpg
    80.1 KB · Views: 596
Keith,

Thanks for the kind words about my work. After reviewing your pens, you are where I hope to be. Your work is very inspirational for me.

As fortune would have it, this morning my wife mentioned to me that she read someone used a aluminum can in an inlay. Got me to thinking, I made about 4 blanks today using can material. Turned out nice. After seeing your pens, I hope to add another dimension using my scroll saw.

On that subject, if you don't mind me asking, do you use a jig of some kind to get the regular circular patterns in your Proteus design? That looks sharp, and I have an idea for a variation on that, but can't see how to cut it, maybe a big hole saw, but that would be troublesome...

I will be building that vacuum jig. Looks sharp, I need to find a cheap supplier of the hardware used in the build out. I normally pickup bits from HF as I can, but they don't have a great deal of knobs and such.

Thanks for the advice on the tail stock drilling. That is what I started with on my lathe. I have a Jet 1236 I think, its big and has adjustable speed and a 2.25-2.5" "throw" tail stock. I have a 4 jaw chuck and a jacobs chuck, and have done plenty of drilling that way. My problems with it are as follows..

1) My wife can't turn while I am doing setup.
2) I don't like the short throw of the tail stock, my table top is not much better, but I plan to get a new press with a 6" throw.
3) I had problems with my 4 jaw chuck either being too loose or too tight, causing blow-outs/cracks/loose holes. Probably that I never spent enough time to get it right.
4) Since I have setup the cross slide vise and started using exclusively Brad Point bits, my error rate has dropped exponentially. I rarely get a off center hole or a slanted hole. This only happens if I don't make sure I lock one of the axis.

I suppose in the end, it is what you find works for you. (provided you are being safe) I am finding luck with the cross-slide, so I don't want to tempt the Fates.

On your suggested pen project. I see how you need two "opposite" complete pen blanks made up, but I am having a hard time seeing how they are segmented together. Be patient with me, I am new to segmentation and a bit thick in the head.

BTW, thanks for taking the time to share.

-X
 
As fortune would have it, this morning my wife mentioned to me that she read someone used a aluminum can in an inlay. Got me to thinking, I made about 4 blanks today using can material. Turned out nice. After seeing your pens, I hope to add another dimension using my scroll saw.

Soda can is often used. The only problem I've found is that, depending on the direction of the inlay, sometimes it is possible to see the color of the label. I made one pen where I could see the red of the Coke label.

On that subject, if you don't mind me asking, do you use a jig of some kind to get the regular circular patterns in your Proteus design? That looks sharp, and I have an idea for a variation on that, but can't see how to cut it, maybe a big hole saw, but that would be troublesome...

I think you may be talking about this pen?

1_JG-RB-BTi-0001.jpg


I call the design "Circles in a Forest". On my website I refer to the Jr. Gent pen kit as Proteus. Sorry for the confusion. I don't use a jig when making this design. The cuts are made freehand on the scroll saw. I'd love to see the variation you have in mind.

On your suggested pen project. I see how you need two "opposite" complete pen blanks made up, but I am having a hard time seeing how they are segmented together. Be patient with me, I am new to segmentation and a bit thick in the head.

The two blanks are built mirror image to each other. Looking at the end of the blank it would look like a tic-tac-toe game. 9 blocks, each 1/4" x 1/4" so the blank is 3/4" x 3/4". On the one blank the walnut is in the center. On the other blank the ash is center.

The first blank is cut at an angle just like you did your celtic knot. (I used an angle closer to 60 degrees, it looks like yours is 45). The second blank is then cut at the exact same angle and then a second cut at the same angle is made so that you end up with an angled slice that is the same thickness of your saw kerf. Cut eight of these angled slices. They are what you will use to form the "knots". From then on it is the same procedure as making a regular celtic knot. I hope that is a bit clearer :smile:
 
Keith,

Thanks for all the information. I will be finishing up my vacuum jig for slicing tomorrow I hope. I learned today that it is very important to have a square, blank to start with otherwise the X's are slightly off from each other. I had thought they would even out in the center, but was wrong. Not the first time, probably not going to be the last.... But, I did make a very nice Kauri, Aluminum and Ebony blank, the wife is going to turn it. She was very excited to see it.

The pen you have shown is beautiful, but not the one I had questions about. Although, it is cool to see that you have done that on a jig saw. Such nice clean even lines.

This is the pen I was curious about...

http://www.syzygypens.com/featured-pens-c-3/syzygy-proteus-p-203

It looks like you have built a jig and used a hole saw to cut the rounds.. I had thought about doing that this after noon, but thought I would ask before I tired it. I may try the hole saw method anyway...

Also, I have been having trouble keeping my aluminum to stay laminated to ebony. Have you had any trouble with that? Also, my ebony tends to stain the lighter wood when sanding... So its lots of careful cleaning, sanding, cleaning, sanding.... Do you have that problem? How do you overcome it?

I will post some pictures later once the finish is done. It will take a day or two for the dipping process. All said, I am very excited about the aluminum in turning... more to come as I figure out how to manifest my ideas....

-X
 
Keith,

Thanks for all the information. I will be finishing up my vacuum jig for slicing tomorrow I hope.

You're welcome. Show us some pictures when you are done with it and let us know how it works.


That design is called Syzygy. Syzygy refers to the perfect alignment of the planets, specifically the sun, the moon and the earth. It occurs at a full moon and a new moon. It is also the word my wife used in a letter to me when she spoke about our first date. Needless to say it didn't take long for me to deceide who I wanted to spend my life with :wink:

I digress :smile: to answer your question the design is also made with a scroll saw, not a hole saw.

Also, I have been having trouble keeping my aluminum to stay laminated to ebony. Have you had any trouble with that?

Yup, not ebony specifically, but wood in general :smile: I sand the aluminum with my random orbital sander and use 5 min epoxy and clamps. Many other people use CA and have success with it, I try avoid CA as it hurts my eyes and I stick myself to everything.

Also, my ebony tends to stain the lighter wood when sanding... So its lots of careful cleaning, sanding, cleaning, sanding.... Do you have that problem? How do you overcome it?

I have not laminated ebony with a lighter wood. It may be the aluminum that is staining. When sanded aluminum stains mosts woods horribly. One solution is to use brass which doesn't stain. The other is to not sand, but you obviously need to get a really nice finish with your skew. Wiping the blank down with the grain between grits with DNA will get rid of some of the aluminum stain.

I will post some pictures later once the finish is done. It will take a day or two for the dipping process. All said, I am very excited about the aluminum in turning... more to come as I figure out how to manifest my ideas....

Looking forward to seeing the pictures.
 
Thanks again for all the details. I will post up some pics. I maybe able to take some "wet" shots of the tuned blanks to give you an idea of how they are going.

I totally dig the name, and usage.

I think I am all out of DNA, I wonder if Vodka will work.... ;)

More to come

-X
 
Back
Top Bottom