I'm not taking pics in the sun. If I were, they come out just fine. It's taking pics inside on a cloudy night with rain and no moon.
LOL, ok take a deep breath and walk away from the camera... LOL.
1st what make and model is your camera?
I will try to look up the manual and tell you what to do.
The more I mess with it, the worse it gets. I got a couple pics that looked good as far as color, but it was all pixelated. I couldn't enlarge the pic.
There are too many things that can be adjusted to correct the same problem. For example, if the pic is dark, it says to adjust ISO, but in another part of the book, it says to adjust the aperture.
Ok here's the thing about ISO, shutter speed and Aperture, The book is correct they all control light. Now let em explain that statement before you get the pitchforks and torches.
ISO controls light by it's sensitivity to light. A low ISO setting say 100 is less sensitive than a setting of 400. Which means you would need more light or in this case Brighter light to shoot the same subject at ISO 100 than you would at ISO 400. SO If I were in a dark room and lit one candle at ISO 100 you would make out the candle and not much else, but at ISO 400 you will see a lot more of the room. There is a trade off though, at ISO 100 the pixelation will be finer whereas the ISO 400 the pixelation becomes more pronounced. Everything in photography has a trade off.
Now Shutter speeds control the amount of light that hits the image processor and the depth of field. A shutter speed of F 2.8 is what is called wide open. At F 2.8 your depth of focus is very narrow, what I mean by that is that you have a point of focus anything in front of and behind that point is your depth of focus. So If i were to use f 2.8 there would be a very narrow depth of focus but If I were to use a higher number say F 16 there would be a lot more in focus in front of and behind the depth of Focus.
So what is the trade off? The trade off is amount of Light for Depth of Focus.
Now Shutter speed, this controls how long the light is allowed to hit the image processor and also control movement of your subject. Have you ever taken a picture and your hands were shaky, well this setting alone would help control that. So If you use a slower shutter speed say 1/4 of a second the duration that the light is allowed to hit the image processor would be longer than say 1/500 of a second. so lets say you're going to take a picture of a horse running, If I were to take the picture at 1/4 of a second the horse would be a complete blur, but if I bumped up my shutter speed to 1/500 of a second the horse would look like it was frozen in it's tracks.
Now lets make this like stirred mud. All of these settings work in conjunction with each other and here's how.
ISO controls sensitivity
Aperture Controls Depth of Field
Shutter Speed controls movement but they all control light. They actually work in hand with each other. You have to figure out prior to taking your pictures what is the most important to you, Is it movement or depth of field.
For an example, lets say that I am taking a picture of your pen on a table. I would say the most important thing to me is the depth of Field ( you want as much of it in focus).
So #1 important setting is the aperture.
I want to control how much will be in focus. So I would set the camera in Aperture priority so I can control the aperture and let the camera control the other two.
I am the type that doesn't want my camera to have control so I set the camera on Manual. I don't want to have a pixelated picture so I would set the ISO to it's lowest setting (mine is 80) and then I would set the aperture to F 16, I want a lot to be in focus.
At this setting I may come out with a dark picture, right?
Well not if make my cameras shutter stay open longer, Say for a second. The light has a chance to build.
All of the settings have a give and take, If I need to take a picture in a dark room i'm going to want to set the ISO higher it will be grainier but it will take less light to take the photograph.
I could open the aperture all the way to F 2.8 and keep the ISO at 100 but I may have to set the shutter speed to 1/30 a second and that wouldn't be good if the subject was moving. So by this example the picture would be less grainy, it would have a very narrow depth of focus and if the subject is moving it would be blurry.
If I would simply bump up the ISO to 400 and leave the aperture at F 2.8 I could speed up the shutter to 1/250 of a second. The picture would have the exact same exposure except it would be grainer and the subject would be frozen. it's all a give and take.
Try this take a picture of someone blowing out a candle, put your camera on a tripod or a solid surface that won't move,
#1 set your camera to ISO 100, aperture f 5.6 and your shutter speed to 1/15 of a second.
#2 Then change your settings to ISO 400 and your shutter speed to 1/60 of a second aperture F 5.6 .
#3 set your camera to ISO 100, aperture f 2.8 and shutter speed to 1/250 of a second.
All three are the same exposure.
As for the white balance I would need to know what make and model you have and I can tell you how to set your white balance. This is a lot to take in up to this point, but I know you will be able to tackle this.
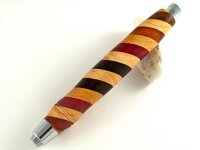
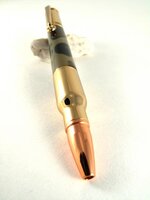
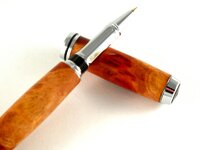
Take a look at my attached pics all are taken at the same exposure but with different depth of focus.
I guess I'll do like some have mentioned and just take the pic and it comes out how it comes out. Just not worth the aggrivation.


 I think you are trying too hard. Take a phot outside in daylight and use that to compare you photos. You will never get any better realism or photo of actual colors than to use mother nature.