Add polish to an acryllic pen?

Signed-In Members Don't See This Ad

johngmccune

Member
Joined
Mar 29, 2018
Messages
14
Location
Spring, Texas, USA
I use Dr. Kirk's Micro Magic to finish my acrylic pens after sanding. I'm reasonably happy with the results I get, though I realize that after much use, the shine will lessen. I don't know whether applying a polish after the Micro Magic would improve the shine immediately, but my question is whether it would delay the loss of shine from regular handling/use. Thoughts anyone?
 
Signed-In Members Don't See This Ad

JohnU

Member
Joined
Jan 31, 2008
Messages
4,987
Location
Ottawa, Illinois
My opinion is, it really depends on the acrylic material. Some are softer than others and will dull quicker. I don't think a polish is going to make a huge difference in the length of time, it will just help it shine more when applied. Unless you're building layers of a finish over the acrylic, it will dull sooner. I recently conducted an experiment with finishing a custom color blank. I did only half with a Gluboost layered finish and then micromeshed and polished the entire blank. When done, you could see a difference in shine and color. The Gluboost fill and finish will hold up much longer than just resin because it's harder and will also be easier to bring back to a shine. I always encourage people to try that test for themselves. Seeing is believing.
 
Joined
Jul 1, 2021
Messages
562
Location
Fayetteville, North Carolina
I would recommend Magic Juice from Stadium Pen Blanks. It is a 6 step finish and I have found it to be the best polish available for finishing resin pieces. Check it out, I assure you that you will not regret it.

I was actually using it this past Tuesday to polish up some clear stopper blanks I was finishing. Started with just micromesh pads but the finish just wasn't clear enough for my tastes so went the the Magic Juice. Night and day difference, the Magic Juice makes the stopper blanks as clear as glass allowing what was cast to just shine. Great stuff.
 
Last edited:

Hippie3180

Member
Joined
May 30, 2023
Messages
989
Location
Texas
I would recommend Magic Juice from Stadium Pen Blanks. It is a 6 step finish and I have found it to be the best polish available for finishing resin pieces. Check it out, I assure you that you will not regret it.

I was actually using it this past Tuesday to polish up some clear stopper blanks I was finishing. Started with just micromesh pads but the finish just wasn't clear enough for my tastes so went the the Magic Juice. Night and day difference, the Magic Juice makes the stopper blanks as clear as glass allowing what was cast to just shine. Great stuff.
Just curious does the finish seem to last a length of time with regular handling?
 

johngmccune

Member
Joined
Mar 29, 2018
Messages
14
Location
Spring, Texas, USA
Thanks for the suggestion, SabertoothBunny. I've ordered it already, and because I also ordered the wrong size holding container for the six bottles, I got a phone call from Stadium, and had a nice chat with them. Learned that contrary to what some YouTube videos about Magic Juice say, it is NOT a friction polish: heat is something to avoid when applying it. Also learned that it's fine to apply either after Micromesh or CA, but you shouldn't apply it after a friction polish like Dr. Kirk's because the Magic Juice will eat through the wax the friction polish has laid down.
 

johngmccune

Member
Joined
Mar 29, 2018
Messages
14
Location
Spring, Texas, USA
My opinion is, it really depends on the acrylic material. Some are softer than others and will dull quicker. I don't think a polish is going to make a huge difference in the length of time, it will just help it shine more when applied. Unless you're building layers of a finish over the acrylic, it will dull sooner. I recently conducted an experiment with finishing a custom color blank. I did only half with a Gluboost layered finish and then micromeshed and polished the entire blank. When done, you could see a difference in shine and color. The Gluboost fill and finish will hold up much longer than just resin because it's harder and will also be easier to bring back to a shine. I always encourage people to try that test for themselves. Seeing is believing.


See comments below in this thread, though I see I credited SabertoothBunny for the initial recommendation, when it was actually you!
 

jrista

Member
Joined
Aug 12, 2021
Messages
2,253
Location
Colorado
In my experience, with any kind of resin finish (even CA), buffing is the key in the long run to achieving a longer lasting, brilliantly shining finish. I didn't used to buff, but I also didn't quite have the skill. I've developed the skill, own a lot more buffing wheels and tools now, and I buff pretty much everything now.

I think one of the potential reasons why finishes or resins dull, is that even when you can't see them, there are usually very fine scratches in the surface. Over time, these will pick up oils and grime, which I think dulls the finish (just a postulation...but some time ago I was wondering why it happened at all...this is where my musings took me. :p)

Buffing is a process similar to, but not the same as, sanding. Buffing uses a stabilized grit (usually some kind of clay) primed into a fabric of some kind. The fibers of the fabric, saturated with this stabilized grit, will then brush across whatever surface you are buffing...but do so RANDOMLY! The randomness here is key, along with one other factor. Sanding, even when we try not to be, tends to have a regularity to it, and sandpapers, even at exceptionally fine grits, are not as fine as final pass polishing grits (i.e. Blue Rouge), which can be in the tens of thousands, or small fractions of a micron. Buffing and the nature of physics results in the fibers of the buffing wheel brushing over your blank in a very random fashion.

The other key factor here is that with thorough enough buffing, you can really smooth out the grit at a level that will catch oils and other micron-range sized stuff, which is what I think dulls the finish. When the scratches are instead in the nanometer range, its much harder for anything to stay stuck to the blank. If you get the right kind of light on your blank, even sanding down to say 1 micron or thereabouts (i.e. Zona Paper "white", which is a 1 micron grit), under the right light you'll still see these ultra-fine scratches. A good technique can randomize them to a decent degree, so our eyes won't catch a pattern, but under the right light they are still visible. As you start to buff, you will find that first these scratches soften...the harsh nature softens as hard edges are rounded over. Then eventually, these scratches will disappear, or you may just end up with a very soft, shallow ripple that can't be seen in the vast majority of light. When you just have a smooth, fine shine line, and no visible scratches at all...then you've probably buffed to the point where dulling is less likely, of it happens at all.

Polishing, such as with Magic Juice (which I just remembered I have), can also achieve the same thing, as a good set of polishes will also take you to extremely high grit. The one difference I have found with polish vs. buffing...well, two...is that its not necessarily as random, say if you polish with the lathe on, and if you don't polish with the lathe on, then it can be a heck of a lot of work!! Buffing has the benefit of not requiring you to put a ton of energy into motion to move a polish around, the wheel does that for you. That said, I remember Magic Juice working extremely well in the long run. Its just a lot of effort. If you go through the entire set of polishes, though, you should still be able to end up with effectively a scratch-free surface, for all intents and purposes.

I'll probably use up the Magic Juice on my next set of resin pens, and maybe also give it a try on GluBoost finished pens here... FWIW, my go-to final step in buffing is a two wheel setup. One with blue rouge, which works well on acrylic and other resins, CA, and many, many other things...its a very high grit compound. The other is just very soft loose leaf cotton, unloaded, to clean off any remaining compound after buffing with the first wheel. I like to use a very soft cotton, to avoid this final wheel adding any scratches of its own. I've been working on this with some GluBoost finished pens, and in the final result, I am not seeing any scratches, at least none that are visible to my eye...and I don't think any that may remain are large enough to capture and hold much that might dull the finish over the long run.
 
Joined
Jul 1, 2021
Messages
562
Location
Fayetteville, North Carolina
Just curious does the finish seem to last a length of time with regular handling?

Magic Juice, to my knowledge, does not add any strength the what you are polishing like a wax does for wood, it is just a polish or buff to get you a great sheen on your piece. Using it only requires a soft paper towel, no extra tools needed and the process for using it is quick. You don't need anymore than a pea sized dab of the polish per step so it has the advantage over a buffing wheel system because of no needing tools or accessories.

So the durability is really based on the resin like with all the items we make. Regular wear and tear will rough up the surface like it does all things, there just isn't a way to prevent that entirely.
 
Joined
Jul 1, 2021
Messages
562
Location
Fayetteville, North Carolina
Thanks for the suggestion, SabertoothBunny. I've ordered it already, and because I also ordered the wrong size holding container for the six bottles, I got a phone call from Stadium, and had a nice chat with them. Learned that contrary to what some YouTube videos about Magic Juice say, it is NOT a friction polish: heat is something to avoid when applying it. Also learned that it's fine to apply either after Micromesh or CA, but you shouldn't apply it after a friction polish like Dr. Kirk's because the Magic Juice will eat through the wax the friction polish has laid down.

The owner, Mike, is a great guy. Very knowledgable about just about everything pen turning and casting. He makes it a point for his business to provide quality service. You cannot go wrong with buying from them, they sell epoxy and casting molds as wel. Pretty broad business setup they have going right now.
 

johngmccune

Member
Joined
Mar 29, 2018
Messages
14
Location
Spring, Texas, USA
In my experience, with any kind of resin finish (even CA), buffing is the key in the long run to achieving a longer lasting, brilliantly shining finish. I didn't used to buff, but I also didn't quite have the skill. I've developed the skill, own a lot more buffing wheels and tools now, and I buff pretty much everything now.

I think one of the potential reasons why finishes or resins dull, is that even when you can't see them, there are usually very fine scratches in the surface. Over time, these will pick up oils and grime, which I think dulls the finish (just a postulation...but some time ago I was wondering why it happened at all...this is where my musings took me. :p)

Buffing is a process similar to, but not the same as, sanding. Buffing uses a stabilized grit (usually some kind of clay) primed into a fabric of some kind. The fibers of the fabric, saturated with this stabilized grit, will then brush across whatever surface you are buffing...but do so RANDOMLY! The randomness here is key, along with one other factor. Sanding, even when we try not to be, tends to have a regularity to it, and sandpapers, even at exceptionally fine grits, are not as fine as final pass polishing grits (i.e. Blue Rouge), which can be in the tens of thousands, or small fractions of a micron. Buffing and the nature of physics results in the fibers of the buffing wheel brushing over your blank in a very random fashion.

The other key factor here is that with thorough enough buffing, you can really smooth out the grit at a level that will catch oils and other micron-range sized stuff, which is what I think dulls the finish. When the scratches are instead in the nanometer range, its much harder for anything to stay stuck to the blank. If you get the right kind of light on your blank, even sanding down to say 1 micron or thereabouts (i.e. Zona Paper "white", which is a 1 micron grit), under the right light you'll still see these ultra-fine scratches. A good technique can randomize them to a decent degree, so our eyes won't catch a pattern, but under the right light they are still visible. As you start to buff, you will find that first these scratches soften...the harsh nature softens as hard edges are rounded over. Then eventually, these scratches will disappear, or you may just end up with a very soft, shallow ripple that can't be seen in the vast majority of light. When you just have a smooth, fine shine line, and no visible scratches at all...then you've probably buffed to the point where dulling is less likely, of it happens at all.

Polishing, such as with Magic Juice (which I just remembered I have), can also achieve the same thing, as a good set of polishes will also take you to extremely high grit. The one difference I have found with polish vs. buffing...well, two...is that its not necessarily as random, say if you polish with the lathe on, and if you don't polish with the lathe on, then it can be a heck of a lot of work!! Buffing has the benefit of not requiring you to put a ton of energy into motion to move a polish around, the wheel does that for you. That said, I remember Magic Juice working extremely well in the long run. Its just a lot of effort. If you go through the entire set of polishes, though, you should still be able to end up with effectively a scratch-free surface, for all intents and purposes.

I'll probably use up the Magic Juice on my next set of resin pens, and maybe also give it a try on GluBoost finished pens here... FWIW, my go-to final step in buffing is a two wheel setup. One with blue rouge, which works well on acrylic and other resins, CA, and many, many other things...its a very high grit compound. The other is just very soft loose leaf cotton, unloaded, to clean off any remaining compound after buffing with the first wheel. I like to use a very soft cotton, to avoid this final wheel adding any scratches of its own. I've been working on this with some GluBoost finished pens, and in the final result, I am not seeing any scratches, at least none that are visible to my eye...and I don't think any that may remain are large enough to capture and hold much that might dull the finish over the long run.
What an interesting and helpful post! Two questions: 1) when you're buffing a resin pen, what level and method of sanding do you do before blue rouge buffing? 2) Do you use the large wheel buffers (as opposed to the smaller, two wheel set marketed as being for resin pens?
 

TonyL

Member
Joined
Mar 9, 2014
Messages
8,919
Location
Georgia
I know it is not necessary, but i have been using a CA finish on all of my pens (even M3). It as depth and preserves the underlying finish of the material.
 

JohnU

Member
Joined
Jan 31, 2008
Messages
4,987
Location
Ottawa, Illinois
I know it is not necessary, but i have been using a CA finish on all of my pens (even M3). It as depth and preserves the underlying finish of the material.
Like you, I apply a CA finish to all of my pens (except Polyresin - because of it's extreme hardness), and I also think it improves the clarity, durability and enhances colors, but I hear a lot of people use that same phrase…" it's not necessary". It got me thinking… Is any finish really necessary to make the pen useful? No. The pen will work just fine without a finish. The question is how long do you want your "work of art" to look like a work of art? I feel, most of the time a finish is necessary. At the end of the day I guess it really just comes down to how much effort and time one want to put into their work as a pen maker, and what makes them happy with their results. Happy turning !
 

JohnU

Member
Joined
Jan 31, 2008
Messages
4,987
Location
Ottawa, Illinois
I just found this and thought I would post it since I mentioned it in my first comment. I used Gluboost fill and finish (4-5 layers of ultra thin) on half the blank and then micromeshed and polished the entire blank all the same. You can see the difference in the shine and color. The blank is a common Alumilite Clear Urethane color cast. This is why I apply a ca finish over my acrylic blanks.
 

Attachments

  • IMG_7087.jpeg
    IMG_7087.jpeg
    153.3 KB · Views: 58

jrista

Member
Joined
Aug 12, 2021
Messages
2,253
Location
Colorado
What an interesting and helpful post! Two questions: 1) when you're buffing a resin pen, what level and method of sanding do you do before blue rouge buffing? 2) Do you use the large wheel buffers (as opposed to the smaller, two wheel set marketed as being for resin pens?

1. I am a huge fan of Zona Paper. Its not exactly a paper...maybe more like something resembling rather dense cheesecloth, covered in a sanding grit. I switched to it from Micro Mesh when I tried it back in 2021, and it has been my go-to for final sanding ever since. This stuff goes down to 1 micron at the highest grit, which is what I always sand to.

To contrast 1 micron with normal sandpaper grits, you are looking at about 14,000 grit in normal sandpapers. This is higher even than the 12,000 of micro mesh, which is about 2 microns. There is something about the nature of the grit and substrate with Zona, that just gives me a better result than any other sandpaper option out there...its more like a fabric than paper, and the grit feels much sharper than what you get with micro mesh (which has a more squarish mesh like crystal structure).

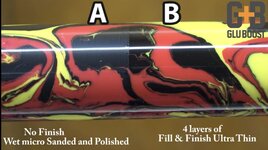
So I sand to basically the finest grit I can. This actually goes very quickly. For CA (GluBoost) and resins, I wet sand from 400-1200 normal grits (Norton sandpaper brand, which also has a fairly sharp crystal.) This takes a couple of minutes or so. I then switch to Zona. I sand from Green (coarsest) to white (finest), or 6 grits in total (green: 30 micron; grey: 15 micron; blue: 8 micron; pink: 3 micron; aqua: 2 micron; white: 1 micron). This takes a couple of minutes. I'll spend some extra time on green and grey, and then also on white, to get the best results. In the end, you should have a very fine shine line. You might notice a slight "glow" around the shine line. This is usually what results from sanding with the lathe on, with radial scratches. You can manually sand lengthwise along the blank with the lathe off to minimize this, however buffing is usually done lengthwise which will have the same result (and then some.)

2. Lately I have been suing 6" buffing wheels for pens. I have 8" buffing wheels as well. I just ended up with 6" when I started this, as that was what was available locally. I don't think it really matters what size wheel when it comes to pens. What matters more is the material. You want to use cotton with the blue rouge, which is a high grit polishing compound for use with almost anything you want to be scratch free in the end. It can be used with CA, resins, most metals (there are a couple of exceptions). Its a general purpose high grit rouge. This stuff just works properly with cotton.

You can get wheels in a few kinds of fabric. Cotton is common, and is good when you need very fine fibers for very fine polishing jobs. Muslin is also cotton. You can find either "treated" (usually a color other than the natural cotton color, such as yellow), which will increase compound retention, but are also usually more aggressive (not ideal for pen buffing).

You can also get flannel buffing wheels. Loose leaf flannel can be useful for final cleaning, and are also commonly used to apply final wax coatings (primarily, carnauba...I do NOT recommend using carnauba, bees, or pretty much any natural wax with shiny pens!! These waxes will DULL the shiny finish, due to the nature of their crystalline structure.) A loose leaf flannel buff can be a good general purpose final cleaning wheel (i.e. don't load it with any compound). I find that for pens, flannel might be a bit too aggressive itself, so I've stuck with muslin or cotton for my cleaning wheels.

There are also some synthetic buffing wheels, notably satin. I've never used these, although I have felt them, and they seem to be a lot more aggressive than either flannel or cotton. Everything I've read indicates they are used for stronger abrasives and rougher work, and are often pre-loaded with a grit or compound.

So, for pens, you can easily pick up a two-wheel buffing kit, load the first wheel with blue rouge, and leave the other unloaded for cleaning, and you'll be on your way.


Oh, I guess I should mention. Not all buffing compounds, even those of the same color, are necessarily equal. I've only bought smaller rouge bars so far. Some have worked really well, some not as well. In that, some really seem to cut through the scratches left by sandpaper really well, whereas others require more effort by you to really clean all the scratches up. Sadly, there really isn't a lot of useful detailed information out there about any given rouge. They are just called by their color, and usually that's it. So its kind of hit or miss, whether you get one that works really great, or not. Maybe its a matter of ratio of grit to substrate, and maybe some have more grit while others have more clay? Honestly cannot say.

There are also other fine polishing compounds out there. Some are unsuitable for resins (notably acrylics), but I did come across purple rouge. Apparently its suitable for acrylic and other resins, metals, and is silica-free. Silica is a common grit compound. Supposedly, purple rouge is capable of providing an even higher shine than blue. I haven't tried any yet (still have a ton of blue from my latest bar). There is also white route, or white diamond. This obviously uses diamond as the grit. Its good for initial buffing, but I haven't found that it really gives a superbly shiny finish in the end. Blue, and maybe purple, are better for getting that sublime shine. That said, if you feel blue (or purple) just isn't quite doing the job to clear out all the scratches from sanding, STARTING with white diamond might be an option, then progress to blue. If you have a three-buff system, you could do white, blue or purple, then bare cotton for final cleanup. I think in the long run, I may be picking up another of Beall's 3-wheel buffing systems (8" wheels), and instead of using the trip/white diamond/carnauba setup, I'm going to do white diamond/purple/bare as my pen buffing system.

Oh, and as a side note. There is also green and red rouge. These are also high grit, high shine polishing compounds...but they are designed for metals. They are not good for resins, ca, acrylic...as they tend to produce more heat, which can be problematic for resins, especially softer ones. In fact, blue rouge is also not suitable for low melting point plastics, but it is fine for most of the resins we use with pens (including acrylic), as is purple.
 

jrista

Member
Joined
Aug 12, 2021
Messages
2,253
Location
Colorado
Oh, thought I would add. I've been using my Magic Juice on a set of pens today. This stuff is very, very good at polishing things up. I think it does a very good job, cleaning up most of the fine scratches from the 1 micron zona paper. I also think that in the end, I actually like the shine I get with MJ, vs. the blue rouge on a buffing wheel.

That said...in the end, because you polish with the lathe on at a high speed, you are not actually able to eliminate all the scratches like you can with a buffing wheel. In one orientation, a blank polished with MJ looks BRILLIANT, and incredibly clear. However as you rotate the blank in a given light, eventually you will notice radial streaks. These will actually appear coarser than the 1 micron scratches of the zona paper grit, but softer.

In contrast, with buffing, if you buff "across the scratch grain", you will completely eliminate the scratches entirely. Further, with a buffing wheel, you can focus on particular areas, if you find some problematic spots in your finish, and work it until the problem is gone. This is something I've never quite been able to do with polishing, and the main reason I switched to buffing.

I may polish with MJ here until my set of that polish is gone, but then also buff with blue rouge to get that final totally scratch-free finish in the end.

Since MJ polishing does remove the fine scratches, and leaves a smoother surface, it may still be capable of preventing dulling over time, since there is going to be less to capture and hold onto grit and grime over time. But, I still think that if you want the BEST finish possible for CA, acrylic or other resins, buffing is still the way to go.
 

Hippie3180

Member
Joined
May 30, 2023
Messages
989
Location
Texas
This is a very informative thread and gives lots of opportunity for thought and trial of different methods.

I typically Micro Mesh then use a plastic polish. I use the plastic polish with the lathe running pretty high to build up some heat. I get a pretty good finish initially. I do tend to see micro scratches, but I don't own buffing wheels at this time so, it is what it is. Black of course is the most problematic. One day I'll add buffing wheels to the menagerie of equipment and tools.
 

johngmccune

Member
Joined
Mar 29, 2018
Messages
14
Location
Spring, Texas, USA
Oh, thought I would add. I've been using my Magic Juice on a set of pens today. This stuff is very, very good at polishing things up. I think it does a very good job, cleaning up most of the fine scratches from the 1 micron zona paper. I also think that in the end, I actually like the shine I get with MJ, vs. the blue rouge on a buffing wheel.

That said...in the end, because you polish with the lathe on at a high speed, you are not actually able to eliminate all the scratches like you can with a buffing wheel. In one orientation, a blank polished with MJ looks BRILLIANT, and incredibly clear. However as you rotate the blank in a given light, eventually you will notice radial streaks. These will actually appear coarser than the 1 micron scratches of the zona paper grit, but softer.

In contrast, with buffing, if you buff "across the scratch grain", you will completely eliminate the scratches entirely. Further, with a buffing wheel, you can focus on particular areas, if you find some problematic spots in your finish, and work it until the problem is gone. This is something I've never quite been able to do with polishing, and the main reason I switched to buffing.

I may polish with MJ here until my set of that polish is gone, but then also buff with blue rouge to get that final totally scratch-free finish in the end.

Since MJ polishing does remove the fine scratches, and leaves a smoother surface, it may still be capable of preventing dulling over time, since there is going to be less to capture and hold onto grit and grime over time. But, I still think that if you want the BEST finish possible for CA, acrylic or other resins, buffing is still the way to go.
A master class in finishing pens! Thanks so much for taking the time to spell all this out in such detail. And the photo speaks for itself!
 

jrista

Member
Joined
Aug 12, 2021
Messages
2,253
Location
Colorado
This is a very informative thread and gives lots of opportunity for thought and trial of different methods.

I typically Micro Mesh then use a plastic polish. I use the plastic polish with the lathe running pretty high to build up some heat. I get a pretty good finish initially. I do tend to see micro scratches, but I don't own buffing wheels at this time so, it is what it is. Black of course is the most problematic. One day I'll add buffing wheels to the menagerie of equipment and tools.
I would give Zona Paper a try...its like $10-12 a package, and you can really make it last (I use ~3/4"x3/4" squares of each grit, and each package lasts me a lot of pens. IMO, its more cost effective than MM.

The 1 micron grit can get you to a point where the ultra fine scratches are much less of a visibility problem, and then if you also use a polish (both lathe on, as well as manually with swirl and longitudinal motions along the blank with the lathe off), then you can get most or all of the way to were buffing would get you. Its just a bit more manual work, but if you don't have a buffing system, then this is the next best thing.

There are actually LOTS of polish options. Too many for me even to account for. I actually find that many of the Meguiar's polishes do a wonderful job, and are probably one of the most cost effective options. There are many other options as well. So polishing will take you a long way, its just a bit more manual and requires lathe-off work to really minimize the scratches to the realm where they cannot be seen anymore.
 

jrista

Member
Joined
Aug 12, 2021
Messages
2,253
Location
Colorado
I just found this and thought I would post it since I mentioned it in my first comment. I used Gluboost fill and finish (4-5 layers of ultra thin) on half the blank and then micromeshed and polished the entire blank all the same. You can see the difference in the shine and color. The blank is a common Alumilite Clear Urethane color cast. This is why I apply a ca finish over my acrylic blanks.
Wow!! That is superb! So this is only the ultra thin? Did you just turn to size then apply the ultra thin to half, or did you sand it down to size and all that first, then apply ultra thin to half, then do final sanding?

I just picked up a bottle of that, can't wait to give it a try. (It may also help me solve a problem I've been having with filling engravings on my wood pens, which has thus far proven to be quite a challenge due to the wood grain soaking up just about anything and everything I put into it, but if I can seal the grain with ultra thin, that might solve the problem.)
 

rixstix

Member
Joined
Jan 10, 2007
Messages
653
Location
Canistota, SD USA
I would give Zona Paper a try...its like $10-12 a package, and you can really make it last (I use ~3/4"x3/4" squares of each grit, and each package lasts me a lot of pens. IMO, its more cost effective than MM.

FYI, Zona is re-branded 3M Tri-M-Ite so you many times you can find the latter at a better price either the multi grit or single grit packages.

Similarly, I cut sheets into 24 pieces (I think) and use them for single pen use and throw away.
 

jrista

Member
Joined
Aug 12, 2021
Messages
2,253
Location
Colorado
FYI, Zona is re-branded 3M Tri-M-Ite so you many times you can find the latter at a better price either the multi grit or single grit packages.

Similarly, I cut sheets into 24 pieces (I think) and use them for single pen use and throw away.
Really? What a very weird name...Tri-M-Ite? Zona is such a better name, and I can actually pronounce it...
 

JohnU

Member
Joined
Jan 31, 2008
Messages
4,987
Location
Ottawa, Illinois
Wow!! That is superb! So this is only the ultra thin? Did you just turn to size then apply the ultra thin to half, or did you sand it down to size and all that first, then apply ultra thin to half, then do final sanding?
I turned it round, lightly sanded with 400 grit, applied ultra thin fill and finish to half, then wet sanded the entire blank with micro mesh, applied polish, and buffed.

I also like it as a base coat on wood. It soaks in nicely and hardens the surface to build a nice finish on.
 

jrista

Member
Joined
Aug 12, 2021
Messages
2,253
Location
Colorado
I turned it round, lightly sanded with 400 grit, applied ultra thin fill and finish to half, then wet sanded the entire blank with micro mesh, applied polish, and buffed.

I also like it as a base coat on wood. It soaks in nicely and hardens the surface to build a nice finish on.
Looking forward to trying it on wood. Probably won't get the chance till later this week. I have this thing I've been trying to do since mid spring this year: fine (thin channel) engravings on wood, filled in with something (whatever will work, at this point.) So far, everything wicks into the grain. Further, nothing penetrates deeply enough to actually hold into the fine engraving channel through subsequent processing (although, at the time I was using Pens Plus, with CA, the loss of material from teh engraving may no longer be a problem since I can jsut cover it with CA now.) I tried some sealers, but nothing worked real well. Shellac might have done the trick, not sure, its tough to get shellac to the right consistency to penetrate well and also still seal properly.

I figure, if I can wick this ultra-thin stuff into the wood first as a sealer after engraving, then fill the engraving (maybe with GC+Master Tint), then continue finishing wiht a few more coats of GC thin and thick (or whatever the blue stuff is), that might finally do the trick.
 

Hippie3180

Member
Joined
May 30, 2023
Messages
989
Location
Texas
I would give Zona Paper a try...its like $10-12 a package, and you can really make it last (I use ~3/4"x3/4" squares of each grit, and each package lasts me a lot of pens. IMO, its more cost effective than MM.

The 1 micron grit can get you to a point where the ultra fine scratches are much less of a visibility problem, and then if you also use a polish (both lathe on, as well as manually with swirl and longitudinal motions along the blank with the lathe off), then you can get most or all of the way to were buffing would get you. Its just a bit more manual work, but if you don't have a buffing system, then this is the next best thing.

There are actually LOTS of polish options. Too many for me even to account for. I actually find that many of the Meguiar's polishes do a wonderful job, and are probably one of the most cost effective options. There are many other options as well. So polishing will take you a long way, it's just a bit more manual and requires lathe-off work to really minimize the scratches to the realm where they cannot be seen anymore.
Thank you! I will try the Zona paper, saving a penny is always appealing.
 

jrista

Member
Joined
Aug 12, 2021
Messages
2,253
Location
Colorado
Thank you! I will try the Zona paper, saving a penny is always appealing.
I just picked up some more Zona paper myself. Am running real low on the last pack. It seems that there are numerous products out there. I don't think Zona has been replaced...seems there were rumors of that back as far as 2020. There is something called 3m Tri-M-Ite, which seems to be similar or the same. There are also other lines of ultra fine sandpaper or lapping paper. I don't know if they are all the same thing...they seem to have the same colored sheets. The lapping paper in particular, might be more of the same grit (and same colors), on a different substrate...so maybe its just the substrates that change, and the grits stay the same? I honestly cannot say. Oh, actually...with the Tri-M-Ite, in a couple of cases, it sounded like the grits might in fact be quite different from Zona Paper. Zona goes to a very fine 1 micron grit....the Tri-M-Ite may not be nearly as fine at the high grit, and much coarser at the low grit?

Anyway, Zona Paper is amazing stuff. For my pens, it generally only requires a 3/4"x3/4" square, or maybe 3/4"x1", to do the job. Its exceptional stuff. Sometimes I might use a bit more of the green and white. Thankfully, it looks like you can buy 10 packs of each grit, so I may pick up some green (30 micron) and white (1 micron) to cover the extra usage of those.
 

Hippie3180

Member
Joined
May 30, 2023
Messages
989
Location
Texas
I just picked up some more Zona paper myself. Am running real low on the last pack. It seems that there are numerous products out there. I don't think Zona has been replaced...seems there were rumors of that back as far as 2020. There is something called 3m Tri-M-Ite, which seems to be similar or the same. There are also other lines of ultra fine sandpaper or lapping paper. I don't know if they are all the same thing...they seem to have the same colored sheets. The lapping paper in particular, might be more of the same grit (and same colors), on a different substrate...so maybe its just the substrates that change, and the grits stay the same? I honestly cannot say. Oh, actually...with the Tri-M-Ite, in a couple of cases, it sounded like the grits might in fact be quite different from Zona Paper. Zona goes to a very fine 1 micron grit....the Tri-M-Ite may not be nearly as fine at the high grit, and much coarser at the low grit?

Anyway, Zona Paper is amazing stuff. For my pens, it generally only requires a 3/4"x3/4" square, or maybe 3/4"x1", to do the job. Its exceptional stuff. Sometimes I might use a bit more of the green and white. Thankfully, it looks like you can buy 10 packs of each grit, so I may pick up some green (30 micron) and white (1 micron) to cover the extra usage of those.
Great information, I'm going to screenshot do I will have it. Thank you.
 
Top Bottom