mmayo
Member
This is the point where the pen turning actually starts and the prep time is over.
I have made several sizes of wooden punches from dowels to push out the wax plugs. The third photo shows the two wax plugs pressed out of the tube. Have a round file handy to get out any epoxy if you find some. Don't over file!!!


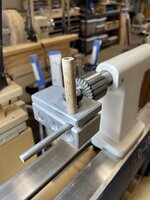
I ALWAYS use Rick Herrell's sanding jig and NEVER use an end mill. It fits in the tailstock drill chuck. It comes with a shaft that fits 7 mm tubes.


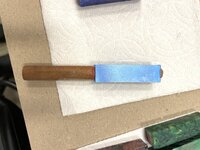
I've made sleeves to fit each of my pen tubes. The colorful photo shows before and after ends of pen tubes. Be sure to stop the second you hear the sandpaper hit brass - you'll hear it.
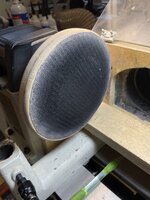
You also need a faceplate and sandpaper discs. I made the wood disc and applied the hook of hook and loop.


Now to turn that blank. I use TBC bushings for all turning. Here are metal TBC from Nikitas and my 3D printed sanding bushing.

Here is the start of turning

After roughing the blank with 2" radius carbide.

Turned to final dimension.

Now I switch to the sanding bushings to protect the dimensions of the metal TBC.

I sand laterally and never with the lathe spinning. I use 400 grit or greater to get rid of the lathe tool marks. This is the blank sanded smooth.

To buff I use the Beale buffing system. I bought the PSI two wheel buffs and thought they were terrible. Buy the real deal! I switch to 3D printed buffing bushings with a hole through them and homemade buffing stick and spacers.

Here is the sandwich of all components ready for the first wheel, Tripoli.

After seconds on the first wheel it looks like this.

I finish with the white diamond wheel to yield a glossy shine in seconds.

Now for pressing that pen together. Here are the components I use: Locitite red, MT2 lathe pressing adapters, pipe cleaner, small pliers and a countersink. I run the countersink in both ends gently to ease the sharp edge of the brass tube and use the pipe cleaner to clean out the tube.

Here are the components in a DK ballpoint kit: nib, finial with clip, transmission, spring, refill and brass tube. I always use a Schmidt EasyFlow 9000 refill.


The finial/clip is shown ready to press on the lathe. I haven't used a pen press in years and don't own one though I make hundreds of pens yearly.

The pen body is now pressed to the finial. If you use Sierra pen kits this is where heartbreak can occur as you spilt or crack the blank. It never happens with a DK ballpoint kit.

One of the good points for a DK ballpoint is that there is only one area to glue During assembly. I apply a small drop of Locitite to the threads of the transmission and use the pliers to get a tight fit. I wipe off the excess glue.

Another good point of this DK kit is that it is very easy to change cartridges for you and your customer. Unscrew the nib section between the diamond knurl area and the chrome nib.


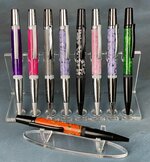
At long last here are the finished pens.

Ihope this helps you get better pens. If you are successful doing a different method, keep doing that. This method works 100% of the time for me.
I have made several sizes of wooden punches from dowels to push out the wax plugs. The third photo shows the two wax plugs pressed out of the tube. Have a round file handy to get out any epoxy if you find some. Don't over file!!!
I ALWAYS use Rick Herrell's sanding jig and NEVER use an end mill. It fits in the tailstock drill chuck. It comes with a shaft that fits 7 mm tubes.
I've made sleeves to fit each of my pen tubes. The colorful photo shows before and after ends of pen tubes. Be sure to stop the second you hear the sandpaper hit brass - you'll hear it.
You also need a faceplate and sandpaper discs. I made the wood disc and applied the hook of hook and loop.
Now to turn that blank. I use TBC bushings for all turning. Here are metal TBC from Nikitas and my 3D printed sanding bushing.
Here is the start of turning
After roughing the blank with 2" radius carbide.
Turned to final dimension.
Now I switch to the sanding bushings to protect the dimensions of the metal TBC.
I sand laterally and never with the lathe spinning. I use 400 grit or greater to get rid of the lathe tool marks. This is the blank sanded smooth.
To buff I use the Beale buffing system. I bought the PSI two wheel buffs and thought they were terrible. Buy the real deal! I switch to 3D printed buffing bushings with a hole through them and homemade buffing stick and spacers.
Here is the sandwich of all components ready for the first wheel, Tripoli.
After seconds on the first wheel it looks like this.
I finish with the white diamond wheel to yield a glossy shine in seconds.
Now for pressing that pen together. Here are the components I use: Locitite red, MT2 lathe pressing adapters, pipe cleaner, small pliers and a countersink. I run the countersink in both ends gently to ease the sharp edge of the brass tube and use the pipe cleaner to clean out the tube.
Here are the components in a DK ballpoint kit: nib, finial with clip, transmission, spring, refill and brass tube. I always use a Schmidt EasyFlow 9000 refill.
The finial/clip is shown ready to press on the lathe. I haven't used a pen press in years and don't own one though I make hundreds of pens yearly.
The pen body is now pressed to the finial. If you use Sierra pen kits this is where heartbreak can occur as you spilt or crack the blank. It never happens with a DK ballpoint kit.
One of the good points for a DK ballpoint is that there is only one area to glue During assembly. I apply a small drop of Locitite to the threads of the transmission and use the pliers to get a tight fit. I wipe off the excess glue.
Another good point of this DK kit is that it is very easy to change cartridges for you and your customer. Unscrew the nib section between the diamond knurl area and the chrome nib.
At long last here are the finished pens.
Ihope this helps you get better pens. If you are successful doing a different method, keep doing that. This method works 100% of the time for me.
Attachments
Last edited: