2 more Pine Cone Pendents W/Stone // now with info

Signed-In Members Don't See This Ad
See more from maxman400

maxman400

Member
Joined
May 25, 2009
Messages
3,111
Location
Omaha Arkansas
Here is two more Pine Cone Pendents with crushed Turquoise stone in place of the seeds. I stopped by Johns place (desertrat) and he gave me some turquoise to play with so I went to the shop this afternoon and put these together. They have been dipped in polyurethane twice.
Any comments Welcome, Thanks for Looking. :biggrin:

Thanks John!!!:good: SEE POST # 8
 

Attachments

  • pine cone Pendent W inlay 006_edited-1.jpg
    pine cone Pendent W inlay 006_edited-1.jpg
    99.2 KB · Views: 345
  • pine cone Pendent W inlay 007_edited-1.jpg
    pine cone Pendent W inlay 007_edited-1.jpg
    71.7 KB · Views: 304
  • 2 007_edited-1.jpg
    2 007_edited-1.jpg
    58.9 KB · Views: 283
Last edited:
Signed-In Members Don't See This Ad
Very nice Mike but you got to stop now you are getting to good at them.v This is a turning site remember turn turn turn. LOL

Dannie
 
Did you stabilize these and then take slices? Or slice and then dip?

Just wondering, as I imagine they'd be difficult to hold together without
something to bind it together first. If that's a trade secret, then never
mind. I was just curious.

Very nice, BTW .. I can see those selling well in a boutique somewhere
 
really great work. Yes, please share your steps to make these as mentioned. I have a tree in the back yard that is LOADED with pine cones.
 
info for making

OK:: John and I each have a way to do cones.
John uses a mixture of acetone and Plexiglas, he dissolves the Plexiglas in the Acetone then soaks the cones in it for a week or two then lets it air dry for a week or so before cutting. after cutting it is still wet and needs to air dry for a day or two.
I use thin CA and soak the cone in it from the outside, then I reapply after each cut to both pieces (the slice and the rest of the cone). Both ways will work, mine is faster his is real stable.
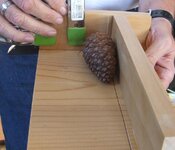
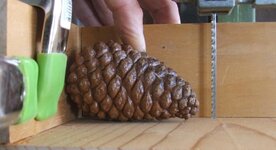
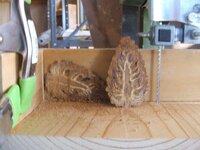
1. I built a sled for the band saw to make a 1/4" slice.
2. Make sure the cone is as flat as it can be on the sled, I use an 1/8" scroll saw blade which has very little drag.
3. Use the base of the cone to keep it straight for the first cut then the fence will do it for you for the rest of the cuts.
4. After making your cuts either let dry or use CA to stabilize.
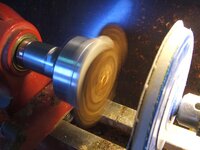
5. Sand until flat and smooth.
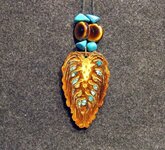
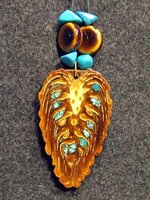
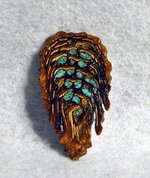
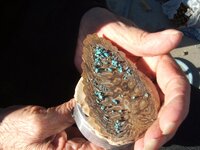
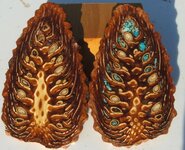
6. you can keep the nuts (some may fall out, reinsert and glue) or pry them out and fill with something, I used some turquoise that John gave me.
7. Finish as desired (spray or dip) and decorate. :biggrin:
 

Attachments

  • info 002.jpg
    info 002.jpg
    43.9 KB · Views: 191
  • info 008.jpg
    info 008.jpg
    39.8 KB · Views: 193
  • info 012.jpg
    info 012.jpg
    51.6 KB · Views: 195
  • info 014.jpg
    info 014.jpg
    51.3 KB · Views: 185
  • Copy of info 019.jpg
    Copy of info 019.jpg
    55.1 KB · Views: 182
  • info 023.jpg
    info 023.jpg
    55.3 KB · Views: 196
  • info 026_edited-1.jpg
    info 026_edited-1.jpg
    80.6 KB · Views: 196
Last edited:
Back
Top Bottom