This April I made a promise to Michael Hardin when we were at the Midwest Pen Turners Gathering to write a story about this pen and how I made it. Now four months later I'm finally getting this written and shared on here. Please forgive me as it's a bit of a long writeup.
Before anything else, thanks to Michael for doing a demonstration of his technique to preserve the outside patina of a pen blank at the 2024 MPG. He was gracious enough to answer a few questions after his presentation from me about a passion project that I had brewing in my head. I was able to leave his presentation with a page full of notes and the link to a demonstration of his technique on his website (https://stadiumpenblanks.com/blogs/news/saving-the-original-painted-surface-on-your-finished-pen) that I could use to review things with again. John Underwood also gave me some great advice on using ultrathin CA glue to stabilize the wood on my blank too.
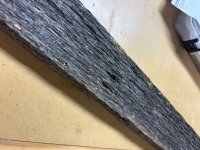
As background, my family has lived on the same parcel of farmland in the southwestern Missouri Ozarks since the late 50's. The barn on the property was built by a previous owner and has a date on the cornerstone of 1938. After decades of very faithful service as a livestock barn with a massive hay loft it fell into disrepair from age and collapsed a few years ago. My cousin who owns the farm now has tried to save as many of the exterior planks from barn as he could and repurposed them into other projects. The weathering on the planks on the outside is both extremely distinct and fragile when working with it. I don't know exactly what type of wood it is for sure but it's very likely that it's white oak because they grow all over the surrounding area.
For the rest of this I'll go into detail on how I created the blank and then turned it to form the pen body.
The first thing I did was to trim pieces of the barn plank down into ¾ of an inch wide sections and cut them to length for the pen I was making. The plank I have is between 7/8 and 1 inch thick depending on where you measure it so I spent some time with my belt sander and carefully sanded it down to be as close to 3/4" by 3/4" square using my micrometer and a combination square to measure as I went. This left me with one side of the blank that showed the outside weathered patina of the barn and three sides that showed the actual wood the plank was made from. These three sides were all flat and as square to each other as I could get them.
Once the blanks were set to the correct size I wrapped a couple layers of painters tape around the blank to make a tub surrounding the weathered side that was the outside of the barn. Next, I flooded it with ultrathin CA glue to try to strengthen the ridges sticking up from where the barn had worn away when it was exposed to the elements. I did this two or three times with a light spritz of activator between them if I felt it was needed. I let it dry overnight before doing anything else with it because I didn't know how far into the blank the glue had penetrated. The painters tape came off and then I moved to setting up to drill an offset hole for my tube for the pen.
According to Michael's instructions, I set my pen jaws (that is spelled with an "e", not an "I") up in my lathe chuck to hold the blank for drilling. I placed a ¼' thick shim up against the "exterior" of my blank that I was trying to preserve and put a 1/8" shim against the opposite side to make a sandwich around the blank. I inadvertently discovered that Home Depot paint sticks are exactly 1/8" thick during this process too! I used several layers of tightly wrapped plastic wrap around the sandwich to hold it all together and put it into the chuck. The pen jaws should each sit flat against the sandwich, you are not placing it across corners like you would in a regular drilling situation. Using the blank sandwich essentially moved the edge I was trying to preserve up to near where the drill bit will go through the blank. At this point, I drilled the blank as I would for any other pen blank, glued in my tube and squared the ends.
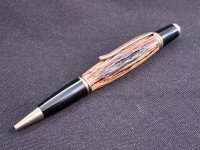
There are two important things to remember when turning the blank down to size. First is that you will probably need to plan to turn the blank to some form of an oval shape (think insect body shape) to show some of the patina of the blank without turning it completely away. The closer you go to truly round will show less of the patina. The exact shape is up to you and how much of the side you're trying to show. In my case because I had very pitted and weathered wood I was able to turn down to almost cylindrical and still show the wood I was trying to preserve. The second thing to remember is when turning with something off center you need to be gentle with your tools because you will have wood against the tools for three sides and air when the fourth side is facing the tool because of the offset hole.
Once I had the blank turned down to show enough of the patina and at the shape that I wanted I worked my way through sanding grits (150, 220, 320, 400, 600) mostly by hand without the lathe on so that I wouldn't ruin or otherwise sand off my ridges. Once that was done I turned the lathe on low and put on 2-3 coats of Gluboost Ultrathin to try to make sure everything had a coat of CA and hoped to re-stabilize the edges near the ridges. Next was 2-3 coats of Gluboost thin and then sanded it all back a little bit with 320 to try and flatten out some pitting the Gluboost was highlighting. I used the 400 and 600 grit to come back up to normal starting point and then proceeded to do a coat of ultrathin, 2-3 thin and finished with regular Gluboost. I used Dr Kirk's Scratch Free with the lath on low speed followed by the three step Dr Kirk's polish to shine and polish the CA with the lathe on a high speed.
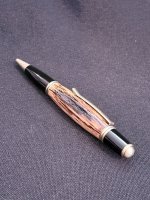
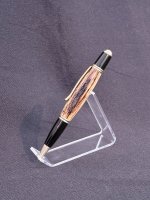
The blank is mounted on a Gatsby pen from Exotic Blanks.
Thanks very much for reading and taking a look at the pen. Several of these will be going to my remaining Aunts & Uncles along with a few cousins.
Before anything else, thanks to Michael for doing a demonstration of his technique to preserve the outside patina of a pen blank at the 2024 MPG. He was gracious enough to answer a few questions after his presentation from me about a passion project that I had brewing in my head. I was able to leave his presentation with a page full of notes and the link to a demonstration of his technique on his website (https://stadiumpenblanks.com/blogs/news/saving-the-original-painted-surface-on-your-finished-pen) that I could use to review things with again. John Underwood also gave me some great advice on using ultrathin CA glue to stabilize the wood on my blank too.
As background, my family has lived on the same parcel of farmland in the southwestern Missouri Ozarks since the late 50's. The barn on the property was built by a previous owner and has a date on the cornerstone of 1938. After decades of very faithful service as a livestock barn with a massive hay loft it fell into disrepair from age and collapsed a few years ago. My cousin who owns the farm now has tried to save as many of the exterior planks from barn as he could and repurposed them into other projects. The weathering on the planks on the outside is both extremely distinct and fragile when working with it. I don't know exactly what type of wood it is for sure but it's very likely that it's white oak because they grow all over the surrounding area.
For the rest of this I'll go into detail on how I created the blank and then turned it to form the pen body.
The first thing I did was to trim pieces of the barn plank down into ¾ of an inch wide sections and cut them to length for the pen I was making. The plank I have is between 7/8 and 1 inch thick depending on where you measure it so I spent some time with my belt sander and carefully sanded it down to be as close to 3/4" by 3/4" square using my micrometer and a combination square to measure as I went. This left me with one side of the blank that showed the outside weathered patina of the barn and three sides that showed the actual wood the plank was made from. These three sides were all flat and as square to each other as I could get them.
Once the blanks were set to the correct size I wrapped a couple layers of painters tape around the blank to make a tub surrounding the weathered side that was the outside of the barn. Next, I flooded it with ultrathin CA glue to try to strengthen the ridges sticking up from where the barn had worn away when it was exposed to the elements. I did this two or three times with a light spritz of activator between them if I felt it was needed. I let it dry overnight before doing anything else with it because I didn't know how far into the blank the glue had penetrated. The painters tape came off and then I moved to setting up to drill an offset hole for my tube for the pen.
According to Michael's instructions, I set my pen jaws (that is spelled with an "e", not an "I") up in my lathe chuck to hold the blank for drilling. I placed a ¼' thick shim up against the "exterior" of my blank that I was trying to preserve and put a 1/8" shim against the opposite side to make a sandwich around the blank. I inadvertently discovered that Home Depot paint sticks are exactly 1/8" thick during this process too! I used several layers of tightly wrapped plastic wrap around the sandwich to hold it all together and put it into the chuck. The pen jaws should each sit flat against the sandwich, you are not placing it across corners like you would in a regular drilling situation. Using the blank sandwich essentially moved the edge I was trying to preserve up to near where the drill bit will go through the blank. At this point, I drilled the blank as I would for any other pen blank, glued in my tube and squared the ends.
There are two important things to remember when turning the blank down to size. First is that you will probably need to plan to turn the blank to some form of an oval shape (think insect body shape) to show some of the patina of the blank without turning it completely away. The closer you go to truly round will show less of the patina. The exact shape is up to you and how much of the side you're trying to show. In my case because I had very pitted and weathered wood I was able to turn down to almost cylindrical and still show the wood I was trying to preserve. The second thing to remember is when turning with something off center you need to be gentle with your tools because you will have wood against the tools for three sides and air when the fourth side is facing the tool because of the offset hole.
Once I had the blank turned down to show enough of the patina and at the shape that I wanted I worked my way through sanding grits (150, 220, 320, 400, 600) mostly by hand without the lathe on so that I wouldn't ruin or otherwise sand off my ridges. Once that was done I turned the lathe on low and put on 2-3 coats of Gluboost Ultrathin to try to make sure everything had a coat of CA and hoped to re-stabilize the edges near the ridges. Next was 2-3 coats of Gluboost thin and then sanded it all back a little bit with 320 to try and flatten out some pitting the Gluboost was highlighting. I used the 400 and 600 grit to come back up to normal starting point and then proceeded to do a coat of ultrathin, 2-3 thin and finished with regular Gluboost. I used Dr Kirk's Scratch Free with the lath on low speed followed by the three step Dr Kirk's polish to shine and polish the CA with the lathe on a high speed.
The blank is mounted on a Gatsby pen from Exotic Blanks.
Thanks very much for reading and taking a look at the pen. Several of these will be going to my remaining Aunts & Uncles along with a few cousins.