Box illusion Bandit

Signed-In Members Don't See This Ad
See more from SteveJ

SteveJ

Member
Joined
Jul 11, 2012
Messages
3,538
Location
Grand Junction, Colorado
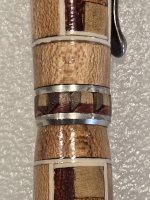
I will be teaching a class on creating box illusion pens at the local Woodcraft store in Las Vegas (I travel there to see my in-laws regularly). I figured I should make another one to remind me of the process! I had on hand a batch of "Bandit" kits from Exoticblanks and decided that would be a good test of my box illusion skills.

While I am not satisfied with the larger boxes, I am really happy with the band. It is made up of 10 "mini" boxes. In retrospect I should have used the same woods on the band as I did for the barrels.
Box illusion bandit 3.jpg
Box illusion bandit 4.jpg

Box illusion bandit 2.jpg


If you are interested in learning how to do this, contact woodcraft of Las Vegas and join me August 9th!
 

Attachments

  • Box illusion bandit 1.jpg
    Box illusion bandit 1.jpg
    278.3 KB · Views: 34
Signed-In Members Don't See This Ad
Those tiny pieces in the band were a real hassle to get lined up correctly. I was worried they would show gaps when turned down, but I managed to keep them tight enough that no metal shows underneath them. I think I will try another segmented band when I get back to it.
 
Oh, I like the larger boxes because you can see the effect without needed cheeter glasses. The small ones while I am sure took a lot of patience and skill just don't show the effect as well.
I think the large ones are amazing.
 
Too bad I cannot make Las Vegas. Perhaps some time in the future you can consider a tutorial?
I thought I had published a tutorial but couldn't find it - besides, I have improved my method since I first did these (although I forgot one important note when I did this one which sticks out to me like a sore thumb but I wont mention since other may not notice!).

I originally cut the pieces by hand using this jig and a Japanese saw:
1753290295732.png

The jig allowed me to insure that the boxes wouldn't be endgrain. When I went to using the bandsaw, at first that was an issue which muddied the finished product. For a full tutorial I would need to create another one, but here are some pictures to give you some idea of what it entails.

First make the box illusion, cutting two pieces at 45* and wrap them around a square rod. You can do this one at a time using a jig like I've shown, or use your bandsaw (I wouldn't try it on a tablesaw, although it may be possible on the Byrnes tablesaw with adequate safety guards). You can do a longer stick by using the bandsaw, but you do make some sacrifices to do so. The stick should look like this:
Box 1.jpg


You need three or four (I think three results in a better looking blank) pieces 3/4 of an inch long which in turn are glued together to form a block which looks like this:
box 2.jpg

The accent strip should be glued to the stick before cutting - and this is where I made my mistake. You need to leave one of the 3/4 inch pieces without the accent strip so that you only have it in the middle, surrounding the middle "box". Glue the side pieces to your boxes, trim to the edge of the boxes and glue another accent strip on the ends along with endcaps. I generally drill before putting the endcaps to make sure I have the hole centered.

Hope this helps. If you have any other questions, please ask.
 
Back
Top Bottom