You are using an out of date browser. It may not display this or other websites correctly.
You should upgrade or use an alternative browser.
You should upgrade or use an alternative browser.
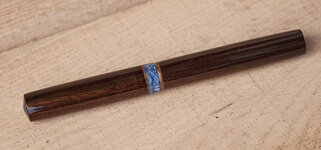
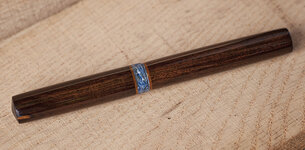
Another domestic wood fountain pen
- Thread starter Fred Bruche
- Start date
Signed-In Members Don't See This Ad
See more from Fred Bruche
Yes, the section is lined with blue resin. The resin blank I was going to use to make the section showed limited "figure". So a design modification was in order and it was used to make only the "guts of the section", inner lining and the threaded tenon.
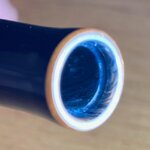
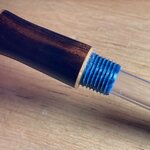
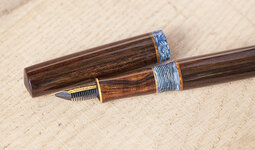
I love that center band! The straight grain suits it well as a "texture" contrast to the band. The wood section is something I don't recall seeing before, but it really makes this stand out from the other kitless pens I've seen for that uniqueness. Outstanding!
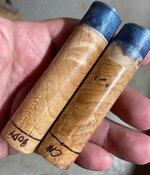
Both the cap and the body are fully sleeved with resin, possibly not necessary for the body but for the cap it will significantly slow/prevent the ink from drying in the section feed. I had limited success inserting sleeve material in the blank, some gluing issues, and I also saw that the material to make the sleeve (ultimately hidden!) could become the more expensive part of the pen (depending on the material). So I thought of an alternative and it's been working for me on the fountain pens I've posted here in the past few weeks. What I do now is to drill the wood blank a few mm larger than the inside of the finished pen, pour liquid epoxy resin (I use liquid diamonds dyed with mica pigments usually) to fill the hole and some extra that will become the center band or the tenon for the body/cap junction. Let the resin cure for at least a few days before turning it. And as they say, a picture is worth a picture... here are parts that are ready to be drilled and turned (the extra on the cap could be less material but I guess I was feeling generous while pouring it). They are labeled because the inside is drilled differently of course. Here the body wood piece was drilled with a 27/64" bit, and the inside of the pen body will be drilled with a 9mm bit.
I'm going to try this process soon.
How do you align the grain? My guess is by removing threading on the cap until it matches but maybe you have a better method?
Thanks.
If the wood you use is porous/open grain or not stabilized I would suggest sealing the inside with thin CA before pouring the resin.
I typically cast with Alumilite and do use a pressure pot to eliminate bubbles. Sealing pores beforehand with a thin CA is a good idea. Once again, thank you for the tips and info!! Hopefully, I'll have one up for show soon!
Kevin
Signed-In Members Don't See This Ad
@Fred Bruche
VERY NICE indeed !!!
B*E*A*U*T*I*F*U*L , in fact !!!!
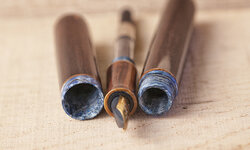
Just a minor question . . . In picture #3, there seems to be a bit of blue (acrylic) peeking out at the far end of the section.
I don't think that specific piece of blue shows when the pen is assembled.
That would suggest to me that you used that blue acrylic as a liner for the DIW of the section . . . is that right ? . . Just curious.
mark james
IAP Collection, Curator
Superb! Fred, the blank is very attractive, but your modifications/additions are really stunning. Very well done. 

Alan Morrison
Member
Lovely timber, Fred, lovely pen.
Fred Bruche
Member
Thanks Mal!@Fred Bruche
VERY NICE indeed !!!
B*E*A*U*T*I*F*U*L , in fact !!!!
Just a minor question . . . In picture #3, there seems to be a bit of blue (acrylic) peeking out at the far end of the section.
I don't think that specific piece of blue shows when the pen is assembled.
That would suggest to me that you used that blue acrylic as a liner for the DIW of the section . . . is that right ? . . Just curious.
Yes, the section is lined with blue resin. The resin blank I was going to use to make the section showed limited "figure". So a design modification was in order and it was used to make only the "guts of the section", inner lining and the threaded tenon.


moke
Member
Love the center band! Well done!
Jim15
Member
Awesome work.
sorcerertd
Member
Thanks Mal!
Yes, the section is lined with blue resin. The resin blank I was going to use to make the section showed limited "figure". So a design modification was in order and it was used to make only the "guts of the section", inner lining and the threaded tenon.
View attachment 320540 View attachment 320541
I love that center band! The straight grain suits it well as a "texture" contrast to the band. The wood section is something I don't recall seeing before, but it really makes this stand out from the other kitless pens I've seen for that uniqueness. Outstanding!
Roly
Member
Beautiful. Do you actually sleeve the the whole cap and body with acrylic and if so, do you turn it down insert it and then drill for the threading and such.
Bryguy
Member
Very pretty!
Paul in OKC
Member
Nice!
Fred Bruche
Member
Thank you Roelant.Beautiful. Do you actually sleeve the the whole cap and body with acrylic and if so, do you turn it down insert it and then drill for the threading and such.
Both the cap and the body are fully sleeved with resin, possibly not necessary for the body but for the cap it will significantly slow/prevent the ink from drying in the section feed. I had limited success inserting sleeve material in the blank, some gluing issues, and I also saw that the material to make the sleeve (ultimately hidden!) could become the more expensive part of the pen (depending on the material). So I thought of an alternative and it's been working for me on the fountain pens I've posted here in the past few weeks. What I do now is to drill the wood blank a few mm larger than the inside of the finished pen, pour liquid epoxy resin (I use liquid diamonds dyed with mica pigments usually) to fill the hole and some extra that will become the center band or the tenon for the body/cap junction. Let the resin cure for at least a few days before turning it. And as they say, a picture is worth a picture... here are parts that are ready to be drilled and turned (the extra on the cap could be less material but I guess I was feeling generous while pouring it). They are labeled because the inside is drilled differently of course. Here the body wood piece was drilled with a 27/64" bit, and the inside of the pen body will be drilled with a 9mm bit.

KMCloonan
Member
Very nice pen. As others have said, I love the center band, with the contrasting blue, and the lighter orange-ish rings. Wonderful color combination. Thanks also for explaining your process - I plan to do a lot of reading on how to make kitless pens, because of pens like yours and some others I have seen lately, I think this will be my next area to focus on. Thanks for the inspiration.
PatrickR
Member
Another great looking pen Fred!Thank you Roelant.
Both the cap and the body are fully sleeved with resin, possibly not necessary for the body but for the cap it will significantly slow/prevent the ink from drying in the section feed. I had limited success inserting sleeve material in the blank, some gluing issues, and I also saw that the material to make the sleeve (ultimately hidden!) could become the more expensive part of the pen (depending on the material). So I thought of an alternative and it's been working for me on the fountain pens I've posted here in the past few weeks. What I do now is to drill the wood blank a few mm larger than the inside of the finished pen, pour liquid epoxy resin (I use liquid diamonds dyed with mica pigments usually) to fill the hole and some extra that will become the center band or the tenon for the body/cap junction. Let the resin cure for at least a few days before turning it. And as they say, a picture is worth a picture... here are parts that are ready to be drilled and turned (the extra on the cap could be less material but I guess I was feeling generous while pouring it). They are labeled because the inside is drilled differently of course. Here the body wood piece was drilled with a 27/64" bit, and the inside of the pen body will be drilled with a 9mm bit.
View attachment 320596
I'm going to try this process soon.
How do you align the grain? My guess is by removing threading on the cap until it matches but maybe you have a better method?
Thanks.
Fred Bruche
Member
Same here, removing cap threads has worked for me, nothing better to offer. Since I use a triple start, on one hand there isn't much to remove generally but on the other hand it will only work with one of the three grooves. For the ones I have made so far I also don't find that a perfect grain alignment is aesthetically required (or at least it hasn't bothered me). Feel free to reach out with questions, glad to share what I've learned so far.Another great looking pen Fred!
I'm going to try this process soon.
How do you align the grain? My guess is by removing threading on the cap until it matches but maybe you have a better method?
Thanks.
PatrickR
Member
Thanks. I'll be doing some casting soon so I'll drill a couple blanks to try this out. Sometimes I end up doing things the hard way and wanted to check.Same here, removing cap threads has worked for me, nothing better to offer. Since I use a triple start, on one hand there isn't much to remove generally but on the other hand it will only work with one of the three grooves. For the ones I have made so far I also don't find that a perfect grain alignment is aesthetically required (or at least it hasn't bothered me). Feel free to reach out with questions, glad to share what I've learned so far.
NJturner
Member
Really nice pen Fred! I truly appreciated your explanation of how you did the sleeve pour. I am just getting into my own custom built pens and initial issues I have had were with sleeving. I want to continue to produce natural wood bodied pens versus 100% resin casting bodies, but know that the threading and stress of use require some support to the thin woods. One quick question - are you still putting the pour under pressure like a normal resin pour, or do you just leave it go since most isn't seen anyway?
Fred Bruche
Member
I use liquid diamond epoxy resin that doesn't require pressure to cure (mostly) bubble-free. But if you resin you are planning to use is typically cured under pressure then you should probably use it. No bubbles in the areas that will be threaded is always a goal.Really nice pen Fred! I truly appreciated your explanation of how you did the sleeve pour. I am just getting into my own custom built pens and initial issues I have had were with sleeving. I want to continue to produce natural wood bodied pens versus 100% resin casting bodies, but know that the threading and stress of use require some support to the thin woods. One quick question - are you still putting the pour under pressure like a normal resin pour, or do you just leave it go since most isn't seen anyway?
If the wood you use is porous/open grain or not stabilized I would suggest sealing the inside with thin CA before pouring the resin.
NJturner
Member
Thanks Fred!I use liquid diamond epoxy resin that doesn't require pressure to cure (mostly) bubble-free. But if you resin you are planning to use is typically cured under pressure then you should probably use it. No bubbles in the areas that will be threaded is always a goal.
If the wood you use is porous/open grain or not stabilized I would suggest sealing the inside with thin CA before pouring the resin.
I typically cast with Alumilite and do use a pressure pot to eliminate bubbles. Sealing pores beforehand with a thin CA is a good idea. Once again, thank you for the tips and info!! Hopefully, I'll have one up for show soon!
Kevin

