Worthless Wood

Signed-In Members Don't See This Ad

Cmiles1985

Member
Joined
Nov 12, 2013
Messages
1,611
Location
Aransas Pass, TX
Last weekend, I made an investment in a bandsaw and did some yard work. I had a large shrub in my backyard that has frozen several times, and it was finally time for the remainder to go. The stump of said shrub had some spalting and quite a few areas where the grubs had moved in (not too pretty the first go around on the bandsaw DAMHIKT). I cast several sets of worthless wood blanks from the stump, and I still have a lot of material left including the other have of the stump still in the ground!


Here is a bolt action made from one of the teal colored blanks


It became an Easter gift for my mom.
 
Signed-In Members Don't See This Ad

robutacion

Member
Joined
Aug 6, 2009
Messages
6,514
Location
Australia - SA Adelaide Hills
Last weekend, I made an investment in a bandsaw and did some yard work. I had a large shrub in my backyard that has frozen several times, and it was finally time for the remainder to go. The stump of said shrub had some spalting and quite a few areas where the grubs had moved in (not too pretty the first go around on the bandsaw DAMHIKT). I cast several sets of worthless wood blanks from the stump, and I still have a lot of material left including the other have of the stump still in the ground!

G'day,

Congratulations on your first trials, they are always exciting however, I would like you to allow me to to give you some important points of "worthless wood" or, the casting of wood and coloured resin regardless of what resin type you are using.

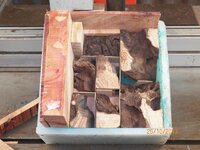
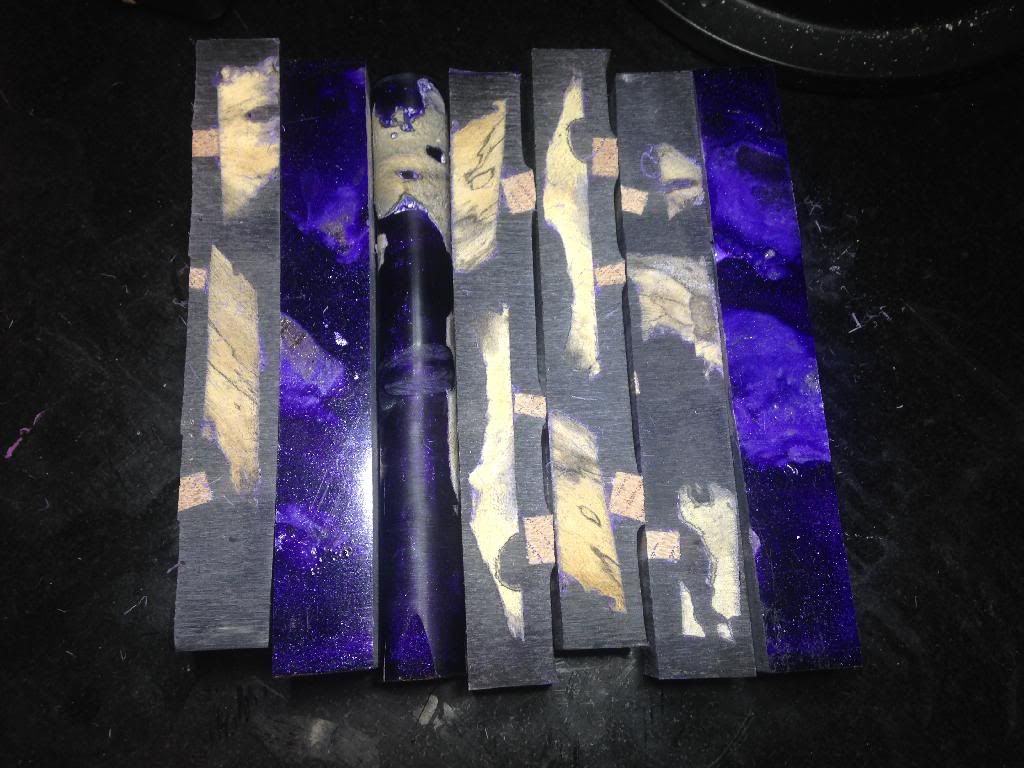
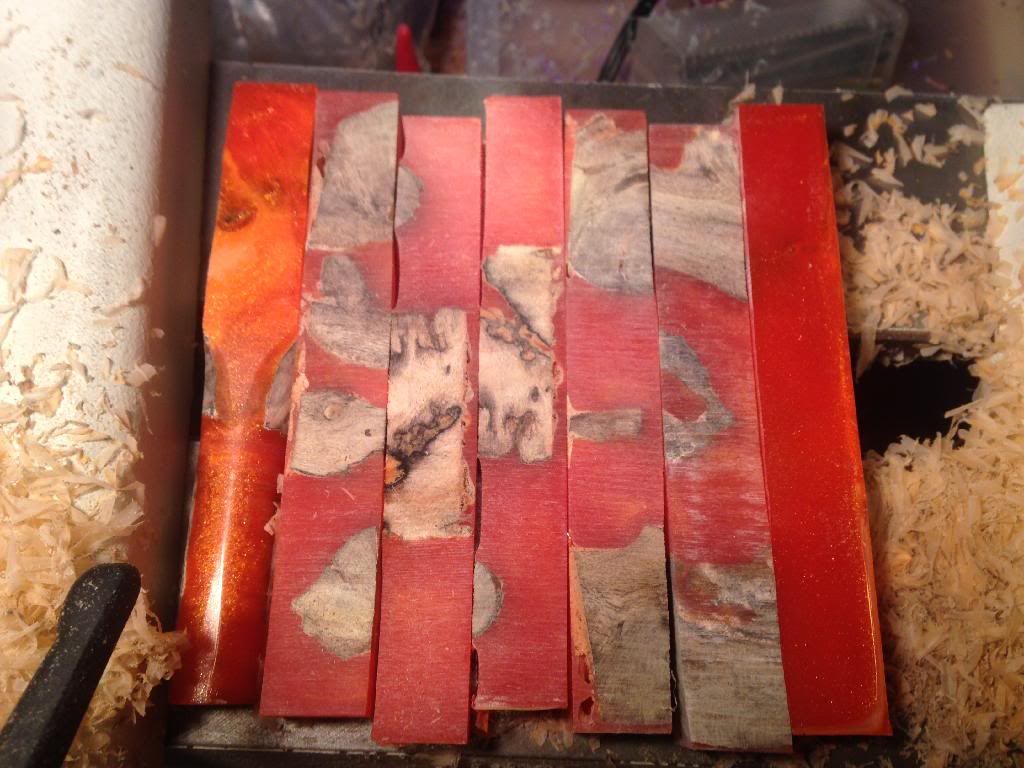
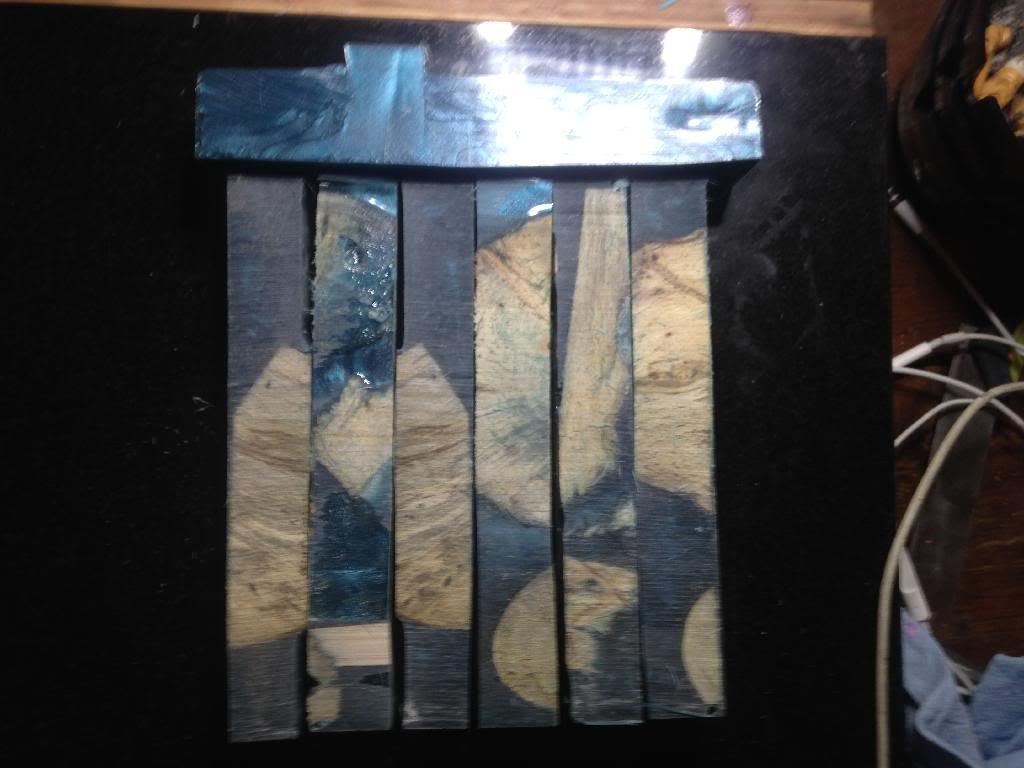
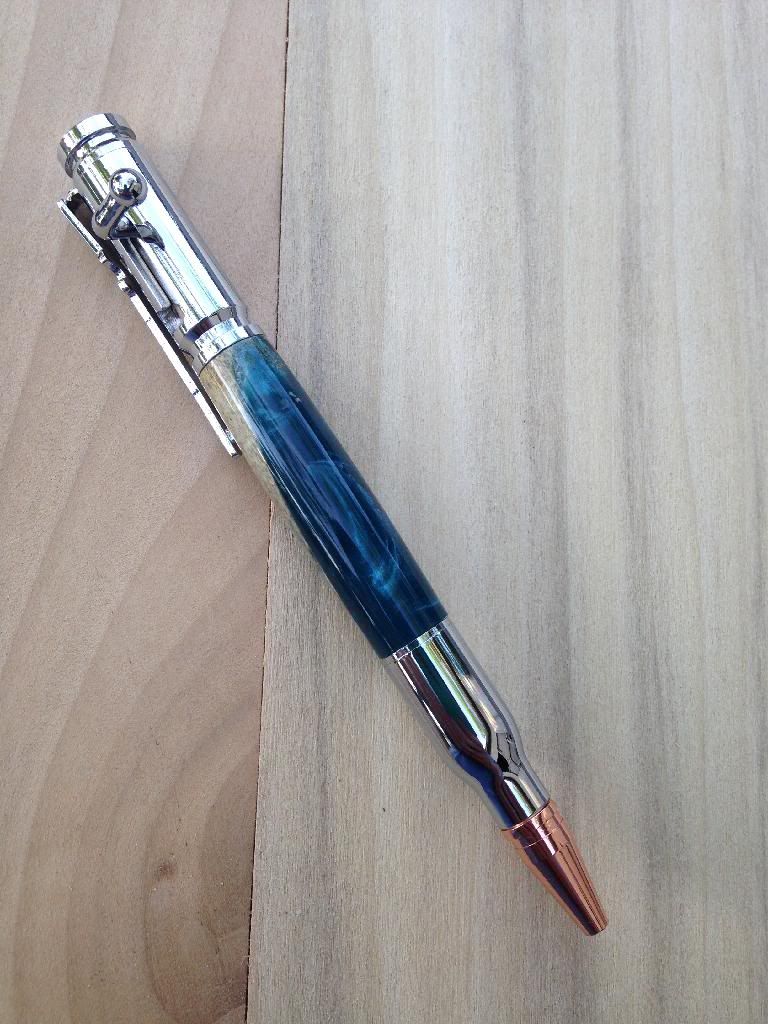
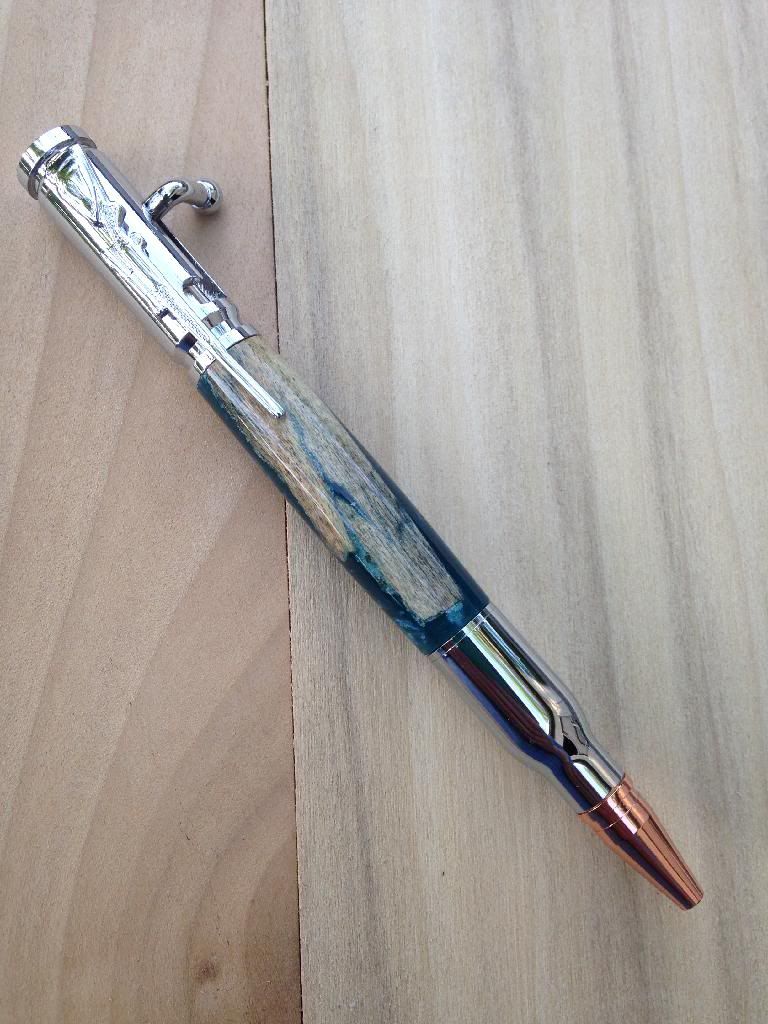
That first batch on the first pic show a typical rookie mistake and one that some people haven't find a solution for, and that is, preventing the wood to float...! Your blanks on that pic show what shouldn't be done, they are now pretty useless for making pens as the strips of wood you used to stop the wood bits to float are now also embedded too deep into the blank, and far too many of them. The second and third lot see not to have that problem but I see also, the wrong way to used those bits of wood you want to cast.

Not all bits of wood are suitable for casting, regardless of you pretty they are, one of the first things that you have to learn is to identify the wood pieces that are suitable for casting, based first on their size and shape, the first rule is that, you don't cast a piece of wood with square or machine cut angles or both ends, one square end is OK and that will be against the mold at one end, you can use 2 of these shaped pieces on a single blank but the ends of those bits of wood that are pointed towards the centre of the blanks, have to have a natural edge or something that does not resemble straight lines, chainsaw teeth marks, bandsaw marks, and so on.

You can use 3 pieces to make one blank, the 2 on each end have the natural edge towards the middle and if those 2 ends are small, enough to add a third bit of wood, you use one that was cut is such ways that has the natural edge on both ends.

Another thing that is wrong with some of your cast blanks is that, you used pieces that have square edges and are thinner than the 20 or 21mm square size, that is exactly what you used on the first top pic/batch and the reason why the wood strips you put on the top of the wood bits to stop them floating, are now there and they don't belong, if you make the bits of wood the normal pen size or slightly bigger (1 mm or 2), you can use those anti floating wood strips compressing the wood down and even if they get covering part of them, doesn't matter as you have to trim that after they are cast so, you clean the face of the blank that was at the bottom of the mold and then trim to correct size and you endup with a clean blank, with nothing more than what you want to be there but cut to correct pen blank sizes.

There are many ways to void floatation of whatever you want to cast, I don't know what sort of material you use on your molds but, if you make them out of the common white kitchen chopping boards, and use a PVC release agent on the mold and let it dry, you can use thick CA and accelerator to very quickly position the wood bits where you want in the mold and they will stay there when you pour the resin and while it cures.

The CA and accelerator together are ideal to make that job a lot faster then using only the thick CA, that can take some time and you have to hold it into place while it dries before you can move to the next bit of wood to glue. What you do is, you put a couple of drops of the thick CA on the bottom of the wood bit you want to put in the mold, and as soon as you do that, you quickly spray the general spot where the piece would go, you have to be accurate and fast as, the soon as the wood gets pressed against the accelerator, the whole thing sets in 3 to 5 seconds, so, you are free to get the next bit done and so on...!

I rely on that technique to do some of my Resifills (same as worthless wood, mutts, and other names given to wood cast with resin), using some type of materials.

I sure understand that you are just starting and you may haven't had any
instructions, suggestions from anyone so, you are just doing what you think is right and the way it is done however, that is not so and most people will see that they aren't right but, prefer not to say anything to the risk of upsetting you and be accused of being a mangrol however, you are most free to call me whatever you wish, what I'm trying to do is to help you but pointing out what you are doing wrong and hope that you see is as positive criticism, and a willingness to see you doing much better blanks than those and save you some money on wasted resin, wood and time.

I sell those type of blanks and I'm not in the least worried that you starting to make good blanks, probably better than mine and sell them here, again, that doesn't bother me at all, whatever the reason you are making those type blanks for, will only work, if you learn to do them right, after that, you are on your own...!

If you have any question, you just say so, if what I said is a little confusing without pics, I will put a few pics together for you, that is no problem at all, there are many other folks out there that either have just started casting or are considering in doing so, they will find this information of most importance to them after all, a like to support anyone that wants to have a go, and experience what is all about and that is, lots of fun and excitement...!

Cheers
George
 

Cmiles1985

Member
Joined
Nov 12, 2013
Messages
1,611
Location
Aransas Pass, TX
Thanks for the pointers George. It is pretty obvious that the top photo was my first go at it so the oak strips are visible. Those blanks have ended up as almost truly "worthless wood/resin". That is also why you see multiple machined faces of the wood in the purple blanks. I see two of the real blanks have multiple machined faces, but I think the way they've been cut for blanks (bolt action) has rid the pen of those faces. I have already turned most of them to round and will double check before I glue tubes in. I went a little backwards in turning these since the wood was fairly delicate. I turned them all round before doing any gluing just in case we had a blowout.

Thanks again for the advice and kind words! I may do some more casts this evening.
 

robutacion

Member
Joined
Aug 6, 2009
Messages
6,514
Location
Australia - SA Adelaide Hills
Thanks for the pointers George. It is pretty obvious that the top photo was my first go at it so the oak strips are visible. Those blanks have ended up as almost truly "worthless wood/resin". That is also why you see multiple machined faces of the wood in the purple blanks. I see two of the real blanks have multiple machined faces, but I think the way they've been cut for blanks (bolt action) has rid the pen of those faces. I have already turned most of them to round and will double check before I glue tubes in. I went a little backwards in turning these since the wood was fairly delicate. I turned them all round before doing any gluing just in case we had a blowout.

Thanks again for the advice and kind words! I may do some more casts this evening.

Your fit and finish are very good, that will help to sell any pen however, what I wanted to talk about, is in regards to my comments on my previous post, and I would you and others to consider this, take note on what I say/the message behind the words, and not the way I say it, that could be argumental.:wink:

I have a great respect for what you are doing, and I have seen you grow as a pen turner, you buy pen blanks from me and I will do the best I can to guide/assist you with every aspect of what you are trying to do, my intentions are good, my words selection, may not be as good, and for that I apologize.:)

I have found that, when I started to get involved with pen turning, about 8 years ago, in most of the aspects of pen making and casting, was not that much available for me to learn from, everyone making them were extremely secretive and unwilling to give any secrets away, with exception of Curtis, our Cactus Juice man that, had produce a great "starting" PDF file called, "Worthless wood blanks" produced in 2007 (thanks mate...!), you may be able to find in in our Library or, contact Curtis and request a copy of that document, I'm pretty sure, he will assist you with that.

That was the start but, a lot of other stuff was not mentioned and I learn it by trial and error, wasting a lot of material and time, that I believe can be avoided by, sharing a few more details about embedding wood and other materials in resin, regardless of what resin type you use however, there are slight differences in the use of the 2 most common resin types, the Polyester and the Polyurethane.

The correct mixing of the various colours types products (powders, liquid, past, etc....!) is the second most important aspect of cast wood and resin blanks, for me, the most important aspect is the way the wood pieces are cut and or positioned in the mold, they can easily make or break the blank effectiveness so, this in the area that I call your attention to, you can do better and I want to make sure you know how...!:wink:

I spend a considerable amount of time casting blanks that I have no intention in making more than 1 or 2, I do them to demonstrated to people here that, with casting, your imagination is the only limit (there are certain rules that have to be followed, off-course...!) and that is never a shortage of "things" to cast, that has been the point of most of my casting samples demonstrations, look around, look closely, you will be surprised of what you have near you that can be used to embed in resin and make a pen blank from, experience that excitement of waiting for the blank to harden so that you can turn it and see how it did turn up, that's great fun and rewarding, not always but, for the most part of it, and that is good enough for me, is that good enough for you...???:wink::biggrin:

Cheers
George
 

Cmiles1985

Member
Joined
Nov 12, 2013
Messages
1,611
Location
Aransas Pass, TX
Thank you George. I took no offense to anything in your previous post. I have met folks from all over the world in my 29 short years on this planet, and I understand that there are great cultural differences that reflect in the way a point is conveyed. I am thankful for the willingness of folks on this forum to share their experience and knowledge, no matter in how it is said.

I used Curtis's tutorial from either his site or the library for the beginning of my "experiment" and intend on practicing some more. Since it costs about $14 every time I fill the mold, it's a little tough to want to have too many experiments out there. I'll be practicing more on my old Shiffilera shrub stump as ther is a lot of it left! I will be using the tips and tricks above. The first thing I really need to do is mark out the 3/4" (20 mm) marks in my mold so I know how it's going to cut up in the end.
 

mark james

IAP Collection, Curator
Joined
Sep 6, 2012
Messages
12,770
Location
Medina, Ohio
GEORGE:

Two great posts! We all benefit from your hands-on experience! Thank you for sharing and assisting others to learn from your "lessons."

Be well!

Mark.

OH, I also like the blanks. First go? Not too bad!!!
 

robutacion

Member
Joined
Aug 6, 2009
Messages
6,514
Location
Australia - SA Adelaide Hills
Thank you George. I took no offense to anything in your previous post. I have met folks from all over the world in my 29 short years on this planet, and I understand that there are great cultural differences that reflect in the way a point is conveyed. I am thankful for the willingness of folks on this forum to share their experience and knowledge, no matter in how it is said.

I used Curtis's tutorial from either his site or the library for the beginning of my "experiment" and intend on practicing some more. Since it costs about $14 every time I fill the mold, it's a little tough to want to have too many experiments out there. I'll be practicing more on my old Shiffilera shrub stump as ther is a lot of it left! I will be using the tips and tricks above. The first thing I really need to do is mark out the 3/4" (20 mm) marks in my mold so I know how it's going to cut up in the end.


Thanks mate, I appreciate your words and understanding of my intentions.

Like so many other issues that I have spend years working with, I never had a problem in sharing them unfortunately, they are scattered all over the place, between my old website, other forums I have participated on, and on IAP since June 2009, I tend to respond to posts providing lots of info and pics that, some time later become buried with thousands of other posts and not in a place that I can refer to when I need, at any one time with ease.

Every so often, I correct this problem by gathering as much info of what has been said, done and shown and create my own thread with the main subject issue on its title.

This is what I should have been done since day one but, easy said than done, it all starts simple and then more questions are asked and I keep adding more information, by the time I realise that I' spending a considerable amount of time and effort, I will more likely than lot, have to repeat all this, in a few months down the track, as when I try to find where I put all that info, I can't remember or I can't find it.

For this same reason, and this is a thread where, what I'm talking about is happening, and I can see that so, it will make a lot more sense to me and everyone that I put all the information I want to share about this issue in a place everyone can find (including me...!) and under my name, as it was to be from the start.

I'm also upgrading my old website, with a new name (as bellow link) and where I will gathering all the mains issues shared all over the net and put in there, together with some others that I already salvaged from old threads. There will be a place where, most of my sales will be made from, under my webstore. At the moment there are only a few listings, that are not listed anywhere else, there are a few more that I'm ready to add that are in the same category and many more that will be transferred from my eBay store and a few extra created, that never had been listed before, either.

So, I will continue this discussion in more detail, as soon as I have the chance to created that new thread, at the moment I'm most busy trying to created a totally new web site, I'm doing it all by myself so, it may take a while...!

For now, I just leave you with a quick suggestion to your problem, I have many ways to go about it and I have to consider what I'm casting and how much I will lose of the casting, through the thickness of the bandsaw blade or any other tool that can be used for such purpose.

Cutting the blanks at 20mm square for casting, you are certainly on the border line of ending up with blanks that are too thin to be used with some pen kits, I tend to not go under 21mm but most of blanks I cut specifically for casting, they are cut at 22mm square.

In the example shown on how to create the "dividers" to delineate the wood position, these dividers (made of olive wood sapwood, only) are cut at the exact same thickness as the bandsaw blade I will be using to slice them up, I use 3 types of blades and each one has its thickness, I most use the 1/2" x 3 TPI x1.8mm thickness so, when I slice the cast blocks I slice them right at that spacer, maintaining the blank thickness to allow sanding, and at the same time, the spacer is cut off with the blade...!:wink:

This method also allows for you to use the wood spacer to glue you bits of wood in different positions, instead of having only one contact surface, you now have 3, in all blanks, capish...???:wink::biggrin:

Have a look in here..!:)

Cheers
George
 

Attachments

  • 001.JPG
    001.JPG
    80.4 KB · Views: 202
Last edited:

Cmiles1985

Member
Joined
Nov 12, 2013
Messages
1,611
Location
Aransas Pass, TX
Thanks for the link and the ideas! I ordered a fence and a miter gauge for my bandsaw. They should be here Wednesday. Provided that pesky little daytime activity (work) doesn't get in the way, I'll practice cutting some thin strips. I have a bunch of 3/4" oak strips in my shed. I also have a bunch of birch, oak and mesquite to turn into "worthless wood" blanks. I'd like to get good at it using the Shiffilera stump that I've been cutting up.
 

robutacion

Member
Joined
Aug 6, 2009
Messages
6,514
Location
Australia - SA Adelaide Hills
Thanks for the link and the ideas! I ordered a fence and a miter gauge for my bandsaw. They should be here Wednesday. Provided that pesky little daytime activity (work) doesn't get in the way, I'll practice cutting some thin strips. I have a bunch of 3/4" oak strips in my shed. I also have a bunch of birch, oak and mesquite to turn into "worthless wood" blanks. I'd like to get good at it using the Shiffilera stump that I've been cutting up.

No probelm...!

Well, why don't you cut a 11" (gives you 2 pen blanks in length...!) long section of it and then slice it at 21 or 22mm to have enough, when you get the slices cut that a few pics and shows how they look like, I can suggest to you where to cut them.

Remember that, if you are trying to get as much as the stump edge to make pieces to cast, you can also use the chainsaw to slice the side of the stump with the better edging, 3" or 4" thick is good enough and you can handle that slice a lot better on the bandsaw....!

Cheers
George
 
Top Bottom