Using Buttons as Pen Finals

Signed-In Members Don't See This Ad

Fireengines

Member
Joined
Jan 22, 2012
Messages
540
Location
Plano, TX
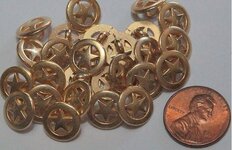
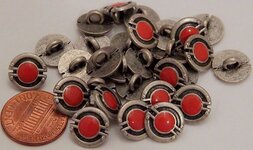
Today I sat down and did a little research for 11mm buttons that might be used as pen finials. Here is what I pruchased.

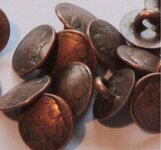
I also purchase some gold anchor bottons for my USS California pens. However, they may become a problem because of the way they are constructed. I am going to have to figure out a way to take them apart.
 

Attachments

  • button 1.jpg
    button 1.jpg
    41.4 KB · Views: 245
  • button 2.jpg
    button 2.jpg
    43 KB · Views: 259
  • button 3.jpg
    button 3.jpg
    39.9 KB · Views: 220
  • button 4.jpg
    button 4.jpg
    51.3 KB · Views: 223
Signed-In Members Don't See This Ad

PenMan1

Member
Joined
Jul 8, 2009
Messages
6,380
Location
Eatonton, Georgia
Hand sand them from the bottom on a belt sander, turned off, unplugged and turned upside down. Depending on the edge decoration, you can use buttons up to 16 mm. By holdind the button flat sanding the back of it, not only will you remove the thread loop (which pops right off on pressed buttons), you can reduce the thickness to your desired density and if careful, it will remove the outside edges evenly, because the button was cupped down to press in the thread loop.
 

PenMan1

Member
Joined
Jul 8, 2009
Messages
6,380
Location
Eatonton, Georgia


The back sanding method was used on this pen to put a Civil War jacket button onto the pen barrel AND in the cap end. The proceedure for the cap button and the pen barrel were exactly the same proceedure EXCEPT the button was not flattened for the cap decoration.

I am trying to find a photo of the top of the cap. If I find it, I'll post to this thread.
 

JohnU

Member
Joined
Jan 31, 2008
Messages
4,960
Location
Ottawa, Illinois
This was back in 2008 so I dont remember what size the star button/concho was or exactly what company I bought it from but was from a leather company. It worked nicely on top but was a little oversized. I think I used epozy and a screw after drilling a hole in the company finial. Sorry, my picture is as poor as my memory.
 

Attachments

  • 200863024341_Jr%20Gent%20jake.jpg
    200863024341_Jr%20Gent%20jake.jpg
    61.4 KB · Views: 284

wood-of-1kind

Member
Joined
Jul 10, 2005
Messages
4,115
Location
Toronto, ON, Canada
I will have to try that AGAIN! The last time I did, the sander took the button and it shot out like a bullet.

Try drilling an appropriate sized hole in a scrap piece of wood. The size has to be snug. That will give you a holder to insert your button in. Sand slowly without exerting a lot of pressure. Should allow you to sand without the button acting as a projectile.
 
Last edited:

plantman

Member
Joined
Jan 2, 2012
Messages
3,437
Location
Green Bay, Wi
:bananen_smilies068: Here is a little trick I use when I need to hold something small to sand or work on. I go into my wife's shop and grab some Florest's tape ( Cling ). It is used to secure foam or other things to glass. It's sticky and will hold small objects without getting your fingers sanded. Apply a small piece of tape to the end of a dowel and add your button. You could also dish out the end of the dowel to hold the button firmer. This is the method a gem cutter would use to shape stones. Tape can be found at any store that sells craft supplies. If you want to cut the star or some other part of your button out, take a small pece of plywood and carve a hole the size and shape of your thread loop in the center. Use a little two sided tape and add the button. Put a fine metal cutting blade in your scroll saw and cut the outside ring straight into the point of the star. Turn your plywood and do the next point. You don't have to completely cut the star free, as it will be easy to take a pliers and work the ring off. Take a metal file to clean up the points and your ready to go. If I am going to use something on the barrel, I will take a small brass hammer and use the anvil on my vice to gently flatten it and round by hand to fit. Jim S
 

PTsideshow

Member
Joined
Dec 26, 2011
Messages
1,033
Location
Macomb County Michigan
When your in your local craft emporium, cruise up and down the scrap booking isles looking at the small bits and bobs that they use to give interest to their pages. You will be amazed at what they have and the ears the they use to attach them to the page are flat and can be cut off with sharp scissors. Plus an added benefit it remember to check out the seasonal items, as they will work for embedding or as finials.

Double sides foam tape works along with hot glue, and a hair dryer or embossing hot air gun while soften the hot glue so it can be removed.
:clown:
 
Top Bottom