One of my Co-workers uncle saw the pen I gave her for Christmas and rally liked it. He is a deer hunter and was wondering if I could make one from antler. I've never done anything with antler so I would like to know if there is anything special prepping the blanks, turning or finishing the pen. Thanks for the help.

You are using an out of date browser. It may not display this or other websites correctly.
You should upgrade or use an alternative browser.
You should upgrade or use an alternative browser.
Turning Antler
- Thread starter Band Saw Box
- Start date
Signed-In Members Don't See This Ad
Signed-In Members Don't See This Ad
ironman123
Member
Ventilation. I think it stink.
Ray
Ray
billspenfactory
Member
The worst part of the smell is when you are cutting it to size. Turn just like wood but the ride is going to be bumpy don't make it completely round leave some of the brown rough part gives it more character (IMO) then finish with ca just like you do wood. (Sharp,Sharp tools and you may need to reshapen as it will dull them pretty quick.
nightowl
Member
I agree with the above comments. My only other suggestion is that when you glue that barrel in use Gorilla glue instead of CA. It just seems to expand an hold better for me.
Can it be finished with other then CA? How does Epoxy work for gluing in the tubes.
tazhunter0
Member
All of the above. Plus make sure you wear a mask. About 90% of the pens I sell are made from antler and I do 15-20 a month from antler. Take your time turning it and use very sharp tools.
Good Luck and post some pics when done.
Good Luck and post some pics when done.
jimm1
Member
I won't speak for others, but I season my antlers for a year before I turn them. I have boxes that are dated. This way I know they won't shrink or swell ant more.
billspenfactory
Member
I do agree with Jim I do have antlers that are well seasoned. Fresh or green antler are going to smell really band and they could crack later on as they dry out. As far a what to use to glue tubes I us thick ca but I sure epoxy would word well also.
LeeR
Member
I was given a box of antlers, and I thought I'd lose it cutting it up with bandsaw. Lots of ventilation is a good idea! A strong fan blowing air past you would be prudent. ")
I have only done one pen with it, but it was rewarding, and came out very nice. I finished it like I do acrylics. Most of the final shaping with a scraper with some relief on the cutting edge, and some final passes with a skew to get it as smooth as I can, followed by Micro Mesh final sanding/polishing. I di dnot use any CA, but I think I used some plastic polish after sanding.
I have only done one pen with it, but it was rewarding, and came out very nice. I finished it like I do acrylics. Most of the final shaping with a scraper with some relief on the cutting edge, and some final passes with a skew to get it as smooth as I can, followed by Micro Mesh final sanding/polishing. I di dnot use any CA, but I think I used some plastic polish after sanding.
Last edited:
billspenfactory
Member
thats really band or bad either way is not going to be good. and for the finish I still would do it just like you do wood with ca
Tim'sTurnings
Member
Can it be finished with other then CA? How does Epoxy work for gluing in the tubes.
I've made quite a few antler pens, they sell very well. They do smell pretty bad and are sometimes difficult to drill.
I drill antler on the lathe with a fairly straight piece. I line it up between the live center and the drill bit and hold the antler in place with pliers and a piece of paper towel cushioning the jaws. When I line up the drill and live center I try to drill as to leave some of the outside "bark" on the antler so it will be seen after turning. Turn as you do wood. I find them very easy to turn myself and the sanding goes very quickly. I start with a roughing gouge to get round and then I use a Versatool or skew to finish. I finish sand with the micro mesh pads.
I use epoxy to glue in the tubes and I finish with Shellawax (I am stating to use Deft Lacquer to finish sometimes). I don't like using CA so I don't. If I'm in a big hurry and the drilled hole is tight I sometimes use CA to glue the tube in but usually epoxy. I tried CA as a finish once, and I will not do it again.
scottsheapens
Member
I have done few deer antler pens. The hardest part for me is the drilling for the tubes. What a pain. If some has a good solution for a jig for a drill press, please PM me.
It smells like you are at the dentist getting your tooth drilled. Once you get past that, very easy turning. Just take your time. I sand to 600 grit and then use a good sealer wax and they come out great.
It smells like you are at the dentist getting your tooth drilled. Once you get past that, very easy turning. Just take your time. I sand to 600 grit and then use a good sealer wax and they come out great.
TimS124
Member
Dust protection is a must. The means vacuuming it at the source as well as filtering it before it can enter your lungs.
Unless perhaps you have a spare set of lungs then just be sure to swap in your "shop lungs" before breathing the antler dust. You definitely don't want that in your "good lungs".
Don't limit yourself to just pens. The small tines of antlers that are too small, or too curved, for pens can be used for styluses, letter opener handles, bottle openers (the smaller kits that use 7mm tubes), sliced to make jewelry (assuming you have a scroll saw, band saw, laser cutter, jeweler's saw, or comparable). I've posted pictures of several of those items as I used pieces that wouldn't work for pens…
I finish mine by dry sanding/polishing (slowly to avoid heat softening and tearing the micro mesh pads). Then I wipe on boiled linseed oil, wipe off the excess, and apply several layers of CA finish, then polish the CA finish.
For the odd-shaped items like styluses that are using the really curvy tines, I hand wipe on the CA finish (wearing nitrile gloves) working more than half the length at a time (with a generous overlap in the middle area ) so I always have somewhere to hold while the finish is drying.
Pitoon
Member
I've turned several antler pens. my advice, try to stay out of the marrow (spongy area) of the antler. You can finish the pen just like a CA finish by wet sanding going up on your grits. It will polish nicely.
....be warned if you try to wet sand marrow section it will clog with the greyish slurry from the sand paper.
A mask is a must as it will produce a lot of dust you don't want to breath in....and keep the windows open (you will understand once you start turning it).
Pitoon
....be warned if you try to wet sand marrow section it will clog with the greyish slurry from the sand paper.
A mask is a must as it will produce a lot of dust you don't want to breath in....and keep the windows open (you will understand once you start turning it).
Pitoon
Last edited:
OZturner
Member
Dan,
Deer are not native in Australia, so I have no experience to offer.
Except when I consider that which is written and said, or that which was not written or said.
As well as ventilation,
It seems to me you might need to start with
"Our Father who aren't in Heaven" and so on.
All joking aside, go for it, you only have your wife and neighbours to loose.
With your skill, you will make it look easy.
Regards, and a Safe and Prosperous New Year to All.
Brian.
CrimsonKeel
Member
Ive made a couple and using a scraper worked alot better for me than a gouge.
to get the center drilled i lined it up between centers and rounded one end that i then grabbed with my chuck and drilled on the lathe.
Did a BLO wipe then blo/ca finish. I got into the marrow and it ended up giving it a beautiful contrast with the white antler.
to get the center drilled i lined it up between centers and rounded one end that i then grabbed with my chuck and drilled on the lathe.
Did a BLO wipe then blo/ca finish. I got into the marrow and it ended up giving it a beautiful contrast with the white antler.
Lamplight66
Member
Can it be finished with other then CA? How does Epoxy work for gluing in the tubes.
I always use two part epoxy to glue in my tubes, as well, I also always finish with about 4 coats of thin c.a., then usually about 4-5 coats of medium. I have not had any problems with it. To me, it turns just as good as wood. To polish them, I wet-sand with micromesh foam pads. But, I don't start with the first one (1500) To me, this is just too coarse. If you can a good smooth application, you won't need it. Some guys might call me out on this, but I get compliments even from people who have been penturners for longer than I have!
I've always used ca to glue up my tubes. I've found that taking your time is a must, I've ruined several tubes because I've rushed. I only use a mandrel and I've noticed that it can over tighten when you turn and crush the tube. Now I stop often and make sure it hasn't over tightened. I normally won't ca finish antler but I will try to fill in the spongey part with ca. I usually finish with a friction polish and always get compliments.
mightymavkev
Member
I've turned about 50-75 bullet pens in deer antler. I use 15 minute epoxy for gluing tubes. I've had several come loose on me with CA and frankly I find epoxy easier to work with on tube glue ups.
For drilling, this is the process I follow:
I first examine the piece around all sides using the brass tube next to it to try to find the best angle through the piece that I think would provide the most color contrast and also leave enough material for the pen barrel. You generally don't want to just go straight through the center of the bone - especially on a really thick piece, because it will usually just turn out pretty white. If you want coloration and character variance through the blank, try to position the pen tube through the piece in such a way that it leaves as much of the outer layers on the pen as possible without making it so you don't have enough material in the middle to keep a round shape.
Once I determine how I want the tube through the piece, I use a sharpie and draw rough guidelines on the antler perpendicular to each end of the pen tube (I'm holding the pen tube at my desired angle on the side of the piece with one hand and just drawing lines on either end of the pen tube with the other).
I then cut the piece along those guidelines leaving two somewhat parallel ends to the piece.
I then place the piece on the lathe between a 60 degree dead center in the headstock and a 60 degree live center in the tail stock. I only apply enough pressure between centers to allow the piece to rotate on the lathe.
Once rotating between centers, you will be able to see a "ghost image" of the blank and judge it's thickness across the entire blank. I view it from above and from the side both while spinning and if it is too skinny in the middle, I back off the live center and adjust the center points until I get a "ghost image" that is thick enough.
Once I have that established, I crank down on the tail stock just enough so that I can start turning the blank.
I use a square carbide tool with a slight radius and try to get the lathe speed as fast as possible and take light cuts until I get the blank as round as possible. It doesn't have to be completely round at this point, but it helps.
NOTE: All I'm doing at this stage is establishing a straight blank that I can safely drill on the lathe without blowing through the side of the antler piece. So you don't really have to turn the piece round much more than a short section of one end if you want for your 4-jaw chuck to hold on to. I just usually go ahead and turn the whole blank down as much as I can at this point since I'm already there.
Once turned, I place one end in my 4 jaw chuck. I use spigot jaws. I use the tailstock live center cone to hold the piece center while I tighten the chuck jaws.
Then I replace the live center with my jacobs chuck and drill the blank with the appropriate bit at a VERY SLOW SPEED!!!
You will fine that some pieces will drill extremely easily and others will drill very hard. I use the absolute slowest speed my lathe will go to (whatever that is on a delta 46-460) and advance the bit no more than 1/2 inch at a time before extracting it and cleaning it. I use an old tooth brush to clean out the drill bit each time I extract it. That's basically because even at such a slow speed, it will still be pretty hot to touch sometimes and also, I've cut my fingers before just trying to clean the antler from the bit.
I've found that using this practice, I can get close to 100% success rate on creating usable pen blanks without cracking, splitting or drilling through the side of the antler piece.
From this point, it's just like any other pen blank. Epoxy the tube in. Square the ends with a pen mill then turn to shape. I turn between centers.
I then remove the bushings and put the blank back between centers (apply the minimum tail stock pressure possible at this point as your applying direct pressure on the end of your brass tube).
I sand mine dry with the pen turning sandpaper kit available everywhere (the cardboard box with 5 rolls in it). I go through all 5 grits. I sand both directions - fwd and rev - with each grit. Then I clean with DNA. Then I apply 2 coats of thin CA then 5-6 coats of medium CA. I use aerosol accelerator VERY LIGHTLY between CA coats. In other words, I hold the can about 2 feet away from the spinning blank and spray once L->R and then once back R->L. That's it.
(btw, I am running my dust collection with the hose immediately behind the spinning piece throughout all of the sanding and CA application steps. I also where a dust mask)
Then I dry sand the CA with 400 abranet until all glossy spots are removed. Wipe the dust off and then wet sand with MM pads through all 9 grades in both directions for each grade.
When finished, I apply plastic polish once or twice.
Then I buff with the two step buffer system. First wheel is polished with the blue compound and the second wheel is just the plain cotton wheel. I use the one I think PSI sells with a #2MT mandrel.
I generally get a very deep high gloss and scratch free finish using this method.
I have recently began experimenting with the walnut oil based finishing technique on antler (Doctor's Walnut Oil and Pens Plus finish). Mike's (MikesPenTurningZ) process is what I've used and so far I'm pretty happy with the finish I'm getting. I have a couple test pens out there to see how the finish holds up to daily use. I can tell you that while not as glossy as CA, the Pens Plus finish, even on antler, is pretty shiny (I'd say semi-gloss +). However, the key difference between the two is that with the Pens Plus finish, the antler still "feels" like antler. The imperfections and character of the turned blank are still there and frankly I'm kind of partial to that look in the end. CA leaves a stunning looking piece, but it feels like plastic (because it basically is at that point).
My only real concern is how well it will hold up and that's what the test pens are for.
So that's my process. I'm not in any way suggesting my way is "the right" way. It may not be "correct" in some people's eyes but it has worked for me so far and I thought I'd pass it on .
Kevin
monark88
Member
A great response and I agree with everything, and generally do as you mentioned, Except for using the Sharpie for marking. The antler is porous and will absorb about everything except pencil or a pen. I now use a pencil after I once marked with a sharpie--and it had to be a red one, of course. It absorbed all the way to the bushings.
Otherwise a very good and easy to follow tutorial. thanks
Russ
Otherwise a very good and easy to follow tutorial. thanks
Russ
I've turned about 50-75 bullet pens in deer antler. I use 15 minute epoxy for gluing tubes. I've had several come loose on me with CA and frankly I find epoxy easier to work with on tube glue ups.
For drilling, this is the process I follow:
I first examine the piece around all sides using the brass tube next to it to try to find the best angle through the piece that I think would provide the most color contrast and also leave enough material for the pen barrel. You generally don't want to just go straight through the center of the bone - especially on a really thick piece, because it will usually just turn out pretty white. If you want coloration and character variance through the blank, try to position the pen tube through the piece in such a way that it leaves as much of the outer layers on the pen as possible without making it so you don't have enough material in the middle to keep a round shape.
Once I determine how I want the tube through the piece, I use a sharpie and draw rough guidelines on the antler perpendicular to each end of the pen tube (I'm holding the pen tube at my desired angle on the side of the piece with one hand and just drawing lines on either end of the pen tube with the other).
I then cut the piece along those guidelines leaving two somewhat parallel ends to the piece.
I then place the piece on the lathe between a 60 degree dead center in the headstock and a 60 degree live center in the tail stock. I only apply enough pressure between centers to allow the piece to rotate on the lathe.
Once rotating between centers, you will be able to see a "ghost image" of the blank and judge it's thickness across the entire blank. I view it from above and from the side both while spinning and if it is too skinny in the middle, I back off the live center and adjust the center points until I get a "ghost image" that is thick enough.
Once I have that established, I crank down on the tail stock just enough so that I can start turning the blank.
I use a square carbide tool with a slight radius and try to get the lathe speed as fast as possible and take light cuts until I get the blank as round as possible. It doesn't have to be completely round at this point, but it helps.
NOTE: All I'm doing at this stage is establishing a straight blank that I can safely drill on the lathe without blowing through the side of the antler piece. So you don't really have to turn the piece round much more than a short section of one end if you want for your 4-jaw chuck to hold on to. I just usually go ahead and turn the whole blank down as much as I can at this point since I'm already there.
Once turned, I place one end in my 4 jaw chuck. I use spigot jaws. I use the tailstock live center cone to hold the piece center while I tighten the chuck jaws.
Then I replace the live center with my jacobs chuck and drill the blank with the appropriate bit at a VERY SLOW SPEED!!!
You will fine that some pieces will drill extremely easily and others will drill very hard. I use the absolute slowest speed my lathe will go to (whatever that is on a delta 46-460) and advance the bit no more than 1/2 inch at a time before extracting it and cleaning it. I use an old tooth brush to clean out the drill bit each time I extract it. That's basically because even at such a slow speed, it will still be pretty hot to touch sometimes and also, I've cut my fingers before just trying to clean the antler from the bit.
I've found that using this practice, I can get close to 100% success rate on creating usable pen blanks without cracking, splitting or drilling through the side of the antler piece.
From this point, it's just like any other pen blank. Epoxy the tube in. Square the ends with a pen mill then turn to shape. I turn between centers.
I then remove the bushings and put the blank back between centers (apply the minimum tail stock pressure possible at this point as your applying direct pressure on the end of your brass tube).
I sand mine dry with the pen turning sandpaper kit available everywhere (the cardboard box with 5 rolls in it). I go through all 5 grits. I sand both directions - fwd and rev - with each grit. Then I clean with DNA. Then I apply 2 coats of thin CA then 5-6 coats of medium CA. I use aerosol accelerator VERY LIGHTLY between CA coats. In other words, I hold the can about 2 feet away from the spinning blank and spray once L->R and then once back R->L. That's it.
(btw, I am running my dust collection with the hose immediately behind the spinning piece throughout all of the sanding and CA application steps. I also where a dust mask)
Then I dry sand the CA with 400 abranet until all glossy spots are removed. Wipe the dust off and then wet sand with MM pads through all 9 grades in both directions for each grade.
When finished, I apply plastic polish once or twice.
Then I buff with the two step buffer system. First wheel is polished with the blue compound and the second wheel is just the plain cotton wheel. I use the one I think PSI sells with a #2MT mandrel.
I generally get a very deep high gloss and scratch free finish using this method.
I have recently began experimenting with the walnut oil based finishing technique on antler (Doctor's Walnut Oil and Pens Plus finish). Mike's (MikesPenTurningZ) process is what I've used and so far I'm pretty happy with the finish I'm getting. I have a couple test pens out there to see how the finish holds up to daily use. I can tell you that while not as glossy as CA, the Pens Plus finish, even on antler, is pretty shiny (I'd say semi-gloss +). However, the key difference between the two is that with the Pens Plus finish, the antler still "feels" like antler. The imperfections and character of the turned blank are still there and frankly I'm kind of partial to that look in the end. CA leaves a stunning looking piece, but it feels like plastic (because it basically is at that point).
My only real concern is how well it will hold up and that's what the test pens are for.
So that's my process. I'm not in any way suggesting my way is "the right" way. It may not be "correct" in some people's eyes but it has worked for me so far and I thought I'd pass it on .
Kevin
I would just like to add that finding the right piece of antler to begin with is important. You want to find a piece that is just big enough and straight enough. If you get to large of a piece you end up turning off the outer layer (or enamel), which leaves you with a very porous surface.
Rod
Rod
I make hundreds of antler pens every year, every one is glued and finished with CA. I've never had a problem with the CA holding on the antler, wood, resin or any other material.
Drilling I do on a lathe but without turning it round to begin with. I drill a pilot hole at the entry and exit point, hold the antler with a pliers and use the tailstock to push it into the drill bit which is held in the headstock by a Jacobs chuck.
Once in a while a piece smells bad but that means it is still green, don't use it. 95%+ of the hundreds of pounds of antler I've used has an odor ranging from mild to none at all.
I like curved pieces so I can leave some bark, or large pieces so there is lots of pith showing. The more character in the finished turning the better it will sell. The smooth, white and boring turnings are very slow selling.
Last edited:
mightymavkev
Member
I have the same experience on the smell. I find very few pieces actually smell at all. In fact, the most odor I get, if any, is from the bandsaw cuts I use to flatten the ends perpendicular to my tube direction I want.
I run the dust collector while turning however, so that likely pulls most of any smell there is while turning out of the air before it gets to me.
Bottom line, I don't think the smell is near as bad as other odors that come from the chemicals we all use in pen turning. But maybe I'm just weird.
I like curved pieces as well. For straight pieces, you can "guess" from looking at the cut ends how much color there is going to be toward the center of the bone and that will help in how you position the tube as well.
I'm not an expert, but it seems that the more color in the "pith", the older the antler is - at least I think I heard that somewhere. I'm not sure if that's true or not honestly.
In any case, on straight pieces, I typically go through the piece at an angle (e.g. top-left to bottom-right) so I pick up color variations from the outer layers at those two points. Most pens end up being thin enough such that when these areas are turned, the coloration wraps a good portion around the body of the pen anyway and doing it that way, I can more easily get more character at both ends of the barrel.
sseamen
Member
Drilling Antler with a drill press.
Take an old live center and mount it in a block of wood.
Cut your antler to size (try to keep the cuts as parallel as possible) and figure the path you want the tube to take thru it. I actually hold a brass tube against two different sides of the antler (90 degrees from each other) and make marks on the corners, as reference points, so I can see the approximate locations when I'm looking at the antler face end on. Then I trace the end of the tube on each face of the antler ends, to make sure I am 'just far enough' from the side of the antler.
I make an X in each of those circles to show me the entry and exit points.
I make a small divot in the exit face by holding the antler in a pair of pliers (cushion the jars with paper towel if you wish), setting the entry face on my drill press table and using the (turned off) drill press to push the tip of the drill into the center of the X.
Mount the wood block on your drill press table with the live center pointing up, centered under the tip of the drill bit.. Set the quill travel to stop just before the bit point will hit the point of the live center.
Using the pliers, set the divot in the exit face on the point of the live center and then start drilling thru the X on the entry face. When the travel stops, use the pliers to lift the blank up, onto the turning bit, to finish the hole.
It sounds complicated here, but it is quick and simple. Once you get used to estimating the path it works great, I haven't had a side blow-out in a long time. Using the live center guarantees you know exactly where the drill bit will exit.
One other point on turning antler. Sometimes you will have to turn down enough to get into a spongy area of the antler. If you do, I recommend using a sanding sealer. If you don't, you may find that the small holes in the antler fill up with discolored sanding dust and look dirty.
I have done few deer antler pens. The hardest part for me is the drilling for the tubes. What a pain. If some has a good solution for a jig for a drill press, please PM me.
It smells like you are at the dentist getting your tooth drilled. Once you get past that, very easy turning. Just take your time. I sand to 600 grit and then use a good sealer wax and they come out great.
Take an old live center and mount it in a block of wood.
Cut your antler to size (try to keep the cuts as parallel as possible) and figure the path you want the tube to take thru it. I actually hold a brass tube against two different sides of the antler (90 degrees from each other) and make marks on the corners, as reference points, so I can see the approximate locations when I'm looking at the antler face end on. Then I trace the end of the tube on each face of the antler ends, to make sure I am 'just far enough' from the side of the antler.
I make an X in each of those circles to show me the entry and exit points.
I make a small divot in the exit face by holding the antler in a pair of pliers (cushion the jars with paper towel if you wish), setting the entry face on my drill press table and using the (turned off) drill press to push the tip of the drill into the center of the X.
Mount the wood block on your drill press table with the live center pointing up, centered under the tip of the drill bit.. Set the quill travel to stop just before the bit point will hit the point of the live center.
Using the pliers, set the divot in the exit face on the point of the live center and then start drilling thru the X on the entry face. When the travel stops, use the pliers to lift the blank up, onto the turning bit, to finish the hole.
It sounds complicated here, but it is quick and simple. Once you get used to estimating the path it works great, I haven't had a side blow-out in a long time. Using the live center guarantees you know exactly where the drill bit will exit.
One other point on turning antler. Sometimes you will have to turn down enough to get into a spongy area of the antler. If you do, I recommend using a sanding sealer. If you don't, you may find that the small holes in the antler fill up with discolored sanding dust and look dirty.
Dan Masshardt
Member
Drilling is the biggest challenge of it I'd say - especially depending on the size, curve of the antler.
You should certainly use a respirator, not just a dust mask. If you can smell it you are breathing it and you sure can smell it unless your have some breathing protection.
It finishes quite nicely with CA. Some other finishes as well. Depending on how it comes out, something like CA might be required to seal it up if there is marrow type stuff showing.
I started turning antler with my carbide tool, but now I mostly use my heavy spindle gouge and sometimes finish up with the carbide insert tool.
I use epoxy to glue in the tube.
Antler is very rewarding when finished right. I found that if your not quite true when drilling, then epoxy is the way to go. Epoxy is a gap filler while ca is much more fragile. Depending on what pen you are pairing it with, you can get creative as to how to turn it. Bigger bushing pens are much easier to work with and yet smaller bushing usually means smaller tubes and smaller drills, which in turn means you can use more of the tips of the antler.
philipff
Member
See my article in the Library!
George417
Member
Can it be finished with other then CA? How does Epoxy work for gluing in the tubes.
Epoxy works fine. I use the 5 minute epoxy, never had a problem.
rossvh
Member
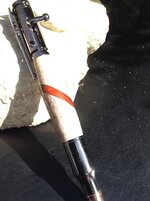
Deer Antler - with Aluminum and Padauck
I've turned a few but they all stink - no matter what. But they turn nicely.
Here's the last one I did. I added a piece of Padauk and sandwiched some thin aluminum as an accent. Turned out pretty nice.
I've turned a few but they all stink - no matter what. But they turn nicely.
Here's the last one I did. I added a piece of Padauk and sandwiched some thin aluminum as an accent. Turned out pretty nice.
Attachments
mightymavkev
Member
Love the segmenting idea! Did you use a jig to keep the cut pieces from sliding when clamping back together?
philipff
Member
See my article on antler in the Library
rossvh
Member
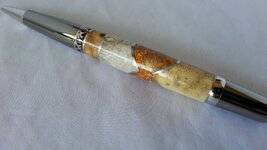
I haven't done a lot, but my neighbor gave me a box of old antler and so it looks like I'll be turning more soon. I agree with the comments about the smell. BAD! The ones I've done I have finished with a few coats of CA - more for sealing and keeping oil from getting to the antler. I also used med CA to glue the tubes and did some segmenting that turned out really nice. At least my customer was thrilled. Good luck. I think you'll enjoy it!
RossVH
RossVH
Attachments

I did this last year for a swap on another forum...Deer antler, stabilized golden buckeye burl and aluminum. Can't say I was over joyed by the process...but it turned out really well. As already mentioned on post after post on antler...massive filtration is required...antler, horn, nails will cause fatal lung injury. Can't do it right...or don't want to, shut off your lathe.
Attachments
Mike Powell
Member
wear a mask, and cut slow...