Tips requested for turning without bushings.

Signed-In Members Don't See This Ad

Bikerdad

Member
Joined
Apr 4, 2009
Messages
237
Location
Utah Valley
I have a PSI Polaris Twist pen kit that I picked up somehow or other, but have no bushings for it. :eek: I figured it's as good a subject for trying to turn "by caliper" as any other, so I'm here asking for tips on how to turn without bushings. Courtesy of the wondrously informative reference listing, I know what dimensions I need, so at least that part is sorted out.

Muchos gracias.
 
Signed-In Members Don't See This Ad

More4dan

Member
Joined
Mar 17, 2016
Messages
2,102
Location
Katy, TX
With my limited experience as a preface: careful you don't over tighten the tail stock, it can flare the ends of the tubes and crack your blank. Not happened but a risk. Measure often, go slow as you get close. You won't have the bushing to know if you are close. Careful near the end so you don't cut your centers. When sanding be careful not to round the ends when sanding down the length of your blank. Leave a few thousandths for sanding. Also if finishing with CA be careful to protect your centers. I make HDPE plastic bushings for sanding and coating with CA.


Sent from my iPhone using Penturners.org mobile app
 

Edgar

New Member Advocate
Staff member
Joined
Feb 6, 2013
Messages
6,900
Location
Alvin, TX 77511
Several possibilities:

1. Make your own bushings - if it's a one time thing, you can simply make them out of wood. If you want them to be a little more durable, use a harder material like corian or aluminum. I always remove the bushings & switch to delrin bushings before sanding & finishing - that's even more important when using bushings made from soft material.

2. See if you have bushings for another kit that fit the ID of the tube & just use those. Measure the shoulder of the bushings to see how much more or less you will need to turn the blank, turn it down close to what you need & start using calipers to get down to final size.

3. Turn between centers without bushings, but for best results, you should use 60 deg centers. Be careful not to overtighten the blank so you don't flare out the tube or crack the blank.

There might well be other alternatives, but these are the ones I use when I don't have the proper bushings. I do prefer #2 though.
 

magpens

Member
Joined
Feb 2, 2011
Messages
15,911
Location
Canada
As Edgar said, you need a 60 degree center at each end.

Dead center at the headstock end.

Live center at the tailstock end.

Measure, measure, measure ... and get a feeling for how much you are taking off with each cut.

The Polaris kit may not be the best for starting your "trip" because it has rounded ends.

Might be better to practice by doing a straight-sided blank like a Bolt Action. . I don't recommend a slimline because of the small diameter.
 

PenPal

Member
Joined
Nov 29, 2006
Messages
2,708
Location
Canberra, A.C.T., Australia.
The mechanics attended to I use two calipers ,I never rely on the measurements given but measure off each end of the kit (To be sure) I have found variations.

Just finished these two it paid dividends for me.

My task for personal use two fountains ,matched nibs for different coloured inks.

Kind regards Peter.
 

Attachments

  • DSCF8121.JPG
    DSCF8121.JPG
    55.6 KB · Views: 226
  • DSCF8146.JPG
    DSCF8146.JPG
    41.7 KB · Views: 227

leehljp

Member Liaison
Joined
Feb 6, 2005
Messages
9,331
Location
Tunica, Mississippi,
A little history here:

When you are turning TBC without bushings,60° centers are NOT necessary.

A 60° center IS necessary for Mandrel Ends and With JohnnyCNC's bushings, and any bushings made FOR 60°. For general bushings that are made for mandrels, it does not matter which centers are used on those bushings.

Back in '06 or '07, Frank aka "Rifleman" mentioned someone (on another forum?) using a rare term of turning without a mandrel. The first time he mentioned it, I wondered what in the world he was talking about. Then, a few weeks later, he mentioned it again. then, I had remembered Johnny CNC also mentioning this. (I was having trouble of separating bushings from the blank after finish - breaking and chipping the finish. Franks' reply was to this end.)

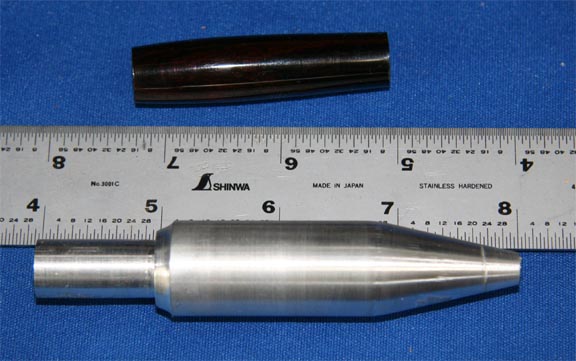
With that bit of information, I took 1 inch round piece of aluminum and turned a drive center. It was not 60° because it was fitting directly into the tubes. JohnnyCNC had not started making his 60° bushings at the time, so a "specific" degree° of the drive center or tail stock was/is not necessary UNLESS the receptor is of a specific degree.

Open holed bushings such as for a mandrel (unless chamfered for 60°) can take any drive or tail stock center. I don't remember who it was but they turned wood to use as the drive center. The angle/degree was not necessary except to fit into the hole.

Below is the picture of the drive center that I made that started the TBC movement after JohnnyCNC and Rifleman's initial comments:


View in Gallery

It is obvious that this is not 60°. A 60° center IS necessary ONLY when the receptor is 60°. BTW, I did not use that initial drive with "made for mandrel" bushings as it was still too fat on the end and I discovered that aluminum was too soft. Soon after that picture was taken, I ordered a 60° drive center and started using that - I used it with "mandrel bushings".

I will add that I was very finicky about bushings. I lived in Japan at the time and there was a big time delay and expensive in receiving things from the USA. About 1 in 4 or 1 in 5 "mandrel bushings" were not made to good tolerances. It was acceptable by most but caused enough "out of whack" that JohnnyCNC started his bushing business along with a few others. Johnny made his bushings for the 60° centers. At that point, the 60° became the standard. But again, if using an open holed bushing made for mandrels is used, the degree of drive does not matter.

If anyone wishes to do searches, back at that time, I used the term "mandrelless" or "mandreless."
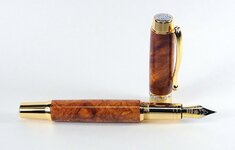
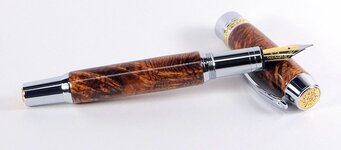
 
Last edited:

TonyL

Member
Joined
Mar 9, 2014
Messages
8,916
Location
Georgia
For me, it was a matter of what several said above (I have, but did it without the 60 degree centers):

Know my final diameters (you do)
Know my pre-sanding diameters
Make sure my calipers were properly calibrated (in my case, set to zero)
Know how much a "pass" or several "passes" removes - that wasn't easy for me, but did it with much trial and error (AND was different for each material).

I also wasn't reluctant to use stop using my chisels sooner and start sanding earlier to get to my final dimensions.

I do want to add that this is by knows means the quickest (and I am sure not the best approach) method, but it worked for me.

Much success and fun!

Tony
 

leehljp

Member Liaison
Joined
Feb 6, 2005
Messages
9,331
Location
Tunica, Mississippi,
SECOND POST:

Tips, not too much pressure on the blank from the drive center; take small bites; Patience, sharp tools;

I often turned with a bushing to get round and near to size and then take off and go between centers.

IF you turn a couple of bushing out of very hard wood such as maple - use those. This will prevent the "flaring".
 
Last edited:

Maverick KB

Member
Joined
Dec 28, 2015
Messages
161
Location
Huntersville, NC
I too started with an aluminum rod. I had a collet chuck, but no dead center. I made one from aluminum, but got tired of having to true it up every time I set up, so I found a dead center for a couple bucks. I've been TBC ever since and now have a collection of dead centers.

Best advice already given - avoid too much tailstock pressure. I would add, it's still a good idea to use an exacto, rasp or deburring tool to make sure there is no lip on the inside of your tube before assembly. Better safe than sorry.

Any center will work if it fits inside the tube and holds it centered. 60 degree is easy to find, but any angle will work. I've even used an old mandrel saver in the tailstock when TBC. Might as well wear those bearings out too since I don't use a mandrel anymore.

I stopped using digital calipers. I prefer metal with a mechanical dial. Be sure the lathe is full stop before you measure. My preference for calipers is my own, it really doesn't matter. I've gotten great results using both a drafting compass and an open ended wrench (mostly for tenons). I have even used micrometers, though it's way overkill.

Trust your instincts!

If it feels wrong, try something else.

Sometimes, parts like center bands don't fit inside the tube. When TBC it's ok to remove the piece and hold a part against the end to check fit & look.

Don't worry too much about finish like CA on your centers. I've found it is easily removed with an exacto. I've even been so crazy as to use an exacto like a skew to clean off my centers.

Try laying a skew flat on the tool rest and using it like a scrape to get perfection in those last few thousandths of an inch.

I think it's been said, stop early and leave room for sandpaper to do it's job.

Happy turning!


Sent from my iPad using Penturners.org mobile app
 

magpens

Member
Joined
Feb 2, 2011
Messages
15,911
Location
Canada
Yup, I did not mean to be so specific about 60 degree centers. Sorry.

Thanks for pointing this out, Hank.

In fact, for open-holed between-centers turning a more shallow angle is preferable, in my own experience.
 
Last edited:

Maverick KB

Member
Joined
Dec 28, 2015
Messages
161
Location
Huntersville, NC
Closed end is a whole other game.

A live center works well, but you'll have to account for the dimple it makes in the end. If you have the money, a live center set like Nova has with a small cup and removable center spur works well.

If you don't want to spend then money on that, take a live center, such as a mandrel saver or similar. The thinner the better, large long cones work for this, but are more difficult. Using a scrap block of wood, match a forstner bit bit to the diameter of the live center and bore out enough to slide the bock over the center, keeping as much of it in the block but not going too deep. You don't want it interfering with the tail stock.

If the block is too bulky, simply turn it down a bit. Give it whatever shape you like, just make sure the face of it is true. (A sanding disk on the headstock helps considerably here.) then you have a soft wooden live center for supporting a closed end pen.

A sanding disk for the headstock is another easy make. Take the faceplate that came with the lathe, (the one you never use because all a lathe does is make pens [emoji6] *joking, or am I?*) and screw a waste block to the faceplate. Take a piece of plywood, MDF or some other wood that will hold up well without warping. Mount the faceplate and waste block on the lathe and true up the face. Round off the corners of you like (don't have to). Using the tailstock with a live center, bring it to the waste block to mark center. Mark center of your plank. (Optional, use a screw through the center and into the center of the waste block)

Use plenty of wood glue (or your preference) and mate the plank to the waste block. Bring the tailstock up without a center to make a nice clamp and to help hold it true while glue sets.

Once glue has set, you can round out the face a bit (helps if you've already cut cheater corners)

Use adhesive backed sanding disks. You can use these to help mark diameter if you want your sanding disk face to match.

True up the face as needed and stick the sanding disk to the face of your new sanding attachment.

Now you can true up blanks and that cool new live center you made from the other half of the waste block.


Sent from my iPhone using Penturners.org mobile app
 
Top Bottom