Dan_F
Member
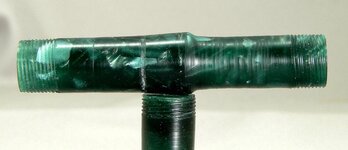
Well, I've been experimenting with the tap and die and not having much luck. I think that the die operation is the problem. When I look at the die threads with a loupe , they are most crisp at the forward end (last cut), and progressively less so toward the beginning end (tailstock), where they have been run over each time I back out. I can't really see the cap threads very well, as they are set in about 1/2" from the lip.
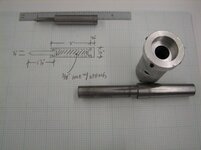
I'm going with a 7/16" hole for the tap, and .475" tenon for the die as was suggested in another thread. I cut 5/16" of thread on the tenon, and a tad more in the cap. I can just barely get one full turn of the two parts, but it takes a lot more oomph to get there than with my Churchill. I tried using the Churchill cap on my threads for comparison and it too required more force than the actual pen does.
So, I'm wondering what I'm doing wrong.
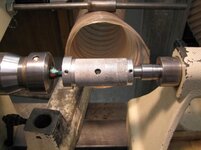
How often do you back out to clear the chips, and do you back out all the way or just a bit? I have been backing out all the way and clearing the curlies from the die about every 1/4 to 1/2 revolution. I hold the barrel in a collet chuck, and have a die holder with a morse taper that fits in the tailstock. I let the die draw the tailstock forward as was suggested in the tap and die thread. The tailstock for my PowerMatic is quite heavy, at least 50 pounds. I don't know if that's too much weight for the die to pull or not.
I'm using PAM cooking spray for lubrication.
Is it possible the die is not adjusted properly? It has a set screw which appears to open it up or close it down. How do I check it? I have a dial caliper that reads thousandths.
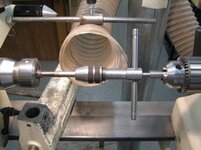
Any other tips or advice is welcome. I have very little experience with such things. Tapping the threads for the section seems to go all right, except that I have to hold the tap manually because that tap won't pull the tailstock forward, the threads just strip right out. The section threads in nicely though.
I've done two barrels and three caps, and there is no consistency of fit between them. I'm hoping that improving technique or adjustment of the die will help.
Dan
I'm going with a 7/16" hole for the tap, and .475" tenon for the die as was suggested in another thread. I cut 5/16" of thread on the tenon, and a tad more in the cap. I can just barely get one full turn of the two parts, but it takes a lot more oomph to get there than with my Churchill. I tried using the Churchill cap on my threads for comparison and it too required more force than the actual pen does.
So, I'm wondering what I'm doing wrong.
How often do you back out to clear the chips, and do you back out all the way or just a bit? I have been backing out all the way and clearing the curlies from the die about every 1/4 to 1/2 revolution. I hold the barrel in a collet chuck, and have a die holder with a morse taper that fits in the tailstock. I let the die draw the tailstock forward as was suggested in the tap and die thread. The tailstock for my PowerMatic is quite heavy, at least 50 pounds. I don't know if that's too much weight for the die to pull or not.
I'm using PAM cooking spray for lubrication.
Is it possible the die is not adjusted properly? It has a set screw which appears to open it up or close it down. How do I check it? I have a dial caliper that reads thousandths.
Any other tips or advice is welcome. I have very little experience with such things. Tapping the threads for the section seems to go all right, except that I have to hold the tap manually because that tap won't pull the tailstock forward, the threads just strip right out. The section threads in nicely though.
I've done two barrels and three caps, and there is no consistency of fit between them. I'm hoping that improving technique or adjustment of the die will help.
Dan