You are using an out of date browser. It may not display this or other websites correctly.
You should upgrade or use an alternative browser.
You should upgrade or use an alternative browser.
Striped bass and Blues plugs
- Thread starter Pen&FishingCT
- Start date
Signed-In Members Don't See This Ad
See more from Pen&FishingCT

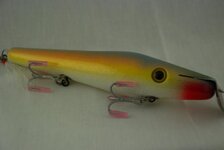
turned with ayc, airbrushed, epoxy coat, long process but catching a fish on your own plug is an amazing feeling.


 arty:. keep it quiet.hhaa
obviously the lighter the wood the more life like you'll get out of it, i set lead weight in certain parts of the lure that will play with plug movement.is very interesting how you can manipulate the lure action by placing the weight in diff spots.
good luck guys and don't hesitate to ask.
Signed-In Members Don't See This Ad
LEAP
Member
Nice,
The Fall run does not seem to be happening up here in maine. Heck the spring run did not happen either. Hope you wear these out and have to make a bunch more.
The Fall run does not seem to be happening up here in maine. Heck the spring run did not happen either. Hope you wear these out and have to make a bunch more.
Pen&FishingCT
Member
some are going to Montauk :biggrin:Nice,
The Fall run does not seem to be happening up here in maine. Heck the spring run did not happen either. Hope you wear these out and have to make a bunch more.
turned with ayc, airbrushed, epoxy coat, long process but catching a fish on your own plug is an amazing feeling.
rjwolfe3
Member
Those look great. I hope you catch lots!
snyiper
Member
I am curious how do you make those? They look sweet I wouldnt mind pluggin any of those!!
mrcook4570
Member
Nice looking lures.
RyanNJ
Member
Amazing being a bass and blue fisherman i can relate.
are you on one of the fishing sites? i recognize your name
We might have to trade sometime
are you on one of the fishing sites? i recognize your name
We might have to trade sometime
penhead
Local Chapter Leader
Really nice plugs..!..very nice job..!
I have a couple of fisherman friends who have been after me to make a few of those.
I bought a book on how, just haven't gotten around to it yet.
But a couple of questions from your post below if you don't mind:
what is 'turned with ayc..??
and presume they are made of some kind of wood..??
Thanks.
I have a couple of fisherman friends who have been after me to make a few of those.
I bought a book on how, just haven't gotten around to it yet.
But a couple of questions from your post below if you don't mind:
what is 'turned with ayc..??
and presume they are made of some kind of wood..??
Thanks.
some are going to Montauk :biggrin:Nice,
The Fall run does not seem to be happening up here in maine. Heck the spring run did not happen either. Hope you wear these out and have to make a bunch more.
turned with ayc, airbrushed, epoxy coat, long process but catching a fish on your own plug is an amazing feeling.
RyanNJ
Member
I will chime in... hope you don't mind.
AYC is Alaskan Yellow Cedar. it is bought usually in 1.5x1.5 spindles. I can't find it locally but there are some sites that sell it (http://www.cedar-4-sale.com/)
You will need to seal the plugs.
some are using a BLO/MS solution (BE CAREFUL, combustible)
I have proportionate (i can get you the link to the seller) which is plastic pellets that you thin with MS.
You will then let the plug dry for a day to 3 weeks depending.
Do you want me to post a set of directions?
Really nice plugs..!..very nice job..!
I have a couple of fisherman friends who have been after me to make a few of those.
I bought a book on how, just haven't gotten around to it yet.
But a couple of questions from your post below if you don't mind:
what is 'turned with ayc..??
and presume they are made of some kind of wood..??
Thanks.
some are going to Montauk :biggrin:Nice,
The Fall run does not seem to be happening up here in maine. Heck the spring run did not happen either. Hope you wear these out and have to make a bunch more.
turned with ayc, airbrushed, epoxy coat, long process but catching a fish on your own plug is an amazing feeling.
RyanNJ
Member
ere we go!
Boiled linseed oil- smallest can they sell
Mineral spirits (paint thinner)- medium sized can
150 grit sandpaper- small pack
Rustoleum flat white primer
Rustoleum spray paint- whatever colors grab you
rags
Rustoleum clear spray enamel
tall jar (peanut jars are good)- to immerse plug in
sealer
Epoxy- 30minute clear- to glue in belly weight if
have one
Acetone- smallest can they have
Screw in J shaped cup hooks (2-3" long) NOT small
brass cup hooks
Get back to me once you have all materials and I will go over mixing the sealer and VITAL safety precautions related to the linseed oil. OK?
____________________________________________________________________________________________________________________________________________________________________________
STEP .5- Lightly sand the plug with 150 to open the pores of the wood. Slightly radius any hard corners on the nose, tail, eye holes or hook holes. Hard corners are more prone to breaking off and don't take paint as well as corners with a small radius. Wipe off dust.
STEP 1- Make sure your tall jar is clean. Use a magic marker to mark it halfway up on the outside. Now mark halfway between the top and that mark, and the bottom and that mark. That should have divided the jar into 1/4s.
STEP 2- Mix the Boiled Linseed Oil and Mineral Spirits in a 60:40 ratio. In otherwords, 3 parts BLO to 2 parts MS.
STEP 3- Put jar lid on and shake to thouroughly mix.
STEP 4- Immerse plug in mixture for 60 seconds. If it can't be immersed completely just pull it out after 60s and immerse the other end for another 60s.
STEP 5- Allow as much of the mixture to drip back into the jar as possible. I like to wipe off one end and then softly blow the excess out of the plug. Wrap rag around plug and blow the excess out of the hook holes too.
STEP 6- Use a clean dry rag to wipe any excess off the plug.
STEP 7- ***SAFETY ISSUE*** Boiled linseed oil can combust if rags soaked in it are left balled up or tossed into a trash can. **ALWAYS DRAPE RAGS WITH BLO OR BLO/MS MIXTURE IN A PLACE WHERE THEY CAN DRY OUT.** I like to take mine out of the house all together. NOTE- Do not reuse this rag as it may leave oil on your plugs that will affect the adhesion of the paint.
STEP 8- Place the plug in a warm dry area and let it dry for several days. You will know it is dry when it doesn't have a cool damp feel to it, and it will make dust when sanded with 150.
STEP 9- Get back to me after Step 8.
______________________________________________________________________________________________________________________________________________________________________________
How should it the BLO/MS dry it has been ~24 hours and it doesn't feel damp or cool. i was wondering if i should just give it a feew days to assure that it is dry
Give it at least 4-5 days. If you paint it too soon the sealer will not allow the primer to adhere. It that isn't well stuck, the entire paint job is lost. And it's back to square 1! NO FUN. Be patient and plan on priming towards the end of the week.
______________________________________________________________________________________________________________________________________________________________________________
i put the flat end of belly weight in firt and leave the rounded at the suface?
Round end in first- it you do flat end first you will create a little pocket of air or epoxy that could affect the balance of the plug. Be sure to coat the inside of the hole and the lead before it goes in. Then push it all the way down so any extra epoxy in the hole is squeezed out. You may need to push it down more than once, as it may rise back out. Use extra epoxy to fill in the low area on top of the lead. Don't leave a big blob on the wood- wipe it with some acetone on a rag. It is rock hard once cured and a pain to sand off with out messing up the shape of the plug.
______________________________________________________________________________________________________________________________________________________________________________
I epoxied thursday should i prime today?
Yup! Light coats with a few minutes of dry time in between. You will be able to put on finish paint later today. Primer dries pretty fast if it is warm where you paint. Good luck!!
______________________________________________________________________________________________________________________________________________________________________________
ok, i will paint it yellow
Not sure of the type sorry
how many coats do you think?
Type of paint?
Number of coats- enough to get a nice uniform color that covers the primer. Probably 3-4 LIGHT one.
Rustoleum
ok thanks[/quote]
Rustoleum is perfect.
Have fun. Don't gas yourself with the fumes. You can spray outdoors and then bring inside to dry.
______________________________________________________________________________________________________________________________________________________________________________
How do you paint yours?
I either hold them by one of the hooks with a rubber glove on, or I suspend the plug horizontally by placing the hooks on the edges of a box or bucket. This method is good, but the plug sometimes tries to roll over due to the belly weight.
The trick to not getting runs is to never just point the can at the plug and spray. You want to hold the plug about a foot away from the can, start spraying to the side of the plug and then pass the can by the plug so that it mists the plug on the way by. I bet you could find a video of this on the web if you looked. Try googling "spray painting" .
Ok.
______________________________________________________________________________________________________________________________________________________________________________
OK. If you are going to add stick on eyes now is the time. After that- coat with clear 30 minute epoxy. Mix per instructions on the package. Brush on with a stiff bristled brush. Don't put it into the hook or wire holes or the lip slot if there is one. Coat everything else evenly. Note- don't put a glob on the eye hooks. Go light on the ends. Once coated hang it vertically and flip it every few minutes so epoxy doesn't run down plug. Once epoxy is set allow to cure for a couple of day.
Do i coat over the eyes?
also i only have 6 Minute Epoxy would 30 Minute be better if so what brand ?
PS Yes- put it right over the eyes
______________________________________________________________________________________________________________________________________________________________________________
when do i put the brass belly groment on? before or after epoxy
all hardware is done after the epoxy
______________________________________________________________________________________________________________________________________________________________________________
Do you have a bench vise?
How about a larger pair of needle nose pliers?
Also, do you have vise grips?______________________________________________________________________________________________________________________________________________________________________________
OK- here we go!!
1- assemble all the hardware and bend the wire straight down at a 45 degree angle to the tail end of the plug.
2- Grasp the wire with the needle nose pliers as close to the tail grommet as possible. NOTE- don't use the very tip of the pliers- grab the wire about 1/3 of the way into the plier jaws. IF you grasp it on the tips you will get a very small tail loop on your plug, and this can hinder the action of the tail hook.
3- Grab the wire with your hand and wrap it up and over the top jaw of the pliers. Go around the tips of the pliers so you can make a loop around the plier jaws.
4- ONce you have a loop, place the tail loop in your vice so that the vise jaws just squeeze the loop, but the loop isn't up inside the jaws.
5- adjust the vise grips so they will lock onto the wire.
6- while pulling at right angles to the wire protruding from the back end of the plug, wrap the tail of the wire around the main wire 2-4 times as snuggly neatly as possible.
7- cut off excess wire and squeeze the tag end in with your needle nose so the sharp edge isn't sticking out.
I know this is choppy but it was a series of private messages i exchanged with someone when i was starting out
So that is my basic direction i have some more in depth ones if you want.
Some changes:
I would thru wire the plugs. I have some extra wire if you would like to trade me for some before buying 100 pieces.
I use Etex for a finish (2-3 coats)
here is a good link
http://www.stripersonline.com/surftalk/showthread.php?t=542815&highlight=needle
Last edited:
penhead
Local Chapter Leader
Just getting back to read the forums...
thanks for the instructions, very helpful...
Any particular reason why AYC was used..?
Just wondering if different wood densities will come into play because of weight/buoyancy..?
thanks for the instructions, very helpful...
Any particular reason why AYC was used..?
Just wondering if different wood densities will come into play because of weight/buoyancy..?
Pen&FishingCT
Member
i got busted, same screen name in SOLAmazing being a bass and blue fisherman i can relate.
are you on one of the fishing sites? i recognize your name
We might have to trade sometime
arty:. keep it quiet.hhaaPen&FishingCT
Member
here's my brakedown.
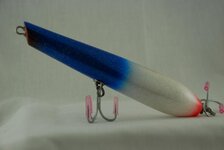
i use Alaskan Yellow Cedar in every plug i make, i drive 45 minutes to get this wood,reason?AYC is almost 99% waterproof,i've tried to make this wood sink by leaving a few blanks in a bucket of water for a month and the plug marks were in the same spot.i've tried many ways and tried the same with several woods and they're no good period and specially when you cast and the plug land on the rocks.
second- i don't use BLO,i respect those who use it. but i've found that BLO activates if you leave the plug inside the car right in the middle of summer or if it gets exposed for a long period of time to heat,imo you just can't dry oil,the BLO sweat and everything comes right off.so i avoid that step, and i use spar urethane 60-40 or 70-30 thinned down with MS, and once it dries is over.shellac primmer Bin preffered(exterior) water based.
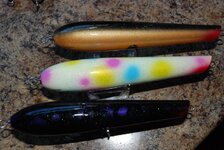
water based paint, like createx,i make my own paint mixes just to spark it up a little.and the're are plenty of plug building distributors out there.
if you have any questions let me know. i'll post more pictures of the ones i have drying.:biggrin:, once you start you'll never stop.
i use Alaskan Yellow Cedar in every plug i make, i drive 45 minutes to get this wood,reason?AYC is almost 99% waterproof,i've tried to make this wood sink by leaving a few blanks in a bucket of water for a month and the plug marks were in the same spot.i've tried many ways and tried the same with several woods and they're no good period and specially when you cast and the plug land on the rocks.
second- i don't use BLO,i respect those who use it. but i've found that BLO activates if you leave the plug inside the car right in the middle of summer or if it gets exposed for a long period of time to heat,imo you just can't dry oil
,the BLO sweat and everything comes right off.so i avoid that step, and i use spar urethane 60-40 or 70-30 thinned down with MS, and once it dries is over.shellac primmer Bin preffered(exterior) water based.water based paint, like createx,i make my own paint mixes just to spark it up a little.and the're are plenty of plug building distributors out there.
if you have any questions let me know. i'll post more pictures of the ones i have drying.:biggrin:, once you start you'll never stop.
Pen&FishingCT
Member
AYC is a heavy wood and one if not the most dense cedars of all,the grain is incredibly tight and it turns like butter with the skew.AYC is a lot heavier than red,white. for swimmers like A40,Pike etc.. a lot of builders use western red cedar or white but you have to seal it very well because that wood is like a sponge,and once the plug starts getting soaked with water the plug will loose the action, and not only that,the water with reach the primer,then paint then epoxy finish,and trust me when i tell you,its not an easy scene.after you spent hours of babysitting this plug it got ruinned because the plug wasn't sealed properly.Just getting back to read the forums...
thanks for the instructions, very helpful...
Any particular reason why AYC was used..?
Just wondering if different wood densities will come into play because of weight/buoyancy..?
obviously the lighter the wood the more life like you'll get out of it, i set lead weight in certain parts of the lure that will play with plug movement.is very interesting how you can manipulate the lure action by placing the weight in diff spots.
good luck guys and don't hesitate to ask.