Steampunk brooch/pendant - router setup

Signed-In Members Don't See This Ad
See more from AlanZ

AlanZ

Member
Joined
Mar 2, 2009
Messages
266
Location
Oradell, NJ
Several weeks ago, our older son called and asked if we could do something for a present... along the lines of the steampunk style.

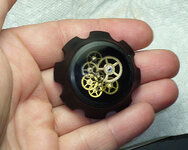
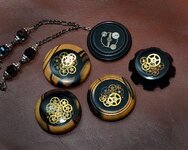
I thought some of you might like to see this almost-completed piece. The turning is done, it's had a coat of antique oil, and still needs some additional detail sanding, buffing and hardware.

Originally we had intended this to be a pendant, but Lauren thinks she prefers it as a brooch, so were waiting for some pin-back hardware to arrive. I'll share some of the other pieces as we assemble them.


So, we thought this would be an opportunity for a few firsts.
  • This one of 8 pieces in our first attempt at casting in polyester resin
  • This is the first time we're inlaying resin into a wood pendant
  • This is the first time working with ebony
  • This is the first time using a dremel as a router mounted on the lathe to do indexed detailing
We didn't make many photos of the process... figuring that once we had a better handle on the casting process we'd do a step by step.

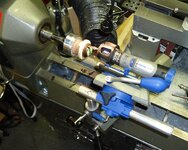
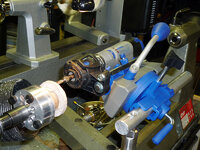
So far, we've turned 3 of the castings, but this one in particular shows some simple indexed routing on the lathe, and I thought I'd share it with you all.


There were lots of little details to work out and we're enjoying the challenges, for example:
  • where to get the watch parts
  • using resin we bought a year ago that wasn't curing as expected
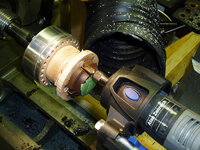
  • turning the cast blanks to size
  • painting the backs of the blanks
  • preparing the mortise for the inlay
  • doing the inlay process
  • shaping the wood and inlay
  • cutting the "gear" teeth around the perimeter
The mount for the Dremel cordless router is taken from a Dremel drill press. The press has a vertical 1" tube , so I tapped a 5/8"x20tpi hole in a piece of 1" aluminum rod and threaded it to the post of a modular tool holder.

The Dremel press mechanism is not what you might call precision, but it was good enough for this project... and has me looking for a more robust mount.

I hope some of you find this useful/entertaining.
 

Attachments

  • steampunk1_a.jpg
    steampunk1_a.jpg
    89.7 KB · Views: 564
  • dremel_lathe_mount_a.jpg
    dremel_lathe_mount_a.jpg
    75.2 KB · Views: 604
  • dremel_lathe_mount_b.jpg
    dremel_lathe_mount_b.jpg
    143.6 KB · Views: 580
  • dremel_lathe_mount_c.jpg
    dremel_lathe_mount_c.jpg
    144.7 KB · Views: 745
Signed-In Members Don't See This Ad

Edward Cypher

Member
Joined
Feb 8, 2011
Messages
1,901
Location
Denver, Colorado
WOW very nice. Great job and inginuity. I never thought of using the plunge drill base on the dremel or the router base on the lathe. I was looking at PSI router set up for the lathe. Looks like you are using the pendant blank chuck also. The watch parts really make it pop!!! Thanks for sharing.
 

Brooks803

Member
Joined
Sep 13, 2009
Messages
5,632
Location
Aiken, South Carolina
Now that was thinking outside the box...much like a rat if you ask me:wink:

Here's a trick I learned with casting pendants that are see through. What I do since I have a flat bottom mold is pour my "back" side color first, wait for it to solidify. Then set up my parts for clear casting on top and cast. As long as you work on a level surface everything will be good to go once cured. Both sides will adhere just fine and no seams will show. Hope that helps some.
 

AlanZ

Member
Joined
Mar 2, 2009
Messages
266
Location
Oradell, NJ
Brooks,

I considered putting down a black layer first, but decided that because I was going to inlay the casting that I wanted black coming up the sides as well. So painting with black enamel did the trick.

I also tinted the epoxy black that was used to cement the casting into the mortise.

Not seen is a small hole in the back of the pendant that allowed the excess black epoxy to escape. Otherwise trying to set the casting into the tight fitting mortise becomes an adventure in hydraulic pressure.
 

AlanZ

Member
Joined
Mar 2, 2009
Messages
266
Location
Oradell, NJ
Asyler,

The tool rest can be turned in any direction. However, fluting would require some way to slide the router down the length of the piece in a controlled manner. This setup would not do that. A router above the work, running on rails would be a more suitable fluting tool.
 

kludge77

Member
Joined
Mar 9, 2009
Messages
644
Location
Santa Rosa Ca
Very cool!!

I like the jig, but it's too complex for me. I wonder how a file or even a small sanding/grinding wheel on a dremel/hand drill would do.

Regardless your results are slick!
 

AlanZ

Member
Joined
Mar 2, 2009
Messages
266
Location
Oradell, NJ
Kludge,

Actually the jig was incredibly easy to set up... considering that I repurposed and combined a drill press and modular tool post that I already owned. The very definition of a 'kludge', eh?

As mentioned earlier, this is a Dremel Drill Press (Dremel 220-01 Rotary Tool Work Station)
It's inexpensive ($38) and reasonably versatile.

attachment.php


I removed the mount from the vertical tube and slid it over a 1" piece of aluminum rod that I tapped to fit the top of a modular threaded tool post. Several companies sell these modular tool posts... most using a 5/8"x20tpi thread (Woodcraft posts use a coarser thread though).

I'll try to make some additional detailed photos soon.
 

kludge77

Member
Joined
Mar 9, 2009
Messages
644
Location
Santa Rosa Ca
Alway love a good kludge!

I wasn't knocking your setup, I think it's great. I was just saying for folks who like this enough to want to replicate (I might very well be one of them) You could still do it without the dremel.

Obviously if you have the setup, use it!
 

AlanZ

Member
Joined
Mar 2, 2009
Messages
266
Location
Oradell, NJ
Lorbay,

The Nova Ornamental turner has been out of production for some time now. They rarely pop up on the used market.

Also, I don't need anything quite that complicated... I'm looking at the Oneway Drill Wizard, as it will likely be able to accept a Trend T4 router that I recently purchased.
 

lorbay

Member
Joined
Jul 2, 2009
Messages
3,384
Location
BC. Canada

AlanZ

Member
Joined
Mar 2, 2009
Messages
266
Location
Oradell, NJ
Because some of you have been so kind with your comments about the piece in the beginning of this thread, I thought you might like to see a few of the other pieces from our first adventure in casting. This is a quick photo using my couch as a background.

These aren't quite finished. Right now it's just one coat of antique oil. When they are completely dry, I'll likely buff then wax.

Finally, we'll attach the jewelry findings so we can add the neckaces. At least one of them will remain a brooch... we got in some pin backs that have integrated bails so the wearer will have options to use as a pin or a pendant.

We may use pretty simple necklaces, perhaps black velour or lace... keeping with the Victorian era fashion for Steampunk-ish items.

The dark wood is ebony (I forget the origin)... the lighter wood is black and white ebony.

I hope to make photos of the finished pieces soon.
 

Attachments

  • steampunk3_a.jpg
    steampunk3_a.jpg
    84.7 KB · Views: 129
Top Bottom