Spline joint

Signed-In Members Don't See This Ad
See more from Dale Allen

Dale Allen

Member
Joined
Oct 27, 2012
Messages
1,384
Location
Massillon, OH
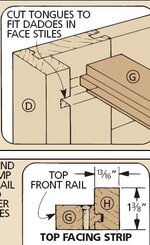
Just as a future reference, I'd like to know how someone else would set this up and cut.
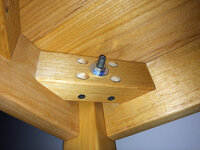
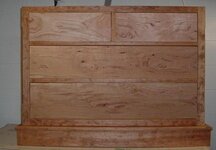
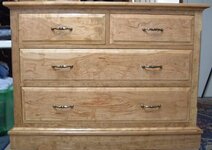
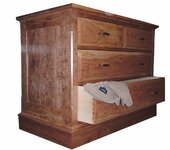
It's refereed to as a spline and the dresser plans I am working off of has it used on the base frame. I've not seen this before as I have not done much furniture building.
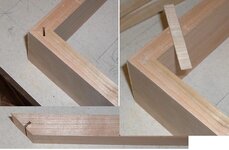
I set up the table saw with the fence on the left as the blade tilts to the right.
Then I cut all of the 45 degree cuts about 3/4 way through. This puts the spline cut in the piece. I did this so I could use the full end as a reference against the fence.
Then I switched to the fence on the right and cut the full miter. This is also done with the full end as a reference.
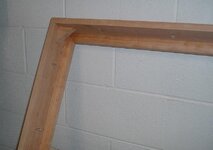
That seemed to make sense and it worked out very well. As long as everything is kept consistent the corners are near perfect.
The down side is having the cutoff pieces flying all over the shop when making the second cut. It gets a bit nerve racking.
Anyone have a different solution I could try in the future?
 

Attachments

  • spline.jpg
    spline.jpg
    65.1 KB · Views: 1,414
Signed-In Members Don't See This Ad

bobleibo

Member
Joined
Mar 15, 2007
Messages
2,130
Location
Utah
Dale
Here's my 2 cents worth (which is no bargain)
The spline joint is just an elongated version of a biscuit joint but can add a bit of detail to the piece if the top shows. Either one works fine. If you have a biscuit joiner, it's a lot easier to do since you don't have to run your piece of lumber thru the table saw at 45* or tilt the blade and the depth of cut is already dialed in with matching biscuits. I have found biscuit joints to be more than enough. If the pieces you are joining are wide, you can put two biscuits.
Either way you go, good luck
Bob
 

Skie_M

Member
Joined
Aug 7, 2015
Messages
2,737
Location
Lawton, Ok
I'ld do it all at once.


Make one very large box at one time, and then cut it apart on the tablesaw after you've let the glue dry with the box squared up.

This ensures that you don't have to fool around trying to get multiple boxes all squared and glued all at the same time later.


Take the measurements for the drawer boxes for width and depth ... then take the heights of all the drawers added together and add some extra for the table saw kerf...

Cut the splines on the table saw with the exact same settings for all 4 boards all at one time so that they will match up and square up properly. Glue and clamp so that they dry square. Finally, set your table saw to the exact height measurement of each drawer and cut the large box apart one side at a time, to ensure that the height is uniform all around.


For the base of the dresser, as you show there, I'ld do the sides and the front/back as a single board and then rip the boards to get your 4 parts.

Use a sled so that you have something steady to clamp the long boards to .... and have an assistant keep the end of a vacuum hose near where the cutoffs will be cut free to remove them from the top of the table saw as they come loose... or clamp one to a temporary floating fence in a ready position just above the blade. (This is just a board clamped so that it sits above your table where you can clamp a hose on it to hang down in the proper position.)


Generally, when using a sled, though, most people don't worry about loose pieces, as the sled is a zero clearance tool and things are rarely thrown.
 

Dale Allen

Member
Joined
Oct 27, 2012
Messages
1,384
Location
Massillon, OH
Thanks all for the info and comments.
I did consider using biscuits but the cheaper Skil brand I have does not do angles very well.
Years ago I did some on a 45 and it took far too long to set up the saw joiner and a jig to hold the stock.
Seems a shame actually that these came out so well and they will never be seen unless someone turns the dresser upside down. But I'll know they are there!
 

CREID

Member
Joined
Jul 23, 2008
Messages
3,009
Location
Vancouver, wa
Thanks all for the info and comments.
I did consider using biscuits but the cheaper Skil brand I have does not do angles very well.
Years ago I did some on a 45 and it took far too long to set up the saw joiner and a jig to hold the stock.
Seems a shame actually that these came out so well and they will never be seen unless someone turns the dresser upside down. But I'll know they are there!

Well, if there was an earthquake.
 

Dale Allen

Member
Joined
Oct 27, 2012
Messages
1,384
Location
Massillon, OH
Earthquake....let's hope not!:eek:

I think next time I will build a fixture like this and use slotting cutters on the router table. This would allow multiple different setups and either through splines or stopped, where the spline does not show.
The trick here is to get the pieces mitered to exacting length first and absolutely square to the end. Then clean up the pointed edge so the reference is true.
I'd feel better dealing with a small 2" blade than a 10 inch one for this.
:biggrin:
 

Attachments

  • spline_jig.jpg
    spline_jig.jpg
    32.1 KB · Views: 401

CREID

Member
Joined
Jul 23, 2008
Messages
3,009
Location
Vancouver, wa
Earthquake....let's hope not!:eek:

I think next time I will build a fixture like this and use slotting cutters on the router table. This would allow multiple different setups and either through splines or stopped, where the spline does not show.
The trick here is to get the pieces mitered to exacting length first and absolutely square to the end. Then clean up the pointed edge so the reference is true.
I'd feel better dealing with a small 2" blade than a 10 inch one for this.
:biggrin:

Sorry, you said no one would ever see it and it reminded me of the old saying (from mothers I believe) that you should always wear clean underwear in case you are in an accident.:biggrin:

Curt
 

GaryMGg

Member
Joined
Nov 23, 2006
Messages
5,788
Location
McIntosh, Florida, USA.
Hi Dale

I cut my miters first, then cut the slot for the spline.
I made a jig for the Tablesaw similar to the one pictured for the router table.
I use it for real small boxes, to honor flag case, to larger casework such as you're making.
Your work looks good--keep doing what you're comfortable with.
 

jttheclockman

Member
Joined
Feb 22, 2005
Messages
19,179
Location
NJ, USA.
There are many ways to reinforce a spline joint. Dowels, biscuits, box joints and so on. If i were making hidden splines I would use a biscuit jointer for sure. My next way would be a router and a straight cutting bit. Last would be a tablesaw. You could even use a bandsaw with the proper jig.

Always remember safety first and a good jig can go a long way in providing that.

Or you could celebrate the joint with decorative keys. They too reinforce the joint but can be very decorative and eye appealing. Here is an example of a cabinet I am working on.


I just went back and reread the post and you mention this is the base frame. Is this the molding for outside the frame??? The reason I ask is if it is the frame the unit sits on then I would do more than that to reinforce those joints. I would use corner blocks on the inside of those corners for sure. A piece of furniture gets moved around alot and is dragged on the floor more times than not and a miter joint is one of the weakest joints made for furniture. That is why dove tail joints are used many times on good quality pieces. Even box joints are also used. Just an opinion.
 
Last edited:

Skie_M

Member
Joined
Aug 7, 2015
Messages
2,737
Location
Lawton, Ok
Earthquake....let's hope not!:eek:

I think next time I will build a fixture like this and use slotting cutters on the router table. This would allow multiple different setups and either through splines or stopped, where the spline does not show.
The trick here is to get the pieces mitered to exacting length first and absolutely square to the end. Then clean up the pointed edge so the reference is true.
I'd feel better dealing with a small 2" blade than a 10 inch one for this.
:biggrin:

Sorry, you said no one would ever see it and it reminded me of the old saying (from mothers I believe) that you should always wear clean underwear in case you are in an accident.:biggrin:

Curt

And yet it is statistically shown that those who are in fatal accidents soil themselves pretty much automatically ... When your body relaxes after death, nothing's holding it back anymore.
 

Dale Allen

Member
Joined
Oct 27, 2012
Messages
1,384
Location
Massillon, OH
[/quote]

And yet it is statistically shown that those who are in fatal accidents soil themselves pretty much automatically ... When your body relaxes after death, nothing's holding it back anymore.[/quote]

I agree. If I knew I was going to get in an accident, I would not want to be wearing my best pair of underwear!:biggrin::laugh:
 

Dale Allen

Member
Joined
Oct 27, 2012
Messages
1,384
Location
Massillon, OH
John, this is the base of the unit and there is a flat board on the front and sides that is routed with a bull nose pattern and sits flat on top of this frame to create the full base. I agree that there should be extra blocks in the corners and maybe a few between. The plans call for just glue between these 2 sections but I plan to use some pocket holes and screws. I was concerned with the integrity of the bottom of the unit when being moved, as you said. So, I used a piece of 3/16 lauan ply glued and screwed onto the bottom of the carcass.
 

jttheclockman

Member
Joined
Feb 22, 2005
Messages
19,179
Location
NJ, USA.
John, this is the base of the unit and there is a flat board on the front and sides that is routed with a bull nose pattern and sits flat on top of this frame to create the full base. I agree that there should be extra blocks in the corners and maybe a few between. The plans call for just glue between these 2 sections but I plan to use some pocket holes and screws. I was concerned with the integrity of the bottom of the unit when being moved, as you said. So, I used a piece of 3/16 lauan ply glued and screwed onto the bottom of the carcass.


I can not tell you what to do and from not seeing the whole set of plans it is your call. The one thing I caution you on though, is gluing plywood to a frame that will move. You have grain running in many different directions and when good quality furniture is made the movement is taken into consideration. Any woodworking plan is just a starting point. If you see things that need to be upgraded you have that freedom. Hope you post a photo when completed and good luck to you.
 

Dale Allen

Member
Joined
Oct 27, 2012
Messages
1,384
Location
Massillon, OH
John, the plywood is at the bottom of the main frame assembly.
I expect the whole thing to move some but that thin plywood will probably not stop it. It's probably overkill.
Below is the base assembly. The plans call for the bullnose apron to be glued onto the base frame...nothing else.
I decided to add the pocket screws and the corner blocks. Again, it may be overkill on a 42 inch dresser, but it suits me better.
The main dresser section will sit on top of this and be only held together with round head screws with holes for the shank large enough to allow some movement. If this base section expands and contracts it should do it as one unit because of the parallel grain directions.
But then maybe I have this all wrong.:biggrin:
I guess I'll know some years down the road.
 

Attachments

  • base1.jpg
    base1.jpg
    39.8 KB · Views: 163
  • base2.jpg
    base2.jpg
    80.1 KB · Views: 218

Curly

Member
Joined
Nov 20, 2010
Messages
4,858
Location
Saskatoon SK., Canada.
Dale
Adding corner blocks was a good idea however the way you have done it is not the best practice. One of the best is the way chairs are done. The grain of the block running across the corner joint. Glued and screwed with the screws coming out of the corner block perpendicular to the frame sides and into the frame.

I will attempt to attach a cellphone shot picture of the underside of a long narrow table I made where the corner blocks hold the legs to the apron and the top too.
 

Attachments

  • image-2874893794.jpg
    image-2874893794.jpg
    557.5 KB · Views: 171

Dale Allen

Member
Joined
Oct 27, 2012
Messages
1,384
Location
Massillon, OH
Curly, I see what you mean about the grain direction. Thanks for that tip. That would be better as mine would have a tendency to break. There are 2 screws in there though and the top of the recessed holes just happen to be in the same spot. With everything in place these probably won't do much but I'll check them from time to time when I move the dresser around. I'm not likely to replace them at this point.
 

Dale Allen

Member
Joined
Oct 27, 2012
Messages
1,384
Location
Massillon, OH
Thanks all for the info and comments.
I did consider using biscuits but the cheaper Skil brand I have does not do angles very well.
Years ago I did some on a 45 and it took far too long to set up the saw joiner and a jig to hold the stock.
Seems a shame actually that these came out so well and they will never be seen unless someone turns the dresser upside down. But I'll know they are there!

Well, if there was an earthquake.

No earthquakes, but I'm glad that plane that crashed in Akron Ohio was not .6 miles due west. :eek:
 

jttheclockman

Member
Joined
Feb 22, 2005
Messages
19,179
Location
NJ, USA.
Dale

I hope you do not think we are nit picking your project:) What Pete shown is a very good method. You have a few different materials used there and each one moves at different rates. Wood will move just because humidity in a house is constantly changing. Good luck with this project and who knows there maybe a whole new furniture set in your future woodworking plans:)
 

Dale Allen

Member
Joined
Oct 27, 2012
Messages
1,384
Location
Massillon, OH
John. No, you are not picking on my project.:)
I appreciate the input. This is new territory for me as this is my most detailed project yet. Not the biggest but the most intricate. Usually I use lots of glue and screws instead of tongue and groove joints.
The image below is the carcass and the base unit together. The picture was actually taken with the unit upside down because my next step is to position and drill the screws between the 2 sections. I wanted to do that before staining. I'd say it is about half done. I doubt I'll have problems with the top but half blind dovetails on the drawers will be another first for me.
As for the extras I added, the corner braces may come loose at some point but should not be an issue. The plywood I added is under the lower drawer framing. I've seen this done on some other furniture that is at least 20 years old. I have to think that the plywood made back then was much better than what I am using. If it holds the frame from moving too far then that is OK and if it moves with it that's OK too. I'm betting it is weak enough to move with the cherry hardwood. We'll see! The main reason for the plywood is so that the lower part of the unit cannot be racked out of square. However, once I realized how stout the frame was without it I considered not using it.
I'm still on the lookout for what I'd consider quality furniture plans. This one isn't, but it is a good start.
 

Attachments

  • dresser_half.jpg
    dresser_half.jpg
    72.6 KB · Views: 221

jttheclockman

Member
Joined
Feb 22, 2005
Messages
19,179
Location
NJ, USA.
Looks good Dale.I like the stopped routed edges on the frame. Nice touch. Photos sometimes are deceiving. Does not look like the drawer runners are very wide but i am sure you have that covered. Hope you show photos of the finished project. I love cherry wood. Good luck.
 

Dale Allen

Member
Joined
Oct 27, 2012
Messages
1,384
Location
Massillon, OH
Actually the frame is put together with T&G like this. The side drawer guides are screwed and glued to the top of a wider piece that forms the bottom rails. The ends of these are glued to the horizontal members. Different construction than I have encountered previously. The drawer guides are 1/2" on the bottom and 1/2" on the side. The drawers will need to be a close fit and I plan to use some slippery tape on the bottoms.
The corners were chamfered with a router bit to within 3" from the ends. Not a true lamb's tongue, but similar.
And, it is surprisingly square and true. I think it may be out by about a 1/16" in one spot but my patience and sharp pencil seems to have paid off.
 

Attachments

  • T&G.jpg
    T&G.jpg
    52.9 KB · Views: 209
Last edited:

Dale Allen

Member
Joined
Oct 27, 2012
Messages
1,384
Location
Massillon, OH
I was curious to see what the drawer fronts would look like in the unit so I took some pictures and did some editing and this is what I came up with.
I'm trying to decide if it looks too busy with the drawer fronts that figured.
Also, that splotching on the right is way worse in this picture than it really is but I may sand it down and try again.
If not for the better half insisting it needed to be darker, I would not have stained it at all.
 

Attachments

  • dresserwithdrawers.jpg
    dresserwithdrawers.jpg
    49.4 KB · Views: 167

Curly

Member
Joined
Nov 20, 2010
Messages
4,858
Location
Saskatoon SK., Canada.
Looks good to me. Nice thing about cherry is that it darkens on exposure to sunlight. As long as it is evenly exposed (no shadows or something on it to block the light) it self stains. That will be a nice piece of furniture when you are finished.
 

jttheclockman

Member
Joined
Feb 22, 2005
Messages
19,179
Location
NJ, USA.
Looks very nice Dale. That is some highly figured cherry used there especially those 2 top drawers. As far as finishing goes, cherry is one of the hardest woods to finish because of the heart wood and sap wood within a board. Example is your top 2 drawers as well as the others but is pronounced in those 2 drawers. You will never blend a stain that will enhance that look. The closet thing to do that would be to use shellac and Glaze. Do not use oil stains. With glaze you can control the color somewhat. Oil will make the piece look too splotchy. Not sure if you used cherry plywood on the sides but if you did that will take stain a whole lot different than the solid wood.

As Pete mentioned cherry will darken rapidly over time. In about a couple hours a freshly sanded piece will darken. It darkens from the air and also light of any source. But this is what makes cherry so desirable because of the deep rich red coloring. Usually they do not use that highly figured wood for furniture. That is for those jewlery boxes and smaller items.

If it were me I would probably just use a linseed oil or a tung oil to give it a warm hue. Then use a coat of wood wax to give it a sheen. Then let Mother Nature do her thing. If you want that film building finish then use a Danish oil and coat with a water based polyurethane or water based lacquer. I would use the lacquer because that is what I am set up for. I would also spray it not brush.

Whatever you do, before you commit I suggest you do some trial samples and see what sets your eyes off. You are the one looking at it along with your spouse. Also remember any of this if you plan on making other pieces to go along with this. Good luck. Love the look of cherry. Remember this is only my opinions so take it for what is worth, not much.
 
Last edited:

Dale Allen

Member
Joined
Oct 27, 2012
Messages
1,384
Location
Massillon, OH
I did clean up the right side. I sanded it down and applied some minwax pre-stain. The directions say to applied the stain after about 20 minutes but I find it works better if I wait about an hour.
Also, in this case I only applied stain with a small rag on the lighter spots and not all over. It looks better but doing the drawer fronts and top is going to be a challenge.
The end panels were made from 1/2" thick slices of this same wood, biscuit joined and set in the groove with space balls. It did darken from the stain but to me it looks acceptable.
I must say that I am learning a lot on this project.
 

Attachments

  • right.jpg
    right.jpg
    43.2 KB · Views: 176

Dale Allen

Member
Joined
Oct 27, 2012
Messages
1,384
Location
Massillon, OH
All done

Finally done.
The pattern on the drawer fronts varied just a bit after more planing and the orientation is a bit different.
It's still highly figured and I'm glad I kept those pieces for the drawer fronts.
I'm happy with it and the boss likes it too. She picked out the handles and they do look great.:)
 

Attachments

  • dresser_done.jpg
    dresser_done.jpg
    68.1 KB · Views: 205
  • drawer open.jpg
    drawer open.jpg
    65.1 KB · Views: 202
Top Bottom