Spalted Hackberry Black Ti Jr Gent

Signed-In Members Don't See This Ad
See more from shawnmhill

shawnmhill

Member
Joined
May 30, 2010
Messages
197
Location
League City, Tx
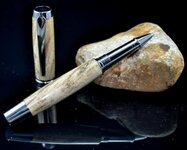
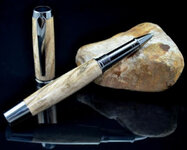
I figured since I couldn't build an ark, I would play in the garage. It's raining like %$#@!! This spalted hackberry was enjoyable. Turned nicely. Wet sanded 400 & 600. Applied 10 coats of thin CA and MM to 12000.I know 10 coats seems a little much but I'm using thin CA and I want to build up slowly. Finished off with Hut and Ren. Thanks for looking and all comments welcome.
 

Attachments

  • CSC_0447.jpg
    CSC_0447.jpg
    30.6 KB · Views: 282
Signed-In Members Don't See This Ad

IPD_Mrs

Member
Joined
Jun 27, 2007
Messages
2,048
Location
Zionsville, Indiana
I really like the look of the spalted hackberry with the kit that you used. I don't think you are over doing the amount of CA you are using. You want to have a nice finish that really shines when you are done and offers a nice bit of protection for the pen.
I often use a fair number of CA coats when doing a pen - however one comment I would make is that your picture looks like the pen is undercut (at least on the bottom portion) and if you are using several coats of CA you will want to cut the pen a bit smaller than the needed finished size. I typically go about .03 to 05 below what I want the finished size to be and then build that back up with CA.
While some might argue that is a lot of CA - it is a VERY good protection. I had a customer run a few hundred dollar DIW burl through his washer (accidentally left in pocket of his pants) that had this type of finish on it. He did this because he had clipped the pen over the edge of his pocket and the cap had come undone wicking the pen ink all over the pants - in his frustration he threw them in the wash.
After being covered with ink and then run through a washing machine the pen looks as good today as it did the day we finished it for him. He did have to get a replacement nib redone and ground back to his specs for it - but that is minor costs compared to what it would have been to get another pen made!

Mrs.
 

jttheclockman

Member
Joined
Feb 22, 2005
Messages
19,150
Location
NJ, USA.
It is a pain in the butt to keep the duet off my black mirror board. Any suggestions?


Sorry I have none. I tried the black look and went away from it for that reason. Too much work to take a photo of a pen. Good luck with it and again nice work and thanks for showing.
 

MesquiteMan

Retired Head Moderator
Joined
Oct 18, 2005
Messages
5,678
Location
San Marcos, TX, USA.
Edit the dust spots out in post processing. I use Corel Paint Shop Pro X2 and it has a salt and pepper filter. I have it set (after lots of trial and error) to remove dots that are the size the dust specs are. It takes 99% of them out perfectly with very minimal hand work. That and cropping are the only post processing I do on my photos but cleaning up the dust does make the pic look nicer!

Good job on the pen, BTW. Is that some of the wood you got when you came for a visit? You do realize you forgot half of the wood I gave you here don't you? Just means you will have to come back for another visit to pick it up!
 

MesquiteMan

Retired Head Moderator
Joined
Oct 18, 2005
Messages
5,678
Location
San Marcos, TX, USA.
Shawn,

Here is your pic ran through my salt and pepper filter and nothing else. Just one click of the mouse and that was it.

Before:
attachment.php


After:
attachment.php


Lost just a little bit of detail on the pen but that could also be attributed to re-saving a jpeg file since they loose quality every time you save them.
 

Attachments

  • CSC_0447.jpg
    CSC_0447.jpg
    37.6 KB · Views: 207

toddlajoie

Member
Joined
Feb 6, 2010
Messages
1,728
Location
Feeding Hills MA
Curtis, I'm not familiar with Corel, but if it has an option to paint back in from the history, I would suggest running your filter (it does a great job on the dust!!) them "painting back" the pen and the rock from the previous history state (before the filter was run, Photoshop has this tool, the History Brush, so I'd expect Corel to have it too.). This will bring back the detail, contrast, and texture of the pen and rock. The difference in contrast and texture between the 2 images (looking mainly at the rock and darker areas of the pen) is much more than I would expect from just re-saving the image...
 

SDB777

Member
Joined
Feb 6, 2010
Messages
6,620
Location
Cabot, Arkansas USA
Hey, if it hadn't been raining, it would have probably been really HOT!

Great looking pen, and as others have said 10 coats of thin CA will work just fine. Might want to give Monty a call and get some thick CA from him...that stuff replaces 4 coats of thin in one pass(JMHO).


Scott (the black background gets me too) B
 

toyotaman

Member
Joined
Jun 24, 2010
Messages
925
Location
NW Georgia (USA)
Very nice pen but I have a question about the wet sanding part.Do you add some coats of thin CA before wet sanding it,and did you use accelorator?
Donny
 

shawnmhill

Member
Joined
May 30, 2010
Messages
197
Location
League City, Tx
Thanks Curtis! I will be working on that. Still on that huge learning curve. I have tried the thicker CA but I feel I can control the "ridges and thickness" easier if I just take my time and use the thin. BTW, how do I get a hold of Monty for some CA?
 
Top Bottom