Some Flatwork

Signed-In Members Don't See This Ad
See more from Bill Arnold

Bill Arnold

Member
Joined
Aug 19, 2008
Messages
140
Location
Thomasville, Georgia USA
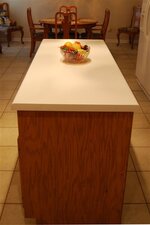
One of the projects I've been working on the past few weeks is a new countertop for our kitchen island. We had the other countertops replaced with DuPont Zodiaq a couple of months ago, but wanted the island to be a bit more 'splashy'. :)

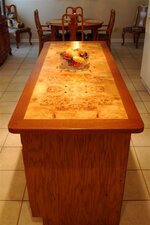
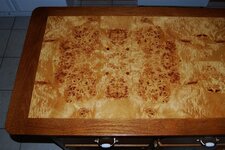
I have a good collection of veneers, so LOML and I looked through them and decided to use some mappa burl for the field of the countertop panel. I made the frame of the assembly with red oak to keep the grain appearance of the cabinets. I dyed the oak to make it darker than the cabinets so it would coordinate nicely with the Zodiaq.

The photos below show the before (typical white laminate) and after. I included a couple of close-ups of the veneer for a better feel of its character. Before starting the finish process, this veneer looked a little plain. A coat of BLO/Naptha helped pop the figure. The finish schedule of shellac, Target WB sealer and Target WB conversion varnish gave the depth we wanted.

I started turning pens to fill in the time while waiting for some of the steps (like finish curing) to complete.

Let me know what you think.

:)
 

Attachments

  • CounterTopIsland_01.jpg
    CounterTopIsland_01.jpg
    26.2 KB · Views: 214
  • CounterTopIsland_11.jpg
    CounterTopIsland_11.jpg
    35.3 KB · Views: 307
  • CounterTopIsland_x1.jpg
    CounterTopIsland_x1.jpg
    85.2 KB · Views: 284
  • CounterTopIsland_x2.jpg
    CounterTopIsland_x2.jpg
    58.3 KB · Views: 209
Signed-In Members Don't See This Ad

Bill Arnold

Member
Joined
Aug 19, 2008
Messages
140
Location
Thomasville, Georgia USA
Bill very nice work you done great job with the seam, 1 little comment I would put something under your bowl and make sure to have saucer under any glass or cup
Darley,

It may not show clearly, but there's a doily under the bowl. I used three coats of Target WB CV as the final finish because it "is engineered for use on high-end furniture and cabinetry applications that require strong household chemical and water resistance, as well as rapid hardness development in a traditional, light amber varnish color tone. Specifically designed for use on store fixtures, fine furniture, interior architectural features, yacht applications and refinishing processes that require conversion varnish-type protection." (the quote is from Target's site)

:)
 

VisExp

Member
Joined
Oct 1, 2007
Messages
2,738
Location
Palm Coast, FL, USA.
Bill, that is stunning. The grain on the veneer is incredible and the bookmatching looks great!

Could you explain the BLO/Naptha part of the process you used. I'm familair with BLO but have no idea what Naptha is or how and why you used it in combination with the BLO. Thanks.
 

Bill Arnold

Member
Joined
Aug 19, 2008
Messages
140
Location
Thomasville, Georgia USA
Bill, that is stunning. The grain on the veneer is incredible and the bookmatching looks great!

Could you explain the BLO/Naptha part of the process you used. I'm familair with BLO but have no idea what Naptha is or how and why you used it in combination with the BLO. Thanks.
Keith,

Thank you for your comments. :)

Naphtha is a solvent used for oil-based products. Its use is similar to mineral spirits. I prefer naphtha because it is less oily than MS and dries faster. I mix BLO and naphtha (usually about 1/1) to aid in penetration and curing.

For this project, I glued the veneer to the MDF substrate and put it in my vacuum press for a few hours. When it was ready, I wiped on BLO/Naphtha to pop the grain. Then, I did some final trimming of the panel prior to assembling the frame to it.
 

leehljp

Member Liaison
Joined
Feb 6, 2005
Messages
9,331
Location
Tunica, Mississippi,
Bill,
That is beautiful work. WELL done! It is good to see some fine furniture skills here too. There are a few others here that post their work on occasion but not many.

Congratulations and post some of your other work too, when you get time. I just looked at your site, BEAUTIFUL work!
 

PTJeff

Member
Joined
Jun 13, 2007
Messages
228
Location
Berea, Ohio, USA.
Hey Bill,
Great counter top. Did you use the EmTech 8000 conversion varnish? and thanks for the Naptha/BLO recipe to pop the grain
 

Bill Arnold

Member
Joined
Aug 19, 2008
Messages
140
Location
Thomasville, Georgia USA
Hey Bill,
Great counter top. Did you use the EmTech 8000 conversion varnish? and thanks for the Naptha/BLO recipe to pop the grain
Thanks, Jeff.

Yes, I used Emtech 8000 as the final topcoats. This is the first project on which I used the Target waterbased products. After using BLO/Naphtha on the veneer and then dying the oak with TT, the complete finish schedule was:
- 3 coats of Sealcoat shellac as a barrier, sanding to 150 after all 3 coats
- 3 coats of clear HSF5100 filler, sanding with 150 between each coat
- 3 coats of clear EM8800 sealer, sanding with 220 between each coat
- 3 coats of clear EM8000cv, sanding with 320 between coats
- after the last coat I sanded to 420, then buffed with FF pumice followed by rottenstone to develop a satin sheen. I also applied a couple of coats of Johnson's Wax before installing the top.

:)
 
Last edited:

BigRob777

Member
Joined
May 1, 2005
Messages
2,717
Location
Newark, Delaware, USA.
I'd say that it has the eyes and face of a baboon. That said, it's fabulous. How'd you do the veneering? I'm getting ready to embark on a whole lot of veneering and I'm going to use a veneer bag, with a vacuum press. I'm not looking forward to trying out my first attempt at seeming.
Rob

BTW, what'd your substrate?
 

Bill Arnold

Member
Joined
Aug 19, 2008
Messages
140
Location
Thomasville, Georgia USA
I'd say that it has the eyes and face of a baboon. That said, it's fabulous. How'd you do the veneering? I'm getting ready to embark on a whole lot of veneering and I'm going to use a veneer bag, with a vacuum press. I'm not looking forward to trying out my first attempt at seeming.
Rob

BTW, what'd your substrate?
The face of a baboon, huh? Oh, you mean the veneer?!? :biggrin:

The veneer was in two strips about 18" by 48" each. To get the best match for my panel, I split each strip, rotated the pieces and tried several combinations. I back-beveled the matching edges, applied 2" blue tape to the show side, flipped the taped assembly and glued the joints with Titebond II. I cut a piece of 3/4" MDF slightly larger than the desired dimensions of the panel, applied a generous amount of Titebond II and aligned the veneer on it. Then I placed it in my vacuum bag for several hours.

If you want to learn to cut and join veneer for whatever pettern, just dive into it and try. You could start with some inexpensive paper-backed veneer for practice.
 

nava1uni

Member
Joined
Mar 30, 2008
Messages
4,936
Location
San Francisco, CA, USA.
An amazing counter top. You did an exquisite job on the counter. The veneer is beautiful. Thanks for explaining what the Blo/Naptha finish. I like learning about new things.
 
Top Bottom