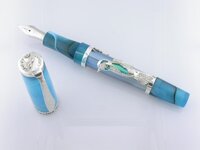
It was tons of work and took months to dial in. It was to be made in batches of hundreds at a time, but the deal fell through. I also invested in a lot of new equipment like a faster computer, 3D scanner, digitizing pad, software, heat treating oven, and other stuff. I also looked into silver casting equipment but decided not to buy that stuff. Getting the computer artwork to true 3D on a curved tapering surface was very hard. I remember working 24 hours straight on that part once. There was lots of steep learning curve involved for me there. The wax parts then had to be printed by a high resolution wax printer. That was no small feat in itself because the parts are so thin and delicate. That took several attempts and a few redesigns to get that to work OK. Some silicone molds were made from the master models, and we had to take shrinkage of the mold and the silver into account. Normal injection wax for the lost wax parts didn't work well because of the thin members, so a special type of liquid wax that hardens under ultraviolet light was used. The parts were cast in sterling silver. They were then hand finished which again was tough due to their thin lines. The main titanium parts were then reengineered to fit the as-cast parts rather than the original numbers. Since the nib had to line up with the body, I had to screw it in and mark where the artwork was to align to. The same had to apply to the cap. I had to screw on the cap then align and affix the clip. Since this had to be able to align, I had to come up with a way to do that since simple threads would not allow that orientation. I made a special fixture that flared out a cylindrical tip of the cap/clip in order to secure it in a hole in the acrylic cap. I made some special pitch 2 lead threads that screwed the cap to the section. This allowed the cap to line up with the bird when it was screwed on one complete revolution. I made left hand threads on the bottom acrylic end of the pen so that it would not unscrew when the upper cap is unscrewed. I didn't have a tap for the feed to screw into the section, so I made one. It was a pretty long one so that the whole section could be machined from the front without having to reposition it. The silver centerband with the latin name of the bird was oriented to the cap and nib and artwork, so had to go on only after orientation was established. The central titanium spine of the pen was anodized to get color in the belly of the bird as well as the flower. I had to hand cut a stencil to be able to anodize the different parts at different voltages to get the different colors. Again, all the artwork had to be vertically and rotationally aligned for when the pen was assembled. The gold nib had a logo lasered on. The surface finish of the acrylic had to be very glossy and alignment of the various parts was pretty important.
Other than all that, it was pretty simple.

")