Setting up a pot for just Pressure casting

Signed-In Members Don't See This Ad

philb

Member
Joined
Sep 1, 2007
Messages
1,561
Location
Midlands, United Kingdom.
Hi,

Have just got myself a pot, and want to ideally setup for pressure casting some Worthless Wood blanks and pine-cones etc.

Have used coloured and clear PR without pressure before, but am unsure how to setup the pot for either PR or Alumilite casting. I've read the the Vacuum/Pressure setup, but was wondering if anyone had any pics of a purely pressure setup? I'm talking simple here, not used a pot or compressors before!!

Any help appreciated, hopefully I should have the pot delivered in a couple of days!

PHIL
 
Signed-In Members Don't See This Ad

Gilrock

Member
Joined
Oct 18, 2011
Messages
560
Location
Tucson, AZ
I'm not the expert but I think everyone usually recommends vacuum to get the resin into all the nooks and crannies of the wood and pinecones. I recently got my vacuum chamber but it took me a couple weeks to order a pump so I've got one on the way.
 

Justturnin

Member
Joined
Aug 19, 2011
Messages
2,235
Location
Houston, Tx
I don't have any pics handy but it is super easy. Build a rack to fit the pot. It does not have to be perfect but I like to make sure mine is square so when I place a level at the top to make sure my resin does not flow to one side I want to know that the 2 shelves are level too. Then the pot lid should have 2 holes going in. One should have a pressure gauge and the other a valve and a male fitting to connect to your hose. You may need to buy a few in between fittings meaning a reducer or close nipple or something but that is really all you need. I have a regulator on mine but I will be taking it off soon to simplify everything like I described.
 

Justturnin

Member
Joined
Aug 19, 2011
Messages
2,235
Location
Houston, Tx
I'm not the expert but I think everyone usually recommends vacuum to get the resin into all the nooks and crannies of the wood and pinecones. I recently got my vacuum chamber but it took me a couple weeks to order a pump so I've got one on the way.

I would not use Vacuum in the pot. If you do the mold better be pretty deep or the resin will over flow. Use vacuum before pouring into the molds to degas but if you vacuum after you will suck all of the air out of the wood into the resin and have a foamy mess. If using PR, put it in hot water to thin it out and it will flow just fine. If using Alumilite it is pretty thin and I have never had an issue with it getting into the guts of the pinecones or sweetgum balls.
 

Gilrock

Member
Joined
Oct 18, 2011
Messages
560
Location
Tucson, AZ
Hmm...yeah disregard what I said. I looked back through all the old posts I was remembering and I guess it's stabilization that needs the vacuum. I know some people have setup their pots to do pressure and vacuum but I kept my pressure pot for pressure only and I got the vacuum chamber to do some experimenting with trying to remove bubbles from clear resin before pouring and maybe do stabilization or something else with it down the road.
 

robutacion

Member
Joined
Aug 6, 2009
Messages
6,514
Location
Australia - SA Adelaide Hills
Hi,

Have just got myself a pot, and want to ideally setup for pressure casting some Worthless Wood blanks and pine-cones etc.

Have used coloured and clear PR without pressure before, but am unsure how to setup the pot for either PR or Alumilite casting. I've read the the Vacuum/Pressure setup, but was wondering if anyone had any pics of a purely pressure setup? I'm talking simple here, not used a pot or compressors before!!

Any help appreciated, hopefully I should have the pot delivered in a couple of days!

PHIL
Phil,

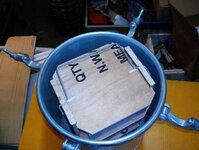
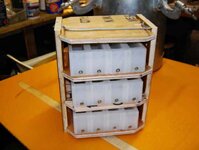
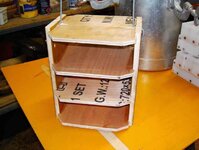
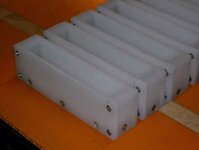
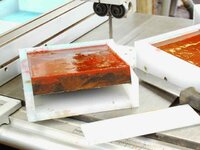
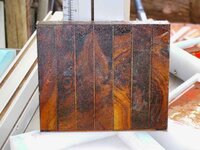
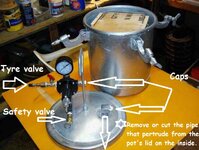
This is mine when I got it and started casting, nothing changed in the pot the only thing that I suggest to you is not to make the molds singly but to accommodate 6 or seven blanks in one go.

I have made the bigger molds not long after I started and depending on what you use to cut/slice the blanks after cast (they will be all stuck/block), you make wooden spacers to match the thickness of the blade used to separate then, either buy bandsaw or table saw, and put them in between the blanks....!

The tyre valve is welded/soldered to the brass fitting...!

Hope this helps...!

PS: The security/safe valve should match the pots ratings so, your pot factory pressure rate capacity should be never exceeded, nor the valve should be removed to increase the pressures, that can be disastrous...!

Casting worthless wood, will require the most pressure possible, the more pressure the more penetration the resin will have into all those wholes and crevasses however, cheaper pots are not suitable to pressures above 50 PSI, so will go 70 PSI but you have to make sure, you know exactly the factory pressure rating for the pot YOU'VE GOT and not from someone else that looks identical...!

Take care and be safe...!

Cheers
George
 

Attachments

  • timber preparation 008_(1).jpg
    timber preparation 008_(1).jpg
    112.5 KB · Views: 569
  • timber preparation 007_(1).jpg
    timber preparation 007_(1).jpg
    46.8 KB · Views: 451
  • timber preparation 006_(1).jpg
    timber preparation 006_(1).jpg
    41.8 KB · Views: 895
  • timber preparation 005_(1).jpg
    timber preparation 005_(1).jpg
    46.2 KB · Views: 454
  • timber preparation 004_(1).jpg
    timber preparation 004_(1).jpg
    22.9 KB · Views: 434
  • timber preparation 1654_(1).jpg
    timber preparation 1654_(1).jpg
    48.4 KB · Views: 1,148
  • timber preparation 1656_(1).jpg
    timber preparation 1656_(1).jpg
    66.9 KB · Views: 515

philb

Member
Joined
Sep 1, 2007
Messages
1,561
Location
Midlands, United Kingdom.
Phil,

This is mine when I got it and started casting, nothing changed in the pot the only thing that I suggest to you is not to make the molds singly but to accommodate 6 or seven blanks in one go.

I have made the bigger molds not long after I started and depending on what you use to cut/slice the blanks after cast (they will be all stuck/block), you make wooden spacers to match the thickness of the blade used to separate then, either buy bandsaw or table saw, and put them in between the blanks....!

The tyre valve is welded/soldered to the brass fitting...!

Hope this helps...!

PS: The security/safe valve should match the pots ratings so, your pot factory pressure rate capacity should be never exceeded, nor the valve should be removed to increase the pressures, that can be disastrous...!

Casting worthless wood, will require the most pressure possible, the more pressure the more penetration the resin will have into all those wholes and crevasses however, cheaper pots are not suitable to pressures above 50 PSI, so will go 70 PSI but you have to make sure, you know exactly the factory pressure rating for the pot YOU'VE GOT and not from someone else that looks identical...!

Take care and be safe...!

Cheers
George

Thanks for the pics, very helpful! Just need to find somewhere to get the fittings from. As I don't think the pot comes with anything.

Looking for a quick release hose fitting, shut-off handle/tap, pressure gauge and the regulator/three way connector block for all of them! Internet searching time!!

George is that PR your using for your Resifills and cones/banksias? Only as a lot seem to only use Alumilite with cones/wood?

Cheers PHIL
 
Last edited:

robutacion

Member
Joined
Aug 6, 2009
Messages
6,514
Location
Australia - SA Adelaide Hills
Phil,

This is mine when I got it and started casting, nothing changed in the pot the only thing that I suggest to you is not to make the molds singly but to accommodate 6 or seven blanks in one go.

I have made the bigger molds not long after I started and depending on what you use to cut/slice the blanks after cast (they will be all stuck/block), you make wooden spacers to match the thickness of the blade used to separate then, either buy bandsaw or table saw, and put them in between the blanks....!

The tyre valve is welded/soldered to the brass fitting...!

Hope this helps...!

PS: The security/safe valve should match the pots ratings so, your pot factory pressure rate capacity should be never exceeded, nor the valve should be removed to increase the pressures, that can be disastrous...!

Casting worthless wood, will require the most pressure possible, the more pressure the more penetration the resin will have into all those wholes and crevasses however, cheaper pots are not suitable to pressures above 50 PSI, so will go 70 PSI but you have to make sure, you know exactly the factory pressure rating for the pot YOU'VE GOT and not from someone else that looks identical...!

Take care and be safe...!

Cheers
George

Thanks for the pics, very helpful! Just need to find somewhere to get the fittings from. As I don't think the pot comes with anything.

Looking for a quick release hose fitting, shut-off handle/tap, pressure gauge and the regulator/three way connector block for all of them! Internet searching time!!

George is that PR your using for your Resifills and cones/banksias? Only as a lot seem to only use Alumilite with cones/wood?

Cheers PHIL

Phil,

If you pot is a Binks, you will have no problems and you should know what it comes with the pot, it should be almost ready to be used apart from the removal of the paint feeding tube on the lid and the quick air connector for your compressor hose, everything else, should come with the pot...!

I would wait fore the pot to arrive and then see what you need...!

In regards to the resin type I work with, the PR (polyester) resin, is the result of 2 factors, first Alumilite is not available in Australia and the identical substitute is just ridiculously expensive at an approx. cost of near $1,000 for a 20 litre drum...!

The second reason, is the result of the first and the fact that, in many ways, is a little more forgiving to work with and provides a better shine on the finished blanks however, is know fact that Alumilite has a strong adhesion capabilities to the wood, something that with some of my woods, will require an extra couple of steps to make sure the final results are acceptable and so far I have had no complaints...!

You may want to try both resin types and decided which one works best for you, if prices are identical...!

Cheers
George
 
Joined
Feb 24, 2012
Messages
4,368
Location
Claremont NH
I got a pressure pot from HF and the manual says that the operating pressure is 40-60psi but the max is 80psi. I use mine at about 60psi and am very new to this. I have not dared to push the pot up any higher yet but I will add just a bit more pressure when I get the confidence.
 

MesquiteMan

Retired Head Moderator
Joined
Oct 18, 2005
Messages
5,678
Location
San Marcos, TX, USA.
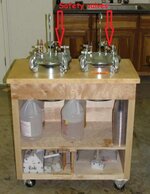
Here is a picture of my Binks pots. Notice I keep it very simply with the minimum amount of stuff on the pot. I don't want/need a regulator as I am my own regulator! When the pressure gets to where I want it, I close the valve. Simpler is better to me since there are less connections to leak.

17081d1254339029-no-more-pressure-pot-failures-me-dsc09899.jpg


17083d1254339108-no-more-pressure-pot-failures-me-dsc09897.jpg
 

philb

Member
Joined
Sep 1, 2007
Messages
1,561
Location
Midlands, United Kingdom.
Thanks Curtis! That helps alot, although mine is a slightly older model.

Just been watching your videos and noticed you had the quick-connectors. can I ask what type they are, as there seems to be quite a selection!!

Also, do you have a saftey release valve, I've seen a George and few online with a keyring like pull-ring.

Cheers, PHIL
 
Last edited:

Keith Heyer

Member
Joined
Aug 24, 2012
Messages
29
Location
Tulare, California

robutacion

Member
Joined
Aug 6, 2009
Messages
6,514
Location
Australia - SA Adelaide Hills
Thanks Curtis! That helps alot, although mine is a slightly older model.

Just been watching your videos and noticed you had the quick-connectors. can I ask what type they are, as there seems to be quite a selection!!

Also, do you have a saftey release valve, I've seen a George and few online with a keyring like pull-ring.

Cheers, PHIL

Phil,

While on the first 2 pics of Curtis set-up, the safety valves are a little hidden, the bottom pic shows them, with the "rings" hanging...!

Curtis is correct, simpler is best, less chances to get leaks, also...!

PS: Sorry Curtis, for the use of your pic to answer the question...!

Cheers
George
 

Attachments

  • DSC09897.jpg
    DSC09897.jpg
    67 KB · Views: 949

philb

Member
Joined
Sep 1, 2007
Messages
1,561
Location
Midlands, United Kingdom.
Ah, can see them now!! Thanks!
Hopefully the pot should arrive today!! Now I've gotta find a compressor too!!

Looking at the pics of the pot it seems to be the 110PSI model, but the description was very vague!!
 

philb

Member
Joined
Sep 1, 2007
Messages
1,561
Location
Midlands, United Kingdom.
It's arrived and is a genuine Binks!!
1995 model, but never been filled. Dirty from storage on the outside, cleaned as a whistle on the inside! Even came with the original box and paperwork!
Also has the Binks Tee-Piece, with two shutoff valves on one inlet. Safety valve on the other, and another outlet with a Binks valve. Also has a nice air disperser under the lid, that shoots the air horizontally in four directions. Which saves me a job in getting a 90deg elbow so the resin doesn't get blown out the molds!!

Pics to follow!!
 
Top Bottom