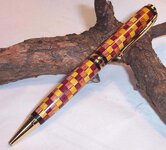
Segmenting

Signed-In Members Don't See This Ad

Rollerbob

Member
Joined
Apr 26, 2009
Messages
1,601
Location
Athens, Texas
How do some of you segmented(?) wizards design. In other words, are you able to visualize your concept or do you draw or use a cad program, such as Sketchup, to come up with your design themes? I am seeing some amazing work that this simple mind cannot factor.:confused: Talk amongst yourselves.....I'll be back.
 
Last edited:
Signed-In Members Don't See This Ad

VisExp

Member
Joined
Oct 1, 2007
Messages
2,738
Location
Palm Coast, FL, USA.
I have an idea for a design in my head. I then use Auto Sketch to draw out my pattern. The pattern just defines the lines I will cut along with my scroll saw. The tricky part is pre-visualizing what a square segmented blank will look like once it is turned round.
 

GouletPens

Member
Joined
Nov 9, 2008
Messages
1,449
Location
Ashland, VA
A lot of times things just turn out and you don't even see it coming. You may plan for a certain angle or effect and it looks different when turned...sometimes better than you originally thought! That's part of the fun of it. A good place to start is to model after other members' designs when they walk through it. Doing it yourself will help you to understand how it all comes together, and that will allow you to make adaptations and create your own unique designs. Nothing beats just trying it yourself.
 

TribalRR

Member
Joined
Jun 2, 2008
Messages
170
Location
Louisville, Kentucky
I usually get an idea, come up with a way to make it, and then see if I was right. I used AutoCAD one night when I had an idea but was too lazy to go out to the shop. But I think it really took longer to model it than it would to have to just make it...
 

MattDaddy

Member
Joined
Apr 21, 2009
Messages
99
Location
Grand Rapids, MI
I would add a recommendation, but these guys said it all. The best way to know what it will look like is by doing. Amazing what you will learn from your successes and failures. I will say - it's all about accuracy - get the cuts and angles clean and make sure your glue joints are tight!
 

ribanett

Member
Joined
Dec 15, 2007
Messages
381
Location
Kenner, LA, USA.
As Matt said, JUST DO IT! Lay out the materials you have and play with them. When you have an idea, make a hand drawing of it, build it and turn it. You will never know exactly what it will look like until its turned. If you are lazy like me, I take a few pics of the blank to remember how I built it. (Digital film is cheap)
 

Dai Sensei

Member
Joined
Jan 14, 2009
Messages
482
Location
Gold Coast Queensland Australia
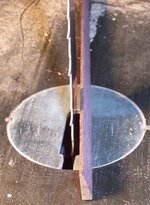
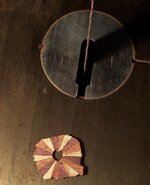
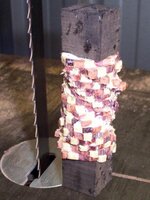
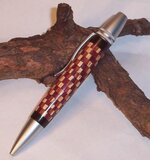
I have made heaps of simple sliced and glued together type pen blanks, but I few years back on another forum a number of us made pens with a Harlequin theme that I thought looked great, although it does take a fair bit of work and time.

You start by cutting tapered lengths of different timbers, then gluing them together to form a dowl. You then drill a hole to suit your sleeve down the centre. Then slice the dowl into little thin disks, then re-glue them together on the sleeve but off-set the disks by one square. After the glue's dry, turn it like any other blank.

Cheers
 

Attachments

  • HPEN-WEDGE.jpg
    HPEN-WEDGE.jpg
    44.4 KB · Views: 287
  • HPEN-SLICE.jpg
    HPEN-SLICE.jpg
    32.6 KB · Views: 311
  • HPEN-STACK.jpg
    HPEN-STACK.jpg
    37.3 KB · Views: 331
  • harlequin2.jpg
    harlequin2.jpg
    36.8 KB · Views: 320
  • harlequin fav.jpg
    harlequin fav.jpg
    51.8 KB · Views: 281

Rollerbob

Member
Joined
Apr 26, 2009
Messages
1,601
Location
Athens, Texas
Thanks so much for the insight thus far, Good stuff! Keep it coming. Dai Sensei, thanks for the mini tutorial!! I love this place.:RockOn:
 

markgum

Member
Joined
Apr 8, 2008
Messages
3,825
Location
Keenesburg, CO
I have made heaps of simple sliced and glued together type pen blanks, but I few years back on another forum a number of us made pens with a Harlequin theme that I thought looked great, although it does take a fair bit of work and time.

You start by cutting tapered lengths of different timbers, then gluing them together to form a dowl. You then drill a hole to suit your sleeve down the centre. Then slice the dowl into little thin disks, then re-glue them together on the sleeve but off-set the disks by one square. After the glue's dry, turn it like any other blank.

Cheers

but do you run these through your band saw with out a jig? I try freehand and end of getting nervous because my fingers are so close to the blade or I don't get a clean cut.
 

VisExp

Member
Joined
Oct 1, 2007
Messages
2,738
Location
Palm Coast, FL, USA.
I have made heaps of simple sliced and glued together type pen blanks, but I few years back on another forum a number of us made pens with a Harlequin theme that I thought looked great, although it does take a fair bit of work and time.

You start by cutting tapered lengths of different timbers, then gluing them together to form a dowl. You then drill a hole to suit your sleeve down the centre. Then slice the dowl into little thin disks, then re-glue them together on the sleeve but off-set the disks by one square. After the glue's dry, turn it like any other blank.

Cheers

The Harlequin pens look great. Nice work.

I had to laugh at the center picture showing the blank before turning. I often look at my blanks and think, wow, what a mess, hope something nice comes out of this after I put it on the lathe :biggrin:
 

workinforwood

Member
Joined
Mar 1, 2007
Messages
8,173
Location
Eaton Rapids, Michigan, USA.
Being a trucker, I have many hours of free time to think about ideas and how to make them real. I jot down idea's as they come to me. I'll rough sketch the idea, then think more about it, maybe have to make some modifications to my plans as I think about problems I might encounter, then I go build it. I wouldn't have a clue how to cad something. I just know what something will look like by experience. Straight line segmenting is the easiest. When you want different effects, it gets a bit bizzarro..like a large circle is designed as an oval in a blank. I was just making some new skull's and it's funny to look at the skulls before they are turned, as they look almost like conehead skulls, but when they are spun they widen out to be close to round, but not too round, as a skull wouldn't be a perfect circle. If you make a million cubes, unless you pie them like Sensai's, then some cubes will be wider than others when turned. If you put a thin slice on an angle, it is straight on two sides and curved on two sides, so if you don't want the curve you have to segment something else in it's place. Alternating curves produce scallops. It goes on and on. Once you do the designs, you understand what they do so you can create new ones.
 

Kaspar

Member
Joined
Aug 1, 2006
Messages
1,363
Location
Ahead of the curve. Waaay ahead.
I use an obscure feature of Paint Shop Pro 7 to see if certain pattern and color combinations will work. Other than that, I do it in my head. The way to think of it, for me, is to build it radially out from the tube, and from the inside out to all points of the blank.

For this one, I just did it in my head.
 
Last edited:
Top Bottom