I was friends with Ron and we did some work together when he visited my home during one of his business trips to north Florida.
Ron's website is still out there but IIRC he stopped turning pens and got into stained glass.
Ron used to cut his slices on the chopsaw and using CA, press them together by hand using a solid surface
and a clean sheet of paper as a fence.
He'd spray it with Accelerator, then tear off the paper and what stuck was sanded off til the edges were flush.
It was an iterative process.
The checkerboard blanks he sold were made by someone else.
By checkerboard, I mean they were 2 pieces each of light and dark and formed a billet which looked like a
checkerboard from the top or bottom edge.
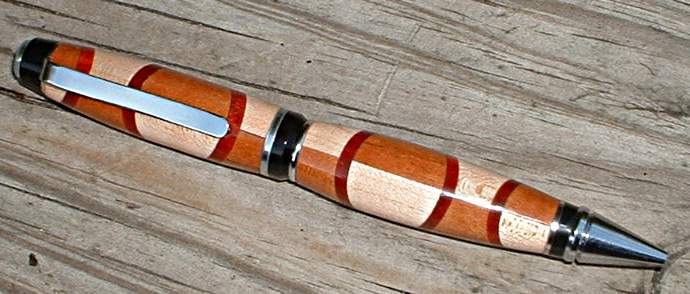
A checkerboard blank would be used as input for a pen like this one, which is my harlequin, which was inspired by Ron's Morning After pen:
That's a cherry and maple checkerboard blank sliced at 30 degrees, then glued back together with bloodwood slices between.
Segmenting is woodworking.
The key to doing woodworking wherein the parts are consistently placed where
you need them is to build jigs and fixtures which make repeatable accuracy possible.
How complex the parts are defines how complex the jigs and fixtures will be.
When I make segmented blanks where alignment in the middle is critical, I start by milling the lumber to a
consistent size such as 1" square.
Let's say I'm going to make that checkerboard of maple and cherry.
I'd also mill some disposable scrap such as poplar to 1" . I'd use the poplar to fine tune the table saw until I find the exact middle of my 1" squares.
Then, I'd rip all the pieces being used to make the checkerboard.
Having 4 equal sized parts for the input makes it easy to glue them up as one billet where all 4 meet in the middle.
Another way to make that billet is to mill all boards to a consistent thickness, then rip wider boards to equal width pieces and glue those together.
How I do it depends on what shape the rough stock is in.
For instance, if I need veneer thin pieces, I'm likely to use the bandsaw then plane those flat using a home made planer sled.
I glue the wood components with Tite-bond II; it gives me time to make sure everything stays aligned while I clamp it and it sets up.
Tite-bond II will make a joint that's stronger than the wood itself; I haven't had a tite-bond II joint fail yet.
After slicing the parts, I glued the blank the same as Ron did, using a solid, level surface such as my workbench,
with a clean sheet of paper as the sacrificial fence.
For more complex blanks, building a gluing jig could be necessary.
In that case, clear packing tape makes a good surface which will release the wood after glue-up.
Thanks to Eagle for that idea.
Once a blank like the above is created, it can still be ruined by drilling off-center.
The best solution there is probably drilling on the lathe.
Hope that's useful to you.