Production organization ideas wanted

Signed-In Members Don't See This Ad

Andrew_K99

Member
Joined
Feb 17, 2011
Messages
1,571
Location
Waterdown, ON, Canada
I am in the process of making 10 pens for donation. I've been doing everything in stages, cut them all at once, drilled them all at once, glued in the tubes at once, milled the ends and finally roughed them out all at once.

Through these stages I could write on them to mark the matching pens and which ends mate. The next steps of finish turning and finishing I won't be able to write on the blanks so I need some sort of organizer to keep track of all them.

I assume others have done, or do the same thing at times. So, the question is, how do you keep track of your pen blanks turning these many processes?

Thanks,
AK
 
Signed-In Members Don't See This Ad

airrat

Member
Joined
May 17, 2005
Messages
2,585
Location
chandler, az, USA.
Me personally I have a few mandrels and usually at least 2 sets of bushing per kit. I would completely finish a pen now before grabbing the next.

The only other thing you could do is get a board, drill holes in it. Put dowel rods in it to hold your finished tubes. Make sure you mark the inside of the tubes so you know which side are the centers. DAMHIKT

Then you can move to assembly.
 

Mack C.

Passed Away Sep 29, 2018
In Memoriam
Joined
May 4, 2008
Messages
2,019
Location
Brooklin, ON Canada
I am in the process of making 10 pens for donation. I've been doing everything in stages, cut them all at once, drilled them all at once, glued in the tubes at once, milled the ends and finally roughed them out all at once.

Through these stages I could write on them to mark the matching pens and which ends mate. The next steps of finish turning and finishing I won't be able to write on the blanks so I need some sort of organizer to keep track of all them.

I assume others have done, or do the same thing at times. So, the question is, how do you keep track of your pen blanks turning these many processes?

Thanks,
AK
Hi Andrew; I have 29 ready to go. I put a piece of masking tape on the kit bag with the name of the blank (that goes back in the bag as well) through it's stages; cutting, drilling, gluing, turning, finishing etc.

Once it's finished, letter written card attached naming the wood etc. and send them off. Oh, don't forget to add a refill as well!

Strange how I know what you're doing, isn't it!:biggrin:
 

bensoelberg

Member
Joined
Aug 19, 2010
Messages
782
Location
Bakersfield, California
I just kept each set of tubes rubberbanded together until it was time to assemble the pen. Cut the blank, put the rubberband on, drill, rubberband, turn, rubberband, etc. It worked for me.
 

alphageek

Former Moderator
Joined
Jul 19, 2007
Messages
5,120
Location
Green Bay, WI, USA.
I just kept each set of tubes rubberbanded together until it was time to assemble the pen. Cut the blank, put the rubberband on, drill, rubberband, turn, rubberband, etc. It worked for me.

Yep.. thats me too.. The only time I don't rubberband is if there is a finish (CA) on it... Then it gets put onto 'pegs' (I found a spool holder that works great). Other than that - its rubber banded... and I usually mark a line across the middle of the blank, which helps keeping "grain" orientation so that I turn the right part (especially usefull on acrylics where that may be harder to tell visually).
 

LEAP

Member
Joined
Dec 22, 2006
Messages
1,938
Location
Old Orchard Beach, Maine
I have a couple boards with finish nails in two rows. The top goes on one row and bottom goes on the other. Each holds about 15 pens worth. There is enough room on the racks to make pencil notes right on the board about the blanks. I often go days or weeks between steps so the notes come in handy.
 

Phunky_2003

Member
Joined
May 18, 2009
Messages
1,470
Location
Bonham Texas
I got one of these to keep sets of blanks together, come in real handy when casting sets of blanks. It is portable I move it from my casting table to lathe to assembly desk. I got 2 at a yardsale for 5.00. They are baby bottle racks. You can search google and find something that suits your needs.
 
Last edited:

asyler

Local Chapter Leader
Joined
Dec 31, 2009
Messages
803
Location
bryant , ar
board with nails, i did cover the board with waxpaper,, i was afraid there might be some 'uncured' ca or something and they would stick to board
 

btboone

Member
Joined
Dec 5, 2004
Messages
2,421
Location
Roswell, GA, USA.
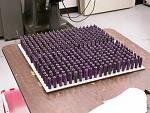
Here's something I came up with to work with big numbers of pens. I got boards of white pegboard and ordered 2" steel dowel pins from MSC. The pins press tightly into the holes in the boards, so support the pen parts as they are being made. Since there is a known amount of pegs, it eliminates the need to sort, orient, or count the parts.
 

Attachments

  • Picture-1446.jpg
    Picture-1446.jpg
    5.9 KB · Views: 335

Chasper

Member
Joined
Mar 22, 2007
Messages
1,987
Location
Indiana
After picking out the blanks, I mark them for cutting using a paint pen. Put a double ended arrow at the cut mark, write a number on each end, and if it matters mark one as pen end and the other as cap end. That takes care of them until turning.

If they are different colors, after turning I lay them in a tray so that the same color is never next to another pen of the same color. When they are all the same color/species I put an exposed corregated liner in the tray to keep them separated. I usually don't make batches larger than one day of turning; about 25 pens. When I lay out a production run of more than 25 pens I mark, cut, drill, paint, glue, trim, and square the entire batch, then turn them in smaller batches of only 25.
 
Last edited:

Rangertrek

Member
Joined
Sep 10, 2008
Messages
2,104
Location
Bossier City, Louisiana, USA
I am currently working on 24 for a client. Four types of wood and 2 pen styles, executive and cigars. The top barrels are are to be laser engraved, so they are sent off separately. I got some index cards and cut them into small strips. Numbered the card for each set of blanks and rolled the card strip and placed in the tube. The card will stay in the tube during handling, etc. Will put them all together after they come back from the engraver (Constant).

I also use a finish nail rack system during cutting to hold turned blanks until I do the finish work. I have plastic sandwich bins/boxes (Wallyworld) to hold sets of blanks also. Painter tape on the top marks the kits, etc. These are inexpensive and the top locks in case you knock it off the work bench. (Yes, been there, done that!)
 

opfoto

Member
Joined
Dec 28, 2004
Messages
1,047
Location
Albany, NY, USA
Prior to finishing I use my "nailboard" made a piece of pine and with 2 columns of 4d finish nails. There are 6 rows x 2ea so its enough for 6 pens.....enough for me to do at a time. They are labeled 1-6 and A,B on the wood in ink. I make a tag for each pen and place it on nail 1a for the nib end, with the name of wood, kit. Nail 1b gets clip end. times that x 6 and you get the idea. I mark the inside of the mating ends of the tube for grain matching. The tag stays with the pen at all times even goes on the clip when assembled.
For finishing I use my "finish rack". I made a plywood base 7"x12" and airstapled 2 pieces of plywood 2x12 with 6 grooves spaced along the length and then after each coat I place the wet tube horizontally across my finishing board on a piece of wire cut from a coat hanger. I drilled 2 sets of holes in the boards with grooves in them to hold the hanger wires after bending a hook into them so they don't fall thru. Then I drilled 8 holes in the bottom spaced evenly and flip that over to use for bottle stoppers. Not very pretty to look at but very functional, for me.
Sorry for the long post:redface:
 
Top Bottom