I don't yet have a 4-jaw chuck for my lathe so I had to figure a way to drill centered holes for my pen blanks. I also don't have that really nice special blank drilling chuck either. This is the method I ended up using fairly successfully for my first 15 or so pens...
First, I drill a small (1/8th inch) hole roughly centered in each end of my blank, and I turn the ENTIRE blank round between centers on my lathe. This hole is just for relief for the centers, and is only 1/4 inch deep at most.
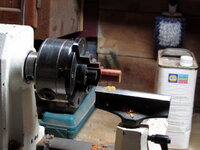
Next, I get out my 3-jaw chuck (Harbor Freight Tools, 32 dollars, online order only >.<), and put that in my headstock (#1MT). I chuck the pen blank in and because it's round, the 3-jaw chuck automatically centers it. I leave the live center in the tailstock and use it to keep the blank running true for this next part.
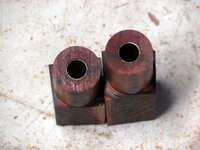
I measure the length of blank I will need for my brass tubes, and using a thin cutoff tool, I cut the blanks to length. I'm not worried about any marks made on the outside of the blank, as that will all be turned away before I finish the pen.
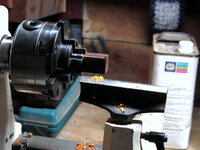
After cutting my blanks to length, I chuck them back in the 3-jaw chuck and drill the blanks. The live center in the tailstock is removed now. I recently acquired a #1MT Jacobs chuck for my tailstock end (Penn State, 3/8ths inch capacity, 13 dollars). Before that, I tore apart a keyless drill (Harbor Freight Tools, 12 dollars with coupon), and used the keyless chuck on that for a HANDLE to drill by hand. I still occasionally drill by hand because it's faster and doesn't bind on the lathe so much (Harbor Freight Tools Mini Wood Lathe ... it just doesn't have the torque to power through).
In any case, starting your hole perfectly centered is definitely part of the key to getting good centered holes. I generally start my holes now using the new chuck in the tailstock and slowly advancing it into the rotating stock while I keep the chuck steady with my free hand. Drilling a 1/8th pilot a good bit into the blank always helps. After that, I change bits to the correct size and either drill using the tailstock or by hand. By drilling at least the first part of the hole using the tailstock drill chuck, I can generally get a perfectly centered hole all the way through using either method.
Keep in mind that if you drill by hand, the hole on the side you are drilling FROM may get a little oversize if you don't keep it steady and in line. Never use a bent bit. In fact, if you ever drop your chuck on the floor with a bit in it, don't even bother looking at it, just toss that bit. And double-check the chuck to make sure you didn't bend the morse taper.
If you start the hole with a tiny bit of wobble, by the time you reach the other side the hole may have wandered a bit off. This is generally OK, because you should still have enough material to turn away that this will never be apparent. It's only after you have the brass tubes glued in that you need to be 100% accurate in turning, sanding, and pressing your kit together.
If you're drilling something eccentric or misshapen, like a section of deer antler ... a drill press is my weapon of choice. I have a drill press vise that I have modified. I removed the steel jaw plates and replaced them with 3/16th inch vinyl plates that I drilled and countersunk to use the original screws from the steel plates. The vinyl gives fairly well, but it's tough. I use this as my primary pen press as well. For holding antler, they have a firm, but soft grip, so I don't ruin the outer appearance of the material. I get it to stand up as straight as possible by putting walnut and maple shims around it, and then drill my 3/8ths hole right through with a standard twist bit.
I am currently using a similar method to try to drill some granite that I got locally, but the bit I am using is a 3/8ths inch carbide glass cutting bit. I think I may need to pre-drill a 1/8ths inch pilot hole. In my first attempt, the bit wandered a little and blew out the side.