Please Critique My Photography

Signed-In Members Don't See This Ad

Cwalker935

Member
Joined
May 18, 2014
Messages
3,506
Location
Richmond, Va
I am trying to get a setup that works for me. I am using a collapsible light tent, with direct lighting from 2 daylight 800 lumen cfl bulbs in clip on desk lights. I tried side lighting but was not getting enough light through the light tent. I played with a number of aperture, shutter speeds, and compensation value settings. I also set the white balance manually. This my best photo- shutter speed 30, aperture f5, compensation value +1.3. The pen was approximately 10 inches from the camera. I don't really understand these settings so please keep any critique simple. Do I need brighter bulbs? What else should I try? Thanks in advance for any assistance.

image.jpg
 
Signed-In Members Don't See This Ad

plantman

Member
Joined
Jan 2, 2012
Messages
3,437
Location
Green Bay, Wi
Photo looks good up front, but as Chuck said, it gets dark in the background. I constructed a light box out of opaque plastic, but gave it up because I wasn't happy with the filtered light. I now use a flat surface covered in a white towel that also runs up the back for a seamless backdrop. It is lit by 3 75W daylight bulbs in clip on holders mounted on 6" tripods. One left front, one right front, and the 3ed. at a 90 degree angle across the rear that lights up the area behind the subject. This third light will backlight your photo and get rid of the dark area you see and any shadows caused from the front lights. I'm no expert, but those who are, have some interesting hints and tips in the library. Short answer. Backlight your subject. Jim S
 

Rich L

Member
Joined
Feb 1, 2012
Messages
263
Location
Centennial, CO
Photo looks pretty good but a slight bit out of focus in some parts. An aperture of f5 is pretty fast - I'd recommend you "slow' it down to f8 or f16 and slow down your shutter speed. You will get better depth of field (more things will be in focus) with a higher f number. Also, I can't see the point of the pen as it's hidden by your stand. Depending on your software you can play with clarity and sharpness settings and also your white balance looks a little warm. You didn't say if you're using a tripod - essential.

Some of my pictures are inside a light tent with only available light coming through a window nearby. I've used up to 5 - 10 second shutter speeds and slow apertures for depth of field to get a decent shot. Sometimes I'll cover the window. My pens are very shiny so I have other considerations, too, especially that extra lighting causes undesirable specular reflections. IMO the more diffuse your lighting (the reason for the light tent) the better your pictures will be. Don't overdo the lighting.

Cheers,
Rich
 

Cwalker935

Member
Joined
May 18, 2014
Messages
3,506
Location
Richmond, Va
Thanks Rich, you are dead on. In looking back thru the various photos, I found one using an aperture setting of f22, shutter speed 1.6 that looks better. I am using a tripod and a 2 second timer.

image.jpg
 

Sylvanite

Member
Joined
Jul 18, 2006
Messages
3,113
Location
Hillsborough, North Carolina, USA.
The color balance looks neutral (which is good), and the exposure is reasonable. I think the photo may look better if you move the camera farther away from the pen. See http://www.penturners.org/forum/f24/photography-basics-perspective-122430/ for an explanation of why distance matters. The specific aperture used doesn't tell the whole story. Without also knowing the focal length of the lens, I cant' say why the pen isn't completely in focus. That could be due to the camera focusing at the wrong point, or insufficient depth of field. See http://www.penturners.org/forum/f24/photography-basics-depth-field-116545/ for details. The lighting looks more direct than diffuse. The purpose of a light tent is to provide diffuse light. Try moving the lights farther away from the tent, so they (or at least one of them) illuminates the entire tent wall. See http://www.penturners.org/forum/f24/photography-basics-why-use-light-tent-121808/ for a better understanding of why (and how) to use a light tent. The above changes will necessitate changes in exposure. I suspect you already understand the relationship between aperture, shutter speed, and ISO setting. If you want a refresher, however, check out http://www.penturners.org/forum/f24/photography-basics-exposure-115586/ and http://www.penturners.org/forum/f24/photography-basics-iso-setting-116576/.

I hope that helps,
Eric
 

Cwalker935

Member
Joined
May 18, 2014
Messages
3,506
Location
Richmond, Va
Its halftime so I took a couple of more shots. Pen further away and diffuse lighting. This shot was focal length 42, f20


image.jpg
 

Cwalker935

Member
Joined
May 18, 2014
Messages
3,506
Location
Richmond, Va
Just to close it out. I did some more experimenting and arrived this-

Diffuse lighting
Focal length 29
F7.1
1/6 shutter speed
ISO 200

image.jpg
 

Dalecamino

Local Chapter Leader
Joined
Jan 2, 2008
Messages
14,572
Location
Indianapolis, In.
Making progress. I would like to see the pen fill the frame. A closer look at the pen and, less background. If that makes sense to you. Can you try to zoom in on the pen? I've also found these stands tend to throw the focus off by the top of the pen tilting away from the lens. Hope this helps. If not, just consider the source :biggrin:
 

BSea

Member
Joined
Dec 28, 2009
Messages
4,628
Location
Little Rock, Arkansas
I think you should also turn the stand so the pen doesn't slant away from the lens. This will widen the picture a pit too. And I also agree that it looks a little under exposed. But all in all a good photo.
 
Last edited:

BSea

Member
Joined
Dec 28, 2009
Messages
4,628
Location
Little Rock, Arkansas
Ok, I like the exposure, and the cropping. But this one looks just a bit out of focus. Pick a spot from the picture before you resized it (like the tip of the clip). Then zoom in as much as possible. When you can zoom in and the enlarged area looks focused, I think you'll have it. At least that's about as good as I can get. Does your camera allow for manual focus? If so, concentrate on the pen parts. The auto focus really doesn't work great for close up pics. I know mine doesn't.

All in all a good picture, and much improved from the 1st. :good:
 

Rich L

Member
Joined
Feb 1, 2012
Messages
263
Location
Centennial, CO
Not sure what you mean by focal length of 42 and 29. Zoom lens settings? BTW, what camera are you using? Full frame or APS-C, or?? That matters in assessing your focal length. You want to get as far away as you can but still fill the frame and accomplishing that will depend on your lens focal length(s). That's why a lot of folks use a long (100mm) macro. Also, the further you are away from the subject the greater your depth of field will be. At the same time, you can lose ultimate detail because you may be too far away. Lots of trades to make!

Do you know what 18% gray is? It is a great starting point for adjusting your final color temperature. On my screen (which is calibrated) your picture looks still a bit warm but maybe that's how you like it. Typically, what I'll do is use the software color balance adjustments to make the light box background look roughly 18% gray and then go from there. If you know how to look at the RGB values for your background then that will help and those values will vary depending on gamma and color space (I now you wanted this simple!) but they're around R120, G120, B120.

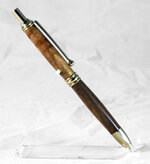
Focus is critical. I have found that manual focusing is best for me because the camera sometimes wants to focus on something other than what is important. BSea says likewise. I think your latest profile shot is good and one thing I would do in addition is just rotate the pen so more of the clip can be seen. The other thing I'd do is use a different stand, or something, so that the tip isn't hidden. You could still use the same stand but just offset the tip/nose cone so that it doesn't go in the hole.

What software are you using?

Cheers,
Rich
 
Last edited:

Cwalker935

Member
Joined
May 18, 2014
Messages
3,506
Location
Richmond, Va
I am using an Olympus pen mini, E-pmi and filterstorm software on my ipad. I guess my focal length must be 35 mm, the file info gives two focal lengths 35 mm and whatever zoom setting I used. I was giving the zoom setting as the focal length earlier. This photo was taken with my 40-150 mm lens, I moved the tripod back and used manual focus. My screen is small and eyesight bad so manual focus is tricky. White balance was at 5600 k and I adjusted it some with my software to make the gold finish look right. I do not know how to get to the 18 % grey starting point that you mentioned or to how to see the readings you referenced. This is getting closer, the background may be too grey but the gold finish looks washed out if I lighten it up. Thanks for your patience and advice.


image.jpg
 

Rich L

Member
Joined
Feb 1, 2012
Messages
263
Location
Centennial, CO
You are doing great and that camera, while not really high end, can do well. I saw a short video on youtube about manually focusing it and it looks like you can get an assist by manipulating which function is in charge of focusing:

"EPM1 video record button can be assigned as magnify button to assist manual focusing"

here's the video and I can only presume that it still applies to your camera.

https://www.youtube.com/watch?v=vae7KnekJZg

The 18% gray thing is done a couple of ways one of which can be done with your setup and the other - probably not since you're on an iPad. The first way is to put a small piece of 18% gray cardboard or a small Macbeth color checker in the picture when you take it. When you use Filterstorm, make that gray patch visually look gray like it's supposed to (you'll have the actual patch for comparison) and then you'll have pretty much the correct color temperature but you can still make it whatever suits you. Also, lightening an image in Filterstorm may not produce the same effect as an exposure change. I don't know enough about Filterstorm. I know it's different in Photoshop. Increasing contrast a little bit may help you. I played with your photo a little bit to get a "pure" gray background while leaving the pen alone, outside of a little adjustment to the level response, since you like the pen color. By "pure" I mean every shade of gray in the background has equal RGB values. Some are 220/220/220 and some are 183/183/183, etc. None are really 18% because that shade is not a reference in your photo and your background is a white light tent.

Cheers,
Rich
 

Attachments

  • CWalker 1.jpg
    CWalker 1.jpg
    154.9 KB · Views: 187
Joined
Feb 25, 2010
Messages
1,800
Location
webberville, mi
My eye says the best one is Sunday @ 8:02 am. Good, balanced, even light but enough contrast to make it close to three dimensional. I tend to overexpose my pics a bit to make the background lighter, almost white. Pers preference. One thing I do prefer is to get the tip out of the holder's hole. I've filed a v-notch where the hole is and use some modeling clay to keep the tip from sliding.
 

edstreet

Member
Joined
Aug 12, 2007
Messages
3,684
Location
No longer confused....
I am trying to get a setup that works for me. I am using a collapsible light tent, with direct lighting from 2 daylight 800 lumen cfl bulbs in clip on desk lights. I tried side lighting but was not getting enough light through the light tent. I played with a number of aperture, shutter speeds, and compensation value settings. I also set the white balance manually. This my best photo- shutter speed 30, aperture f5, compensation value +1.3. The pen was approximately 10 inches from the camera. I don't really understand these settings so please keep any critique simple. Do I need brighter bulbs? What else should I try? Thanks in advance for any assistance.

View attachment 121476

  • pen looks over turned and the wood pours appears to be clogged.
  • out of focus on every shot listed, likely outside the circle of confusion.
  • harsh blowout from a light source to the left (rear?) of the camera.
  • color balance appears to be off.
  • compressed tone range.
  • Red channel is flat which indicates under exposure as well as heavy filtering.
  • your light source output is not effective coverage for the film plane angle you are using.
  • possible light wavelength issues but not 100% certain.
 

Cwalker935

Member
Joined
May 18, 2014
Messages
3,506
Location
Richmond, Va
This picture seems to best capture the actual color of the pen. I feel like this exercise has helped me advance my photography. I am still struggling to get the background right but am much closer.

As for the pen looking like its been overturned, its actually high on one side and low on the other. I do not know what's up with that. There is a similar issue with the center band. I do not think that I did that during sanding but that is possible. I used a skew and sanding was minimal and everything seemed uniform around the bushings. Its a cheap kit and I wonder if the components could be off somehow. I do not see clogged pores when I look at it closely. This is cross cut butternut and you might be seeing color variations in the end grain.

Thanks for the C & Cs. Special thanks to Rich who put forth obvious effort in trying to help me.


image.jpg
 

Cwalker935

Member
Joined
May 18, 2014
Messages
3,506
Location
Richmond, Va
Oops

I went back and checked. The kit is fine. It's my turning that is out of round. I am turning between centers and I now recall returning one of the barrels to get a better fit. I must have reversed the bushings or have some slop in them. Another lesson learned.
 
Top Bottom