Pendant Colored Laminate Help, Please

Signed-In Members Don't See This Ad
See more from shastastan

shastastan

Member
Joined
Jan 15, 2014
Messages
323
Location
N CA
G'day all. I have some colored laminate blank wood that I want to use to make some 2" pendants like the ones in the attached pic. I know the blank is supposed to be cut at an angle, but I'm not sure what to do first. I have the Joyner Jig, that I've used, but am hoping for some ideas. Here's a pic of what I would like to try to get my pendants to look like. Thanks for any Help.
 

Attachments

  • pendant colored wood laminates.jpg
    pendant colored wood laminates.jpg
    28.1 KB · Views: 269
Signed-In Members Don't See This Ad

KenV

Member
Joined
Oct 28, 2005
Messages
4,720
Location
Juneau, Alaska.
That one appears to be about at 45 degrees. 30 degrees gives more exposure for each ring and 60 degrees makes the rings more narrow.

Rule of thumb is that the ring width will be about 1-1/2 times the thickness of the veneer layer at 45 degrees (1.414)

You can go thinner, but I cut about 1/2 inch (12 mm) thickness
 

Charlie_W

Member
Joined
Nov 16, 2011
Messages
5,918
Location
Sterling, VA USA
I don't know the size of your laminated wood but the first step is to cut one flat side at an angle. Angle may depend on the thickness of your block.
Next, make the other side parallel to the side you cut angled.
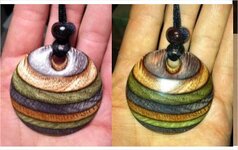
Then you can decide which will become the front, orientation of the layers, where the hole goes, and the. What surface embellishments you want to add if any. On the colorwood, usually I don't add any lines or arcs. I just let the wood be the feature.
I stick he front of mine onto a scrap block attached to the pendant jig with some double stick tape and turn the back smooth, sand and polish. Then flip around and turn the front, true the edge, and sand.
Next, move the jig to drill the hole and shape the opening around the hole, sand.

Finish the front and you are done. I usually then buff with the Beall buffing wheels.

Good luck!
 

shastastan

Member
Joined
Jan 15, 2014
Messages
323
Location
N CA
Thanks, Ken and Charlie. I assume for a rectangle block. The cut lines are marked on the top of the block. Following Ken's comment, looks like 2 parallel lines, at 45 deg, spaced 1/2" apart?
 

Charlie_W

Member
Joined
Nov 16, 2011
Messages
5,918
Location
Sterling, VA USA
Thanks, Ken and Charlie. I assume for a rectangle block. The cut lines are marked on the top of the block. Following Ken's comment, looks like 2 parallel lines, at 45 deg, spaced 1/2" apart?

Usually, I go for 3/8" max.....finish at 5/16" +\-
At 1/2", it is heavy for a pendant and to turn it down to 5/16" just makes more shavings on the floor instead of maybe another pendant from that block of wood.
 

KenV

Member
Joined
Oct 28, 2005
Messages
4,720
Location
Juneau, Alaska.
My thicker section is likely because I round over the back as most of my turnings of that type are shawl pins with a larger off center hole.

Rounding the back just requires two blocks to hold the turning. One flat and one concave to approximately fit the curve. (Borrowed that approach from a video by the Atlanta Turners Group.)

I cut on the bandsaw too. If one used a miter saw and a flat back off the saw, a fat quarter inch say 7-8 mm would do it if the color ply is not overly brittle.
 

shastastan

Member
Joined
Jan 15, 2014
Messages
323
Location
N CA
I've been busy with medical issues so I haven't done any more with the pendants.

Being lazy at times, I have sanded the back to the finishing point before mounting it to the waste stock. I sand to 600 grit using a thick piece of flat granite that I got from Woodcraft. I like using it better than a sheet of glass. This has worked well for me and I don't have to remount the pendant and bring it back into round. I finish my pendants off the lathe with gloss wipe on poly. I buff off any nibs after the final coat--which is usually 4. I use fine synthetic wool to remove nibs between coats also. You can get the synthetic wool at places where they sell paint for cars.

I'll post back here with a finished colored laminate pendant. Thanks for the help!

Stan
 
Top Bottom