Pen Display Stand

Signed-In Members Don't See This Ad
See more from VisExp

VisExp

Member
Joined
Oct 1, 2007
Messages
2,738
Location
Palm Coast, FL, USA.
I made this pen display stand today from cherry.

Sorry for the picture. I didn't feel like setting up my lights and took it outside in the fading light.

1_ACT_790408.jpg


1_ACT_790105.jpg
 
Signed-In Members Don't See This Ad

VisExp

Member
Joined
Oct 1, 2007
Messages
2,738
Location
Palm Coast, FL, USA.
Keith,

Nice looking stand. What kind of finish did you use?

Tim

I just used a couple of coats of spray lacquer. I was planning on using Waterlox because I love what it does to cherry. Unfortunately some moron forgot to replace the lid on the can the last time it was used :tongue: Still kicking myself about that :redface:
 

VisExp

Member
Joined
Oct 1, 2007
Messages
2,738
Location
Palm Coast, FL, USA.
Very nice, I like the design.
I copied your picture into my to-do file... future reference.. hope you don't mind.

No problem Chuck.

How much curve is in that?

Don, both the top and the bottom pieces started out as 3" x 15". To get the curve on the top piece I measured 1" back on each side and 1" forward in the center and then used a bent piece of hardboard on the marks to get the curve. Hope that makes sense.
 

ahoiberg

Member
Joined
Apr 10, 2007
Messages
1,763
Location
Ames, IA, USA.
great work keith. i would be interested in a few more details about how you cut the pen notches in both the bottom and top... you didn't happen to blog this one did you?
 

SherryD

Member
Joined
Nov 24, 2005
Messages
200
Location
arlington, texas.
Nice display stand, using for home show or for sales display. Very attractive, it would look very nice in my glass display shelf by the front door.
 

VisExp

Member
Joined
Oct 1, 2007
Messages
2,738
Location
Palm Coast, FL, USA.
great work keith. i would be interested in a few more details about how you cut the pen notches in both the bottom and top... you didn't happen to blog this one did you?

Andrew, I didn't blog this but I can describe it for you. I made a template out of 1/4 plywood and laid out the two curves. On the curve for the upper shelf I drilled a series of 3/4" holes using a fostner bit and on the curve for the lower shelf I drilled a series of 5/8" holes, again using a fostner bit. I then cut the template along the line of the upper shelf using my scroll saw.

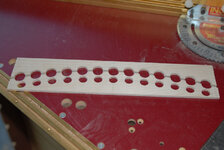
I taped the upper template to a piece of 3" x 15" x 1/2" cherry, lining the straight edge of the template with the back of the shelf, and using the semi circular holes as a guide drilled 3/4" holes.

I taped the lower template to another piece of 3" x 15" x 1/2" cherry, lining the straight edge of the template with the front of the shelf. I then mounted a 1/2" core box bit in my plunge router, along with a router template guide . The outside diameter of the guide is 5/8" so it fit snugly in the holes I had drilled. I set the plunge depth and routed out all the holes in the lower shelf.

I then taped the upper and lower shelves together, marked where the columns would be and drilled all the way through the upper shelf and halfway through the lower shelf with a 3/8" bit.

Then I routed the profiles on the upper and lower shelf edges using my table router. Then I cut the arc on the upper shelf on my scroll saw.

The last thing to do was to turn the matching columns and finials.

Hope that helps.
 

Attachments

  • ACT_790501.jpg
    ACT_790501.jpg
    75.9 KB · Views: 194
Top Bottom