Pen blanks corner removers jig...!

Signed-In Members Don't See This Ad

robutacion

Member
Joined
Aug 6, 2009
Messages
6,514
Location
Australia - SA Adelaide Hills
Hi peoples,

Following what I mention on a recent thread about saving fragile blanks in particular but, applicable to any pen blanks regardless if they are wood, acrylic or a combination on both, saving at the same time your tools from constant sharpening, by removing the square corner of the blanks before turning them.

This can also be and advantage to do in blanks that are going to be stabilized/harden as the amount of solution used is proportional to the volume of wood to stabilize so, taken those corners away, you will save hardener also.

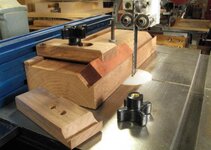
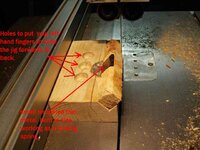
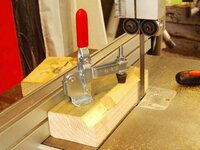
The first jig was made using a piece of "bad" pine that I had laying around (cracks needed gluing) and a small piece of thin tempered metal, salvaged from an old copy machine, a couple of screws and a little time.

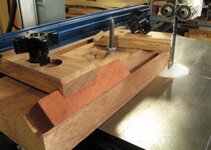
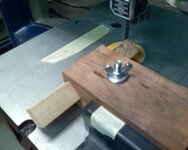
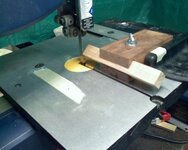
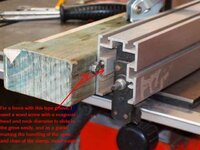
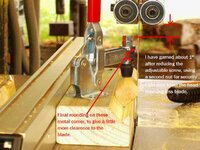
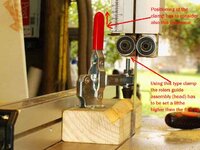
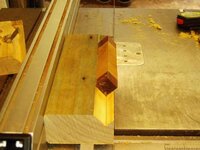
The second one is a improved version of the first one. A bit safer and more effective if the blanks are not all the same thickness. Both jigs were made to accommodate the 21mm square blanks that I cut as the preferred size.

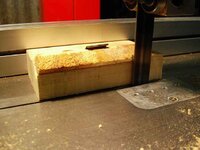
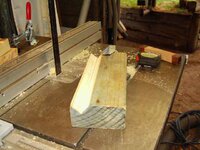
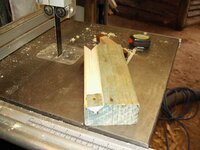
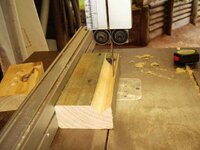
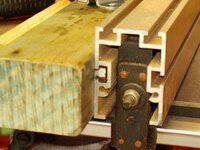
The V groves were made in the bandsaw, I suggest that you do it on the table saw if you have one, as is a lot safer to do but if you have to use the bandsaw, be very careful and take it easy, the cut is a little tricky to do but, perfectly doable!

The rest is very much self-explanatory following the pics which some will contain some info to point out areas of interest!

Try to make one and put it in use, you will be amazed how much simpler and safer things will become, particularly with the fragile blanks and or very hard and splintery woods!

Good luck and enjoy...!:wink:

PS: I forgot to mention, this same jig works perfect with any table-saw too...!

Cheers
George
 

Attachments

  • timber preparation 1175_(1).jpg
    timber preparation 1175_(1).jpg
    44.2 KB · Views: 1,108
  • timber preparation 1225_(1).jpg
    timber preparation 1225_(1).jpg
    53.4 KB · Views: 1,064
  • timber preparation 1226_(1).jpg
    timber preparation 1226_(1).jpg
    51.1 KB · Views: 939
  • timber preparation 1227_(1).jpg
    timber preparation 1227_(1).jpg
    47.4 KB · Views: 1,022
  • timber preparation 1174_(1).jpg
    timber preparation 1174_(1).jpg
    48.1 KB · Views: 1,603
  • timber preparation 1236_(1).jpg
    timber preparation 1236_(1).jpg
    43.7 KB · Views: 1,029
  • timber preparation 1234_(1).jpg
    timber preparation 1234_(1).jpg
    56.5 KB · Views: 1,081
  • timber preparation 1233_(1).jpg
    timber preparation 1233_(1).jpg
    51.6 KB · Views: 1,210
  • timber preparation 1229_(1).jpg
    timber preparation 1229_(1).jpg
    50.5 KB · Views: 1,266
  • timber preparation 1228_(1).jpg
    timber preparation 1228_(1).jpg
    44.6 KB · Views: 1,014
  • timber preparation 1238_(1).jpg
    timber preparation 1238_(1).jpg
    47.1 KB · Views: 1,025
Last edited:
Signed-In Members Don't See This Ad

robutacion

Member
Joined
Aug 6, 2009
Messages
6,514
Location
Australia - SA Adelaide Hills
Thanks for sharing, I have one question, would you drill the blank for the tube before cutting off the corners?
Thanks
DJ

DJ,

I believe, that would be optional depending very much on the set up you have for drilling. I drill my blanks on my drill jig on my bench press after the corners are out, then you can cut the blanks into the length you want and insert/glue the tubes in!

If the blanks are fragile, I certainly recommend the corners being cut before anything else is done to the blanks, otherwise you have the risk of squashing the blank with clamp, if the blank is just a bit oversize!

Like I said, is always advised to try it both way and stick with what works the best for you!

Cheers
George
 

AceMrFixIt

Member
Joined
Oct 1, 2008
Messages
625
Location
Jacksonville, FL
For my v block I used a v bit in my router table and used the fence to guide the wood. If you have to use a tablesaw, two sections can be cut with a 45 bevel on each and then just glue them together then trim to size. I dont have the nerve to try it on the band saw.
 

skiprat

Passed Away Mar 22, 2022
In Memoriam
Joined
Oct 19, 2006
Messages
7,812
Location
In a Skip in Wales
Good idea George. :biggrin:Thanks for that.
Of course, I assume that your bandsaw table doesn't tilt? My BSaw is too small to do like you have, so I just put the fence on the other side of the blade and tilt it to 45.:wink:
 

robutacion

Member
Joined
Aug 6, 2009
Messages
6,514
Location
Australia - SA Adelaide Hills
Good idea George. :biggrin:Thanks for that.
Of course, I assume that your bandsaw table doesn't tilt? My BSaw is too small to do like you have, so I just put the fence on the other side of the blade and tilt it to 45.:wink:

Actually, both my bandsaws do tilt, the bigger one, originally a 14" is now modified to 16" using the same blade length (the one on the pics) has all sorts of adjustments, which I honestly believe they shouldn't have. A bandsaw is one of the machines with the most adjustment points there is, a complicated process to set correctly and efficiently, when a good accurate cut is achieved, the last thing I want to do is move things around.

Table tilting and other variants are more trouble than is worth so, I set the machine to cut straight and square, them I make jigs to create the cuts I need, without altering anything previously set, apart from the fence and the head (blade guides). This works well for me so, I stick with it!:wink:

Cheers
George
 

jleiwig

Member
Joined
Jan 10, 2007
Messages
1,860
Location
Monroe, Ohio, USA.
You know it's funny this here forum. About 3 or 4 years ago there was a post on a similar jig by a gentleman, and the mean responses ran him out of this forum really quick.

I was kind of shocked at the time because I thought it sounded like a really good idea for just the reason you state. But man those people were mean to that poor guy.

Either way today I still think it's as good of an idea as it was back then, and if I had a bandsaw or tablesaw I'd consider making one of these jigs.
 

PTownSubbie

Member
Joined
May 15, 2009
Messages
2,229
Location
Chesapeake, VA
Why would someone not use a Router? I align my fence on my router with a 3/8" roundover bit. Turns perfectly round blanks in no time!
 

KD5NRH

Member
Joined
Nov 23, 2009
Messages
166
Location
Stephenville TX
Actually, I'd thought about making something similar to cut blanks hexagonal, rather than octagonal, so they would center up easily in a 3-jaw chuck for drilling on the lathe. Since I now have a 4-jaw on the way, I filed the idea it away under things I might run into a use for later.
 

dustmaker

Member
Joined
Oct 22, 2009
Messages
334
Location
Gastonia, NC
Why would someone not use a Router? I align my fence on my router with a 3/8" roundover bit. Turns perfectly round blanks in no time!

Fred, you beat me to the punch. Why not use the router table if you have one? You just push the blank through with a push block and you can use either a roundover bit or a 45* chamfer bit. Problem with me is, I use my router table to hold the lathe, LOL...I need a bigger shop. :frown:
The posted solution is a good one for use on the bandsaw. One could do a similar thing with the tablesaw and not have to mess with tilting the blade. All great ideas worth considering.
 

PTownSubbie

Member
Joined
May 15, 2009
Messages
2,229
Location
Chesapeake, VA
What is your method of holding the blank while rounding?

A push stick that looks like a handsaw handle to push it through and one of those push blocks that come with a Jointer to hold it flat to the surface. I don't have pictures right now but if you can't visualize what I am trying to say, I will take some and upload them later.

Let me know if you need them. Unfortunately work gets in the way.......I wish I was home all the time!!
 

PTownSubbie

Member
Joined
May 15, 2009
Messages
2,229
Location
Chesapeake, VA
Fred, you beat me to the punch. Why not use the router table if you have one? You just push the blank through with a push block and you can use either a roundover bit or a 45* chamfer bit. Problem with me is, I use my router table to hold the lathe, LOL...I need a bigger shop. :frown:
The posted solution is a good one for use on the bandsaw. One could do a similar thing with the tablesaw and not have to mess with tilting the blade. All great ideas worth considering.

Router is how I do all my rounding. Sure, it takes the "fun" out of rounding over blanks but I can benefit from the time savings of doing it my way.
 
Joined
Dec 17, 2008
Messages
286
Location
Canada
Hi George,
That is a great fixture you've invented. I just had to drop everything and make one. I'll post a photo when the glue sets up enough to remove the clamps.
I was using a hand screw and the disc sander to knock the corners off but was concerned about heat generated especially on resin blanks. Great improvement using the band saw.
Would you mind if I post this link on the Paradise forum for all the nice folks over there? Thanks George.
 
Joined
Dec 17, 2008
Messages
286
Location
Canada
Walnut Octagon Fixture

George, I finished the fixture. I had this piece of walnut with a large knot in it, perfect for this little job. The grooves were cut with a large "V" groove bit on the router table. Hardware is all knock-down that I had sitting around. I added a second clamp to hold longer blanks. Thanks for the idea.

attachment.jpg


attachment.jpg


With a little care I think this fixture could be use to cut Octagonal pieces for tool handles, etc.
Thanks again George.
 

Attachments

  • Octagon_Bandsaw_Fixture001.jpg
    Octagon_Bandsaw_Fixture001.jpg
    32.6 KB · Views: 1,652
  • Octagon_Bandsaw_Fixture002.jpg
    Octagon_Bandsaw_Fixture002.jpg
    31.5 KB · Views: 1,556

robutacion

Member
Joined
Aug 6, 2009
Messages
6,514
Location
Australia - SA Adelaide Hills
Hi George,
That is a great fixture you've invented. I just had to drop everything and make one. I'll post a photo when the glue sets up enough to remove the clamps.
I was using a hand screw and the disc sander to knock the corners off but was concerned about heat generated especially on resin blanks. Great improvement using the band saw.
Would you mind if I post this link on the Paradise forum for all the nice folks over there? Thanks George.

Larry,

I don't think that I invented it, I may have done or used something slightly different, but I would find hard to believe that many other people haven't done something identical for this same purpose. In any way, I believe the idea is good, regardless of who invented it, I'm just sharing what I did with everyone, being very aware that this will be help and resolve some people problems with the removal of those square corners on the pen blanks before they go into the lathe.

You are most welcome to post this thread where ever you feel like, I made reference to this same jig, a few times on the Paradise forum but never a dedicated thread of it with pics and making info.

Well, you certainly didn't lose any time did you...?:eek:
A very well made jig you got there, doing the same thing but with a different locking in place blank technique and materials, nice...!:biggrin:

How many more ways can this cat be skinned...???

Cheers
George
 

intillzah

Member
Joined
Jan 2, 2008
Messages
244
Location
Larned, Kansas, USA.
Not the most elegant solution, but it's made out of what I had lying around:
 

Attachments

  • 12-18-09_2125.jpg
    12-18-09_2125.jpg
    50 KB · Views: 556
  • 12-18-09_2126.jpg
    12-18-09_2126.jpg
    36.7 KB · Views: 476
  • 12-18-09_2127.jpg
    12-18-09_2127.jpg
    43.7 KB · Views: 566

robutacion

Member
Joined
Aug 6, 2009
Messages
6,514
Location
Australia - SA Adelaide Hills
Not the most elegant solution, but it's made out of what I had lying around:

Nothing wrong with your solution either...!

I never had any doubt that would be many other people with jigs made for this same purpose and that is great, the point that I was making when I decided to show what I had was, first to make so many other people that didn't know what to do to solve this kind of problem, become aware that there is a solution and comes in lots of different shapes and sizes...!:biggrin:, the second was, to make those with the jigs to come out and show what they have, this will help considerably those wanting to make one, by giving them not only one but, many possibles ways to make the jig. These sort of choices are important when one is limited to what they have available to them, giving them also an opportunity to choose the one they fell will most suit them, with and for the equipment they have!:wink::)

Thanks for sharing, lets hope we get a few more ways to get that cat skinned!:eek:

Cheers
George
 
Top Bottom