
Sappheiros
Member
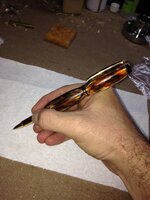
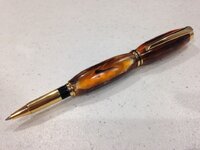
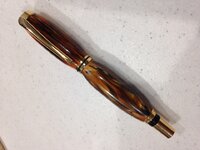
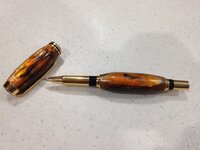
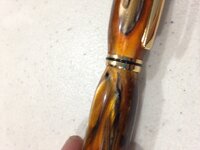
Pen #2 - Jr. Gent Rollerball
Kit: Apprentice Jr. Gentlemen's - 24k Gold
Blank: Pen Makers Choice Acrylic Pen Blank Antique Gold
Finish: Just sanded and micro-meshed to a nice sheen
Alright, my second pen! I'll be honest, I wasn't as excited to turn with wood as I was with acrylic. When my order from The Woodturners Catalog came in, I told my dad he could pick a blank and I would turn it into a pen for him. Turning acrylic was a bit more difficult getting started that wood was. There were bits of plastic flying everywhere and it kind of hurt!
Once I got into the swing of things, the acrylic yielded at a nice pace, but not too quickly like wood can do. I remember with turning the wood, I consciously thought about what shape would look nice for the pen and aimed to shape it out well. The acrylic chose a shape it liked and I was done.
Rather than adding a finish, I just sanded with a 7-piece set and micro-mesh polished with a 9-piece set. The sanding grits were 80, 120, 180, 240, 320, 400, 600 and the micro-mesh grits went from 1,500 to 12,000.
After I finished, I tried to pull off the bushing on the end and it was stuck. I tried force, I tried knocking it off, but it just didn't want to come off. There might have been paper towel inside the threading or some dust that I pulled out. When I finally got it all off, there was a line around the mandrel. I'm not exactly sure where it came from, but I sanded it down to prevent the same problem from happening again. Around the ends of the blank pieces, these small indentations appeared and some sort of ring around the pieces. I tried cleaning them up as best I could, but once a pen is assembled, it is not so easy to go back a few steps.
My dad loved the pen. It came out even better than he thought it would. I might have liked to keep it for myself as it came out even better than my first pen, but I promised him the pen made of that blank! I'll just have to make more pens! The trouble is... I pick out pen blanks and kits that I would like for myself rather than what I could part with. I feel like I'm adopting out my children to other families!
")