You are using an out of date browser. It may not display this or other websites correctly.
You should upgrade or use an alternative browser.
You should upgrade or use an alternative browser.
Ornaments
- Thread starter ldubia
- Start date
Signed-In Members Don't See This Ad
Signed-In Members Don't See This Ad
rjwolfe3
Member
Awesome!
mrcook4570
Member
Those look great!
hanau
Member
Cool
Is there any instructions on turning ornaments anywhere?
Is there any instructions on turning ornaments anywhere?
Pioneerpens
Member
very nice!!
Lenny
Member
Having read the thread leading up to your meeting I was hoping someone would post some of their results. Very nice!
I, too, look forward to a tutorial!
I, too, look forward to a tutorial!
alphageek
Former Moderator
WOW... beautiful inside out turning!!
jskeen
Member
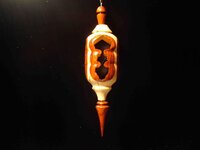
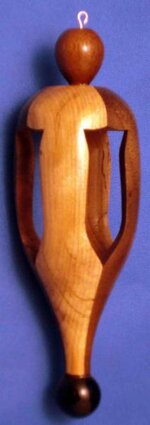
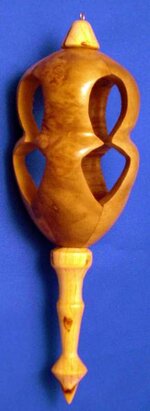
great work there. I think I like #3 best, the proportions just look perfectly balanced and flow nicely.
gketell
Local Chapter Leader
Very nice ornaments!!!
You've made more in the past couple of weeks than I have have ever made.
GK
You've made more in the past couple of weeks than I have have ever made.
GK
darcisowers
Member
those look amazing, Larry. I've been swamped lately with personal/home stuff....so I'm hoping to try it out in the next couple weeks!!
:biggrin:
:biggrin:
gketell
Local Chapter Leader
Tutorials
Guys,
Do a google search on "instructions inside-out ornament" and you will get several sets of instructions.
Here is the condensed version:
Guys,
Do a google search on "instructions inside-out ornament" and you will get several sets of instructions.
Here is the condensed version:
- Get four blanks that are SQUARE, FLAT, and SAME SIZED. Jumbo pen blanks work great.
- Using blue masking tape tape 4 blanks together. Make sure the seams are tight and everything lines up.
- Add ONE drop of thin CA to the X between the blanks of ONE end of the block. The tape plus this will hold that end secure if you are gentle in your turning. If you aren't a gentle turner, get extra long blanks and glue them together at the last 1/4" of each end.
- Chuck the other end into a chuck with #2 jaws using the point of your live center to EXACTLY align the other other end with the center of the X.
- Remove the point of your live center and push the ring up against the blank. Using your hand, spin the ring against the blank while tightening the tailstock. This will drive the ring into the blocks a little and add extra holding power.
- Mark off about 1" on either end of the blanks. This is your "no turning zone".
- Turn your inside shape. Remember that you are turning 1/2 the shape. Also remember you don't want to go all the way to the center (that would get very messy!). Leave about 1/3 the thickness of your blank. ((For your first try keep it simple, just a triangle shape))
- Sand this turning. Make sure your tape remains tight at the "no turn zone". Finish this. We used Deft spray lacquer.
- Unchuck the blanks and split them apart. If you glued the ends, cut the ends off and turn the cutoff into a pendant or earrings. If you used the blue-tape and CA, a slight twist on the free end should get them to just pop apart. Remove all tape.
- Take two and flip them so the inside pattern is now complete and well aligned. Make sure the mating surfaces are smooth and glue it together applying your glue in the "no turn zone" keeping it about 1/8" away from the already turned area. Repeat with the other two.
- Use some sandpaper on a flat surface to clean up the inside face of the two 1/2-blanks you just made. Minimal sanding but they need to be smooth and flat.
- Glue your two 1/2-blanks together to get your full blank that now shows your inside pattern on all four sides.
- Chuck it up so that the "top" faces the tail stock.
- Drill a shallow hole right through the X. This will be used to align your top finial.
- Reverse the ornament and chuck it up with the "bottom" facing the tail stock. Try to leave enough exposed at the top so you can turn your final shape easily without hitting the chuck with your tools.
- Drill your finial alignment hole.
- Turn your outside shape being sure to leave "flats" for the finials to sit on.
- Sand but don't finish yet.
- Part it off.
- Get another pen blank of contrasting color and turn your two finials. Leave a tenon to fit in the holes you drilled. Snug is good but not required.
- Sand but don't finish.
- Part them off and glue them to the ornament.
- Drill the top finial for your eye-hook and add the eye-hook.
- Hang the ornament and finish it.
rjwolfe3
Member
Greg, thank you for posting this. I think I might try this soon!
ldubia
Member
I have made another one. This is number 8...or 9. I have given some away. This is made from Padouk and eucalyptus with padouk finials.
There are about 20 more in the wings waiting to be turned. I am making blanks for anything I can find. Fortunately I have lots of pen stock and other stuff.
For my next trick...:biggrin:
Thanks to all for the comments. I appreciate them. The third in the row was the first one I did while at the meeting. I felt it was a bit long. But it does look good.
Larry
Lenny
Member
Guys,
Do a google search on "instructions inside-out ornament" and you will get several sets of instructions.
Here is the condensed version:
Ok, maybe the not-so-condensed version.
Thanks Greg!!
gketell
Local Chapter Leader
nava1uni
Member
Larry,
You are really going to town making the ornaments. They look good. My personal preference is having the finials of darker wood to really contrast or highlight the main body. I like your different designs. I am just starting to cut blanks for making some more. That was a good meeting and instructional on the ornament making.
You are really going to town making the ornaments. They look good. My personal preference is having the finials of darker wood to really contrast or highlight the main body. I like your different designs. I am just starting to cut blanks for making some more. That was a good meeting and instructional on the ornament making.


