
sbutler
Member
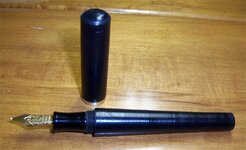
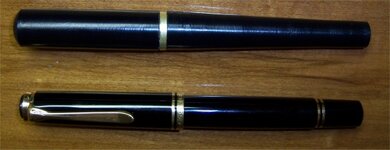
Thanks to all for your kind words of encouragement for my first pen. Here's my second pen, still in nylon. The goal of this pen was to work through engineering issues pertaining to a threaded cap. In one of the photos, I included a Pelikan Souveran for comparison.
This pen has the following features:
(a) 10 mm x1 mm thread inside the barrel for the section
(b) 1/2" x 20 TPI thread outside the barrel for the cap
(c) 19/32" OD brass ring (cut from a tube) to reinforce cap edge.
(d) The cap posts. As a result, the pen is ugly posted, ugly capped, and ugly unposted/uncapped. Any thoughts on caps posting or not?
In building this pen, I ran into the following challenges.
(a) I didn't know if order of operations for cutting the inner and outer threads on the barrel would crush/blowout the thread that was cut first. SOLUTION: I bought a 1/2" x 20 nut, cut the outside threads first, and used the nut to reinforce the outside thread while I drilled and tapped the inside. Might not work in a material more brittle than nylon, but it worked like a charm in nylon.
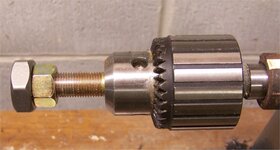
(b) I couldn't cut true outside threads by hand. SOLUTION: Find a market for crooked pens. SOLUTION #2: build an adapter that can be chucked in the tailstock (see photo.) The bolt goes into the die only a few threads, but there's enough cutting surface to get the die started true and you can finish by hand.
(c) My die didn't cut threads to the bottom of my tenon. SOLUTION: turn the die around to cut the last couple of threads. Go slow and back out frequently.
(d) Barrel is out of round, causing a tactile edge when the cap is threaded onto the barrel. SOLUTION: Gnash teeth and ponder.
Next up for this pen:
(a) Add a brass band to the front of the barrel.
(b) Make a cap with a clip.
------------- Added later -------------
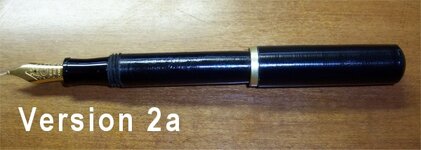
I was using one of my Pelikans and noted how the cap envelopes the barrel instead of butting to it. So, I thinned my barrel to just shy of 1/2" and wasted the first 1/4" (or so) of threads in the cap with a 1/2" drill. Engineering-wise, it was a success after a little more wasting of threads with a gouge. Photo 2a, below. This pen looks better posted and feels better in the hand.
---------------------------------------
Thanks again for your kind words, pointers, and tips. Criticism, constructive or otherwise, is welcome too.
With best regards,
Scott Butler
This pen has the following features:
(a) 10 mm x1 mm thread inside the barrel for the section
(b) 1/2" x 20 TPI thread outside the barrel for the cap
(c) 19/32" OD brass ring (cut from a tube) to reinforce cap edge.
(d) The cap posts. As a result, the pen is ugly posted, ugly capped, and ugly unposted/uncapped. Any thoughts on caps posting or not?
In building this pen, I ran into the following challenges.
(a) I didn't know if order of operations for cutting the inner and outer threads on the barrel would crush/blowout the thread that was cut first. SOLUTION: I bought a 1/2" x 20 nut, cut the outside threads first, and used the nut to reinforce the outside thread while I drilled and tapped the inside. Might not work in a material more brittle than nylon, but it worked like a charm in nylon.
(b) I couldn't cut true outside threads by hand. SOLUTION: Find a market for crooked pens. SOLUTION #2: build an adapter that can be chucked in the tailstock (see photo.) The bolt goes into the die only a few threads, but there's enough cutting surface to get the die started true and you can finish by hand.
(c) My die didn't cut threads to the bottom of my tenon. SOLUTION: turn the die around to cut the last couple of threads. Go slow and back out frequently.
(d) Barrel is out of round, causing a tactile edge when the cap is threaded onto the barrel. SOLUTION: Gnash teeth and ponder.
Next up for this pen:
(a) Add a brass band to the front of the barrel.
(b) Make a cap with a clip.
------------- Added later -------------
I was using one of my Pelikans and noted how the cap envelopes the barrel instead of butting to it. So, I thinned my barrel to just shy of 1/2" and wasted the first 1/4" (or so) of threads in the cap with a 1/2" drill. Engineering-wise, it was a success after a little more wasting of threads with a gouge. Photo 2a, below. This pen looks better posted and feels better in the hand.
---------------------------------------
Thanks again for your kind words, pointers, and tips. Criticism, constructive or otherwise, is welcome too.
With best regards,
Scott Butler
Attachments

Last edited: