My Road to Custom

Signed-In Members Don't See This Ad
See more from Sandsini

Sandsini

Member
Joined
May 11, 2014
Messages
437
Location
Lake Arrowhead, California
I thought I would post my experiences along the way to create pens that are more custom, using fewer components. I will continue to add to this tread as I go. I have a couple of pens to post today and will add new successes or failures when I have an update.

I have been inspired to make full custom pens, but don't have quite enough faith in my skillset (or my equipment) yet to make the leap and buy taps and dies. I also have a bit of a concern about the durability of hand cut threads in custom pens when the pen finally makes it into the customer's hands. So, I decided I would like to explore using kits to supply sections and cap inserts and make a more custom like finished product.

I started out with three of the DNS Master kits (which I ordered directly from Germany) and managed to complete the first one I tried, although I messed up the clip (this is a reoccurring theme). I ended up gluing the finial on and installing a roll stopper instead. I was pretty happy with the results with the exception that the cap and body meet flush and I should have engineered a step in the body to guide the cap in place and hide the gap.

The next two kits didn't make it to completion, I had numerous problems that, if related, would rival the tale of Odysseus, so I'll just say, that I goofed them up beyond repair.

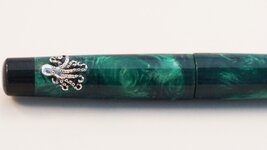
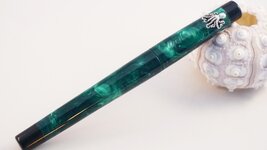
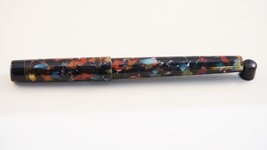
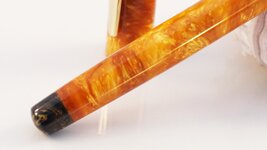
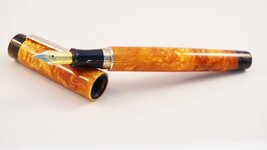
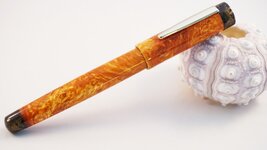
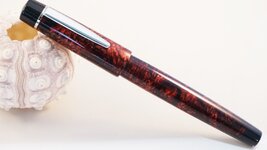
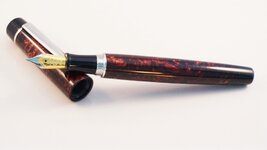
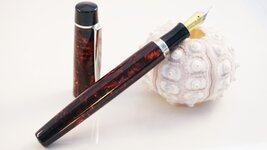
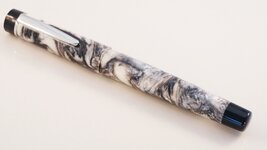
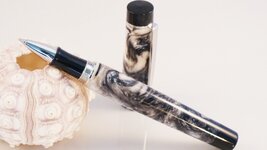
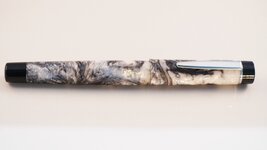
Here is the first of my "Nearly Custom" pens, the DNS Master FP. I like the shape and size and the DNS hardware is very high quality. I turned the complete pen before it had been drilled and before the blank was cut into cap and body sections. This is why the shape of the pen flows so well. I posted pics of this pen before, but I'm adding it here to make the thread more complete.
 

Attachments

  • DSC00778.jpg
    DSC00778.jpg
    74.6 KB · Views: 268
  • DSC00776.jpg
    DSC00776.jpg
    83.4 KB · Views: 239
  • DSC00779.jpg
    DSC00779.jpg
    79.7 KB · Views: 214
Signed-In Members Don't See This Ad

Sandsini

Member
Joined
May 11, 2014
Messages
437
Location
Lake Arrowhead, California
I started with El Grande components for Pen Number 2/ I decided I didn't need the tubes, but would use the section coupler, the cap thread insert and the finial hardware.

I first tried using a coffee bean blank but that material really needed the tube as it has very little to hold all those coffee beans together! I ended up using a long Night Jewels blank and ended up making both the cap and body of the pen too long. I also had a problem with the finial (here's that reoccurring theme) because when I glued the brass male portion in the top of the cap I had trouble aligning it correctly and it setup at an angle, It took me awhile to reshape the finial so that it would fit flush and it wasn't every going to be flush with the clip in place. In addition I glued the finial for the body on after I fully drilled and turned the body and it eventually fell off after I used the pen for about a week. Just not enough material on the body to hold it fast.

So, pretty bad, but I did have a completed pen and getting through this one made me realize that I was going to need the tubes in the next pen to align everything, if nothing else.

Here is the results. I liked the length in the body but not in the cap. I don't like the shape much but this was pretty much a proof of concept that got me to the next step.
 

Attachments

  • DSC00781.jpg
    DSC00781.jpg
    68.6 KB · Views: 154
  • DSC00782.jpg
    DSC00782.jpg
    72.8 KB · Views: 160
  • DSC00780.jpg
    DSC00780.jpg
    57.1 KB · Views: 138

plantman

Member
Joined
Jan 2, 2012
Messages
3,437
Location
Green Bay, Wi
Eric; These are both fine looking pens, and as you progress, you will overcome the setbacks !! It's always nice to see someone point out their misfortunes and explain how and why they happened so the newer members, who may not have noticed at first glance, can take note, study the photos and text, and avoid the same pitfalls when they try their hand at this type of pen. Thanks for showing and explaining. Jim S
 

SteveG

Member
Joined
Dec 21, 2009
Messages
2,989
Location
Eugene, Oregon 97404
I am appreciating the "hands on" info you have put here for myself and others to learn from...from your hard-earned knowledge. I am just at the point of moving away from strictly kit work to varying degrees of modifications to the basic kit design, and you have smoothed some bumps in the road for me. Beyond that part of my response, I do want to acknowledge your design work, as I see the development of excellent design basics on these two pens. Thank you for your post.
 

Sandsini

Member
Joined
May 11, 2014
Messages
437
Location
Lake Arrowhead, California
For Pen Number 3, I again used the El Grande kit, but this time I used the tubes. I also purchased some closed end mandrels from Arizona Silhouette This was a great improvement on the process.

Unfortunately, I tried to turn the cap material down too thin, it started to disintegrate and had to remake it. The material, Mardi Gras Gold, with Burnished Bronze as the accent, really pops and the pen looks great. Due to the issues I had with the cap on the previous try, this cap ended up being a bit thick and the profile of the pen isn't exactly elegant. I turned down the cap thread insert to make for a thinner cap, but even so, it's a little bit clunky.

I ended up turning the cap a bit narrow for the clip spacer, so decided to build it without, There is a very slight gap between the finial and the body of the pen, but I think with more work I can minimize that.
 

Attachments

  • DSC00771.jpg
    DSC00771.jpg
    87.4 KB · Views: 126
  • DSC00774.jpg
    DSC00774.jpg
    72.3 KB · Views: 175
  • DSC00768.jpg
    DSC00768.jpg
    90.5 KB · Views: 145

Sandsini

Member
Joined
May 11, 2014
Messages
437
Location
Lake Arrowhead, California
Here's pen number 4. Again I started with the El Grande kit.

I decided that with the right drilling process I wouldn't need to turn the cap thread insert down so I tried it that way. In retrospect, I should have turned it down, the cap profile is too thick and the slim body of the pen only accents that.

This pen has tubes, like the last one and it went together very easily. I learned to use a spare clip spacer while I turned the cap and finial together to ensure that the finial was the right size and that if it were slightly off center, it would still line up once installed. This was a smart move...

The material is Crimson Glow and I used a pure black Alumilite for the accents. The combination is deep and rich, but the pen is ultimately let down by the step from the the cap to the body. The body is just too narrow for the cap. I was determined to fix that in the next version.
 

Attachments

  • DSC00763.jpg
    DSC00763.jpg
    89.7 KB · Views: 136
  • DSC00760.jpg
    DSC00760.jpg
    69.1 KB · Views: 130
  • DSC00765.jpg
    DSC00765.jpg
    80.9 KB · Views: 137

Sandsini

Member
Joined
May 11, 2014
Messages
437
Location
Lake Arrowhead, California
The last one for the day is the best one so far, which is just how you want the work flow to progress. After reviewing Pen Number 3, I realized that I needed to step the body of this pen to allow the pen cap to flow better into the body. I think I was successful on this, it isn't really a step but a smoother transaction, but the pen is a little thicker and more masculine as a result.

Pen Number 5 also started as an El Grande. This time a Rollerball. I used a material called Black Pearl as well as the solid black Alumilite as an accent. The cap is a little thinner as I turned the cap thread insert down and was able to turn the thickness of the cap down as well.

The body has also been turned thicker. I sloped the nib end down so that there wasn't a big lip between the surface of the body and the nib connector (like there is on the green Pen Number 1) and this eased the difference between the cap and the body. Aesthetically, this is the best of them all.

This brings us up to date. I will continue the process next weekend, but in the meantime I look forward to hearing everybody's take on this. I certainly don't think I've done everything the best way possible, this is just the process of a somewhat addled beginner trying to stretch his wings a bit. I appreciate any advice or criticism you can dole out!

Cheers,
Eric
 

Attachments

  • DSC00756.jpg
    DSC00756.jpg
    84.8 KB · Views: 139
  • DSC00752.jpg
    DSC00752.jpg
    73.4 KB · Views: 191
  • DSC00751.jpg
    DSC00751.jpg
    76.6 KB · Views: 205
  • DSC00758.jpg
    DSC00758.jpg
    96.6 KB · Views: 170
  • DSC00755.jpg
    DSC00755.jpg
    71.5 KB · Views: 164

thewishman

Member
Joined
Mar 9, 2006
Messages
8,183
Location
Reynoldsburg, Ohio, USA.
Eric, taps and dies are not as difficult to work with as you may imagine. If you get the right holders for each, it is really freeing. You don't have to worry about tube sizes and matching dimensions to existing components.

Thanks for sharing your work and frustrations. There is so much learning that comes with trying new things, it helps to look at the mistakes, sometimes even more than at the successes.:)
 

Sandsini

Member
Joined
May 11, 2014
Messages
437
Location
Lake Arrowhead, California
Eric, taps and dies are not as difficult to work with as you may imagine. If you get the right holders for each, it is really freeing. You don't have to worry about tube sizes and matching dimensions to existing components.

Thanks for sharing your work and frustrations. There is so much learning that comes with trying new things, it helps to look at the mistakes, sometimes even more than at the successes.:)

Chris,
Thanks, I'm beginning to see that the road I've taken may not be the most efficient way to go. But, I'm nothing if not stubborn! I think that, once I get a handle on this, I will probably make the jump to taps and dies, but for now I am having fun figuring out the process and learning techniques that will help me when I do make the leap. I've only had my collet chuck and 4 jaw chuck a short time so this process is helping me figure out how best to take advantage of them and use the tools I have to get the results I want.
 

Marko50

Member
Joined
Oct 22, 2013
Messages
938
Location
Orem, UT
Eric, as usual, your work is impeccable and beautiful. Excellent job on all of them! I'm impressed beyond words!

Mark
 
Top Bottom