My first RingMaster bowl

Signed-In Members Don't See This Ad
See more from SDB777

SDB777

Member
Joined
Feb 6, 2010
Messages
6,620
Location
Cabot, Arkansas USA
Let me start this by saying, I don't know what I'm doing yet. There, that's been said....let's move on.

The math is pretty straight forward. Divide the cut thickness by the board thickness, then multiple that total by three. That is the total length the gauge gets set at...gauge is used to set angle on machine. Simple, sometimes!


This is the very first bowl I cut the rings on using my new(to me) RingMaster. Decided to make a 'stem' and then add a base after I got going along. I may decide to change the 'stem' out for a piece of ERC also? Not sure yet....
This is sanded to 400grit, and then the first application of BLO has been wiped on. I'll let that set for awhile longer and then add another application of it.

Anyway, here are the four photo's I took of it on the porch(in the sun):


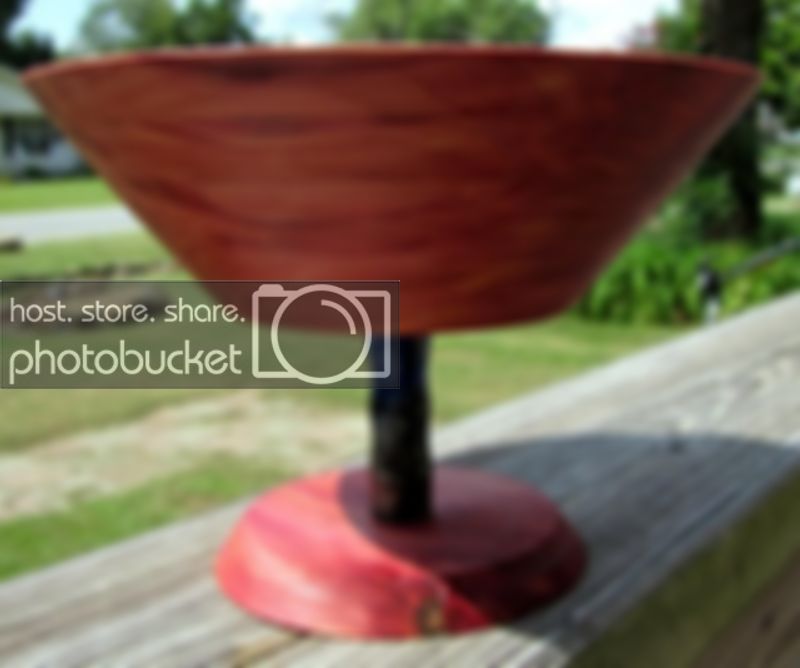
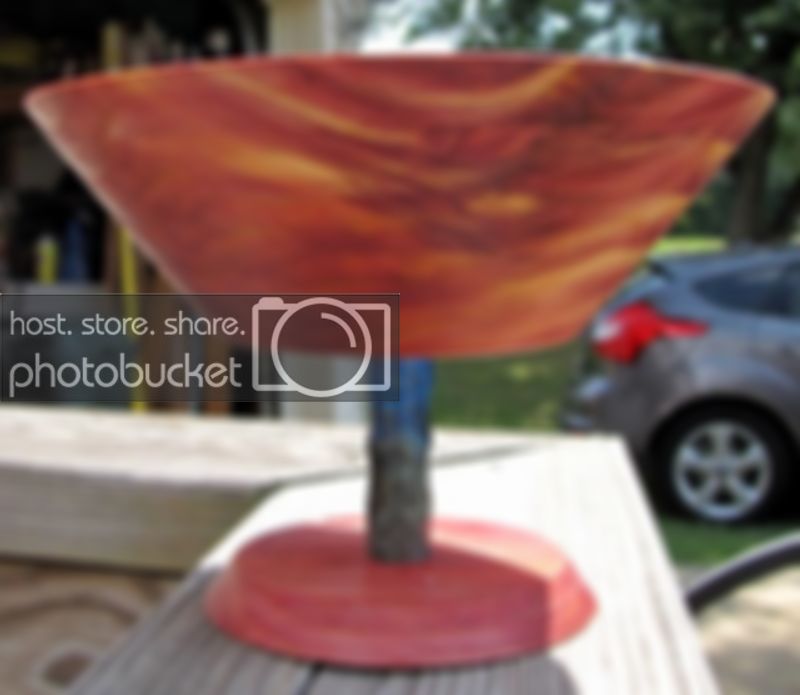
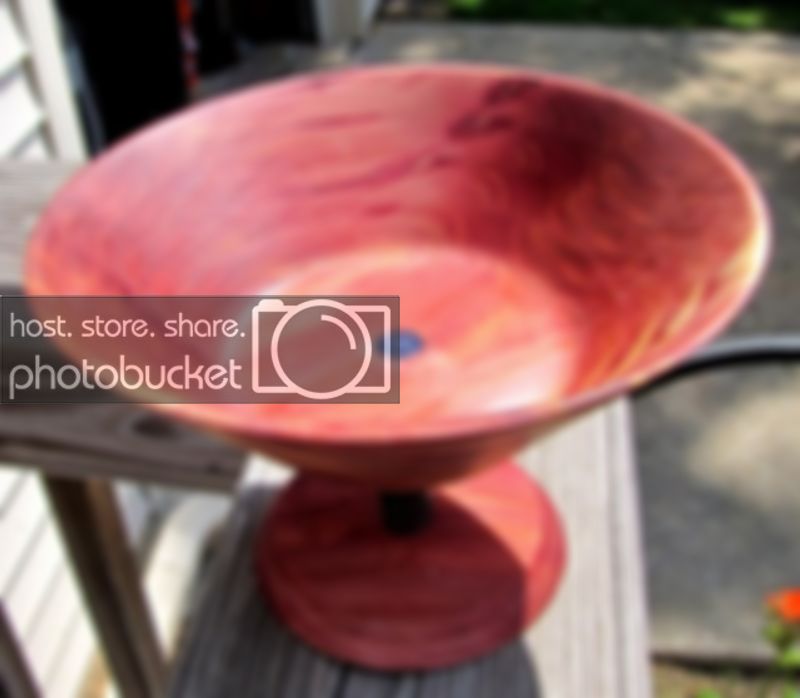
Being this is the first one, I think I'll put it somewhere for myself to reflect on next year(once, I have asked enough questions to have figured things out some more). I know the Ringmaster manual says no knots, just straight-grained boredom, but I couldn't resist.....and there were no issues in this turning.


Thanks for looking, comments and/or critiques are more then welcomed here....even encouraged to help me get to where I would like to be with this type of turning. Thanks again.....


Scott (one down, the rest to go) B
 
Signed-In Members Don't See This Ad

Russknan

Member
Joined
Mar 13, 2012
Messages
537
Location
Nanuet, NY
I really LIKE the bowl - the wood, the job you did turning, etc. I don't favor the pedestal, though. Maybe that's just me. Thanks for sharing. I'd like to see more of these as you make them. Russ
 

Bob Wemm

Member
Joined
Mar 9, 2012
Messages
1,994
Location
Kalbarri, Western Australia
Scott, that is awesome, just love that ERC. Cant wait to see one done out of that Hickory that you were throwing away earlier on.
Telling me you cant do knots etc. is like waving a red flag at a bull. Your result is beautiful. Congratulations.

Bob.
 

SDB777

Member
Joined
Feb 6, 2010
Messages
6,620
Location
Cabot, Arkansas USA
Thanks all!

Going to take some of the critiques I've been given and take action on them.

#1: Going to 'ditch' the stubby piece of PR in there and replace it with a shorter, fatter curved piece. Sort of make it 'flow' from top to bottom.

#2: A few more coats of BLO, I can also see where the BLO has really been sucked into some spots, leaving everything else 'flat'.


That's what I love about the feedbacks.....it'll push me ahead to the next level.


Scott (I can make stuff bigger) B
 

PaulDoug

Member
Joined
Mar 2, 2008
Messages
3,488
Location
Benton City, WA.
The bowl it's self is beautiful, to me the pedestal does not belong at all. Might look better if it was wood also and don't have it showing in the bottom of the bowl.

Just my opinion. I do love the bowl part.
 

SDB777

Member
Joined
Feb 6, 2010
Messages
6,620
Location
Cabot, Arkansas USA
The new foot!

Took a piece from the burn pile(yes, I had this in the burn barrel and was going to fire it up to get rid of it) and threw it on the lathe. This is pretty much what I came up with.


Pluses:
#1: It weighes more now, and it definitely wants to sit still...center of gravity is the bottom!
#2: The material is all the same. No more 'highlighting' the bowls plug(although I have a minus on that too).
#3: The few that have actually handled it, have been much more 'receptive' towards it.

Minuses:
#1: Not as tall as I hoped to get it, but the crack had to be 'wittled' down some.
#2: The 'tare out' on the plug hole gets worse the more I sand it.
#3: Everyone wants it. And it is 'mine'....


Yes, more sanding should have been done, I can still see some scratches in the bottom of it. But as I stated above, the drill bit tare out kept getting worse....so I stopped and cut my losses. I did apply another really thick wipe down using BLO, and it finally stopped sucking the stuff up(whew, I'm gonna need bigger cans of this stuff if I keep doing these).


Thanks all for the suggestions, and comments! Hope to get some more from y'all......


Scott (on to the next) B
 

SteveJ

Member
Joined
Jul 11, 2012
Messages
3,376
Location
Grand Junction, Colorado
I like both bases, but the bottom one definitely looks more stable!

I have a ringmaster attachment for a shopsmith which I inherited from my dad 16 years ago, so it is probably nearly 20 years old. I haven't used it in years :( because of two things I see in your first pictures.

First, on the base you can see the "cut line" where the two cutters didn't match exactly. I see that only on the base. I never did find a good way to eliminate that line, maybe I just never really got the hang of dialing in the cutters. Maybe I also didn't have enough patience to sand long enough.

The second issue I had was the joints between the rings were often full of "nicks" or tear out which always irritated me! I never had a good answer for that either. I never had the patience to keep working on mine to get those two issues resolved - but then again I was using mine years before it was common to have forums you could turn to for advice!

I like your work and look forward to seeing more of it!

Steve
 

scotian12

Member
Joined
Sep 9, 2007
Messages
985
Location
Halifax, Nova Scotia, Canada.
Scott....I think you did a great job on the bowl. I really like the color of the wood and the highlights in the bowl. Is the cedar considered a soft wood and thus more prone to tear out.? I only see tear out on the bottom and not on the sides which to me indicates you have your cutters aligned and sanding perfected.. One of the challenges for those using a ringmaster is what do you do about the hole in the base other than a plug of wood of the same colour. I look forward to seeing what you and other pen makers use as a creative design to utilize this design opportunity (plug hole). I look forward to seeing more of your bowls. Regards Darrell
 

PaulDoug

Member
Joined
Mar 2, 2008
Messages
3,488
Location
Benton City, WA.
I like this better. I didn't realize the hole in the bottom was not avoidable. That's a bummer. Could a person turn a thin piece to cover the whole bottom? It would take some patience to do and make it fit perfectly but might be a solution.
 

SDB777

Member
Joined
Feb 6, 2010
Messages
6,620
Location
Cabot, Arkansas USA
There are a few people doing the 'no hole' bottom, but as a beginner....I think I'll take it step-by-step for awhile:biggrin:


Thanks everyone!


Scott (be like starting out kitless) B
 

plantman

Member
Joined
Jan 2, 2012
Messages
3,437
Location
Green Bay, Wi
:RockOn: Scott; Very beautiful coloration on the bowl !! I think both bases look great, but prefer the matching shorter foot. I have never had a problem cutting boards with knots in them as long as they are tight, and you use some thin CA to hold them in place. Don't be fooled by the holeless bottom, there are several ways to do this, and quite simple to obtain. Also many times the contrasting plug adds to the beauty of the piece. Welcome aboard, the posabilitys are endless. Jim S
 

BSea

Member
Joined
Dec 28, 2009
Messages
4,628
Location
Little Rock, Arkansas
Now that is very cool. I like the base on the 2nd one too. But the PR stem doesn't bother me. It might look better with a solid color stem, but either way, I like it.

What are the dimensions? Looks to be 10" to 11" across, but that's just an educated guess. :question:
 

Fishinbo

Member
Joined
Aug 13, 2012
Messages
2,125
Location
Richmond, Virginia
Both look great, great shapes on the gorgeous wood with very pretty grain patterns. Like the addition of the bases, both the longer and the stouter one. The knots just added some character to them. Great work and salvage of the wood!
 

SDB777

Member
Joined
Feb 6, 2010
Messages
6,620
Location
Cabot, Arkansas USA
Now that is very cool. I like the base on the 2nd one too. But the PR stem doesn't bother me. It might look better with a solid color stem, but either way, I like it.

What are the dimensions? Looks to be 10" to 11" across, but that's just an educated guess. :question:


Looks are deceiving....it's only about 6-3/4" across. The 'board' was .632" thick.


Looks great!! I prefer the looks of the all cedar base. Great job.


Me too, and I have figured out a better way to make the 'foot/pedstal' for these. Reducing the chance of 'failure' while working with them.


Scott (ERC smells awesome in the garage) B
 

Dan Hintz

Member
Joined
Feb 16, 2011
Messages
477
Location
Columbia, MD
Dear God, you burn that stuff?! My heart is breaking! Love the wood you used... next bowl, try interchanging two (or three) different colors of wood. That will also give you a chance to create rings that don't have to be so thin, which means you can play with the bowl shape a bit more than just straight up at an angle.
 

W.Y.

Member
Joined
Aug 10, 2008
Messages
1,656
Location
BC, Canada
Nice work Scott.
Haven't been over to this site for a while and just popped in to have a look around.
Nice to see you posted the same one here as you posted elsewhere at the same time .

Once you get into using hardwoods you will find it will go easier with the RM but I love the effect of the ERC and any I made with it sold very quickly for a good price.
 

SDB777

Member
Joined
Feb 6, 2010
Messages
6,620
Location
Cabot, Arkansas USA
Nice work Scott.
Haven't been over to this site for a while and just popped in to have a look around.
Nice to see you posted the same one here as you posted elsewhere at the same time .

Once you get into using hardwoods you will find it will go easier with the RM but I love the effect of the ERC and any I made with it sold very quickly for a good price.


When it comes to the RM equipment, the 'other place' is very much the top spot for information and seeing all the lastest and greatest!


Scott (got tons of ERC...gotta use it) B
 
Top Bottom