Hendu3270
Member
This post turned out longer than I thought it would be. You may want to just scroll down and look at the pics (but you've already seen thenanyways)…
I'm still a little shocked that I placed in the Advanced Contest. So first off, thank you to all who threw a vote at this pen. I didn't feel I could enter the Intermediate contest again this year. Since I won that one last year, it just didn't feel right. I had serious doubts that a kit pen could hold its own in the advanced category, (a contest that is riddled with killer, kitless entries), but I jumped in anyways. I really felt out of place going into this year's Bash, and I still wonder if there needs to be a contest one step above advanced that is for "kitless" pens, (super advanced, advanced elite?, just thinking out loud…). A kit pen placing 2nd, kinda works against that thought though. I guess this motivated me to put everything I could into it, which is one thing the Bash is all about anyway. FYI- a year ago, I recall thinking, kitless pens look awesome, but making them just doesn't appeal to me at all. In the past few weeks, that's where my mind is moving. So it'll be interesting to see where it goes now.
From around September 2013 until the first part of January 2014, I did not turn a single pen. That's after over a year, where there was never more than a couple of days I wasn't in front of the lathe, either with a pen project, bowl, vase or hollow form. The reason is, my wife has a friend whose daughter is paralyzed from the waist down. She was pregnant during this time and actively trying to locate a baby crib that was wheel chair accessible. They found nothing online except a couple of old photos of what others had done to make a crib "work" for their needs. Long story short, I took on the project and modified a crib they purchased. It was elevated to an appropriate height for the top of her legs, while sitting in the wheelchair. I also modified the front panel of the crib to have two bi-fold doors for access. Everything was done in a way that provided a safe and secure space for the baby, while still looking nice in a home environment. It was more labor intensive than I ever thought it would be, and the project took up all the working space of my garage shop. My lathes and benches were all slid out of the way during the project and any free time was spent on the crib. I was definitely ready to get back to some turning! This contest pen was the first turning project after the crib.
About the pen….
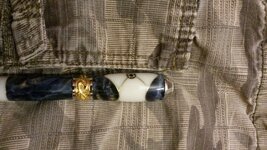
The kit is a Broadwell Nouveau Sceptre, Rhodium and 22kt Gold Roller ball. It is turned from Blue dyed Buckeye Burl and white corian. Segments are separated with brass.
The cap has a mosaic insert, (typically used for making knife handles). The blank was drilled and the insert placed into the center of a four piece corian segment. This four piece segment was then squared off and laid into the Buckeye Burl piece, that I had already cut a 90 degree "notch" into. Brass separates the two pieces. These mosaic inserts can be tricky to work with. You have to drill extremely slow when drilling for the tubes, stopping often. I purchased the inserts, but they are made by inserting various brass rods and square tubing into a larger tube and filling with epoxy. When the epoxy heats up, while, cutting, drilling or turning, it looses its grip on the various components. I had the cap section about 90% turned, when I noticed one of the little brass rods had been thrown out. The rods are 0.02 of an inch in diameter, about the diameter of a pin. I was able to cut into a scrap piece, and "acquire" a donor replacement. Then, using a magnifying glass and forceps, was able to glue in another rod. Then just slowly turn it back down and continue turning the cap. I took a photo of it under the little "bubble" on a magnifying glass but it's a little blurry. You can see the replacement rod sticking up on the left side, (remember, that's the size of a .5mm pencil lead). This happened on another pen this past year and I didn't catch it until I was buffing the finish, so I'm glad I saw this one during the turning stage.
.JPG")
(click for larger view)
The main body of the pen is pretty basic. Simple brass piece sandwiched between a piece of Buckeye and corian. I wanted the focal point of this pen to be the cap. I felt if I put more design into the body blank, it might take away from that or make the pen look too "busy". I think the look balanced out well in the end. Once turned and sanded, both blank received a couple of coats of thin CA to soak into the Buckeye, then several coats of medium CA. The finish was leveled off, then wet sanded all the way through the colored pads and buffed with the Beall buffing system.
Another piece of corian was trued up on the lathe and drilled to the appropriate size to accept a smaller mosaic insert. Once the insert was glued into the section of corian, I simply mimicked the small finials I had punched out of the pen and pressed them into the ends. A couple drops of medium CA carefully placed on the inside secures them in place. If you do this for finials on a pen, make certain you leave the pen un-assembled to allow these interior drops of glue to fully dry and gas off before final assembly. I believe the small mosaic inserts for this one were 1/8" and are pushing the limits for these finials. The corian material surrounding the mosaic insert (on the "post") is very thin and chipped off in a couple of spots. Not a huge deal, as they will never see the light of day again.
.jpg")
(click for larger view)
Again, thank you to all who voted for this pen AND, thank you to all you guys who managed a contest and helped make it another great BASH.
I'm still a little shocked that I placed in the Advanced Contest. So first off, thank you to all who threw a vote at this pen. I didn't feel I could enter the Intermediate contest again this year. Since I won that one last year, it just didn't feel right. I had serious doubts that a kit pen could hold its own in the advanced category, (a contest that is riddled with killer, kitless entries), but I jumped in anyways. I really felt out of place going into this year's Bash, and I still wonder if there needs to be a contest one step above advanced that is for "kitless" pens, (super advanced, advanced elite?, just thinking out loud…). A kit pen placing 2nd, kinda works against that thought though. I guess this motivated me to put everything I could into it, which is one thing the Bash is all about anyway. FYI- a year ago, I recall thinking, kitless pens look awesome, but making them just doesn't appeal to me at all. In the past few weeks, that's where my mind is moving. So it'll be interesting to see where it goes now.
From around September 2013 until the first part of January 2014, I did not turn a single pen. That's after over a year, where there was never more than a couple of days I wasn't in front of the lathe, either with a pen project, bowl, vase or hollow form. The reason is, my wife has a friend whose daughter is paralyzed from the waist down. She was pregnant during this time and actively trying to locate a baby crib that was wheel chair accessible. They found nothing online except a couple of old photos of what others had done to make a crib "work" for their needs. Long story short, I took on the project and modified a crib they purchased. It was elevated to an appropriate height for the top of her legs, while sitting in the wheelchair. I also modified the front panel of the crib to have two bi-fold doors for access. Everything was done in a way that provided a safe and secure space for the baby, while still looking nice in a home environment. It was more labor intensive than I ever thought it would be, and the project took up all the working space of my garage shop. My lathes and benches were all slid out of the way during the project and any free time was spent on the crib. I was definitely ready to get back to some turning! This contest pen was the first turning project after the crib.
About the pen….
The kit is a Broadwell Nouveau Sceptre, Rhodium and 22kt Gold Roller ball. It is turned from Blue dyed Buckeye Burl and white corian. Segments are separated with brass.
The cap has a mosaic insert, (typically used for making knife handles). The blank was drilled and the insert placed into the center of a four piece corian segment. This four piece segment was then squared off and laid into the Buckeye Burl piece, that I had already cut a 90 degree "notch" into. Brass separates the two pieces. These mosaic inserts can be tricky to work with. You have to drill extremely slow when drilling for the tubes, stopping often. I purchased the inserts, but they are made by inserting various brass rods and square tubing into a larger tube and filling with epoxy. When the epoxy heats up, while, cutting, drilling or turning, it looses its grip on the various components. I had the cap section about 90% turned, when I noticed one of the little brass rods had been thrown out. The rods are 0.02 of an inch in diameter, about the diameter of a pin. I was able to cut into a scrap piece, and "acquire" a donor replacement. Then, using a magnifying glass and forceps, was able to glue in another rod. Then just slowly turn it back down and continue turning the cap. I took a photo of it under the little "bubble" on a magnifying glass but it's a little blurry. You can see the replacement rod sticking up on the left side, (remember, that's the size of a .5mm pencil lead). This happened on another pen this past year and I didn't catch it until I was buffing the finish, so I'm glad I saw this one during the turning stage.
(click for larger view)
The main body of the pen is pretty basic. Simple brass piece sandwiched between a piece of Buckeye and corian. I wanted the focal point of this pen to be the cap. I felt if I put more design into the body blank, it might take away from that or make the pen look too "busy". I think the look balanced out well in the end. Once turned and sanded, both blank received a couple of coats of thin CA to soak into the Buckeye, then several coats of medium CA. The finish was leveled off, then wet sanded all the way through the colored pads and buffed with the Beall buffing system.
Another piece of corian was trued up on the lathe and drilled to the appropriate size to accept a smaller mosaic insert. Once the insert was glued into the section of corian, I simply mimicked the small finials I had punched out of the pen and pressed them into the ends. A couple drops of medium CA carefully placed on the inside secures them in place. If you do this for finials on a pen, make certain you leave the pen un-assembled to allow these interior drops of glue to fully dry and gas off before final assembly. I believe the small mosaic inserts for this one were 1/8" and are pushing the limits for these finials. The corian material surrounding the mosaic insert (on the "post") is very thin and chipped off in a couple of spots. Not a huge deal, as they will never see the light of day again.
(click for larger view)
Again, thank you to all who voted for this pen AND, thank you to all you guys who managed a contest and helped make it another great BASH.
Last edited: